

Grilling isn’t just about throwing meat on the grill – it’s about avoiding common mistakes that can ruin flavor, texture, and even food safety. From skipping preheating to overcrowding the grill, small missteps can lead to dry, burnt, or undercooked food. Here are seven key mistakes to avoid and how to fix them:
- Not Preheating the Grill: Cold grates cause sticking and uneven cooking. Preheat gas grills for 10–15 minutes or charcoal for 20–30 minutes to reach 450–500°F.
- Overcrowding the Grill: Leave space between items to allow heat and smoke to circulate, preventing steaming and flare-ups.
- Poor Temperature Control: Use heat zones (direct and indirect) to cook food evenly and avoid burning.
- Flipping Too Often & Opening the Lid: Flip food once and keep the lid closed to maintain heat and develop proper sear.
- Using Lighter Fluid or Wrong Fuels: Skip lighter fluid and choose natural lump charcoal or briquettes for clean flavor.
- Adding Sauce Too Early: Apply sugary sauces during the last 10–15 minutes to avoid burning.
- Skipping Resting & Grill Cleaning: Let meat rest to retain juices and clean the grill after every session to avoid residue.
15 Mistakes That Ruin Your BBQ
1. Not Preheating the Grill
Skipping the preheating step can derail your BBQ before you even begin. Cold grates fail to properly sear food, causing meat to release moisture and steam instead. The result? Pale, soggy burgers and chicken or fish that tears apart when you try to flip it.
Here’s how to do it right: For gas grills, preheat on high with the lid closed for 10–15 minutes until the temperature hits 450–500°F. For charcoal grills, allow 20–30 minutes for the coals to become evenly ashed. Not sure if it’s hot enough? Use the hand test – hold your hand about 5 inches above the grate. If you can only keep it there for 2–3 seconds, you’re in the right range at around 500°F.
Why is preheating so important? It’s all about the Leidenfrost effect. When the grates are hot enough, the juices from your meat instantly vaporize into steam, creating a barrier between the food and the metal. Without this, cold grates cause proteins to stick directly to the surface. As BBQ expert Steven Raichlen explains, "your food won’t sear properly…and the food has a maddening tendency to stick to the grill grate." Preheating isn’t just about avoiding sticking – it also locks in flavor and sets the stage for a better BBQ experience.
Another bonus? Preheating burns off leftover residue from previous grilling sessions, making it easier to clean the grates. Once hot, give them a quick brush and lightly oil them with a paper towel. This "hot, clean, lubricated" routine ensures no old flavors linger on today’s food.
To make preheating part of your routine, start the grill before you finish prepping your ingredients. By the time your burgers are seasoned and veggies are ready, the grill will be at the perfect temperature. No rushing, no guesswork, no sticking – just a simple step that paves the way for BBQ success.
2. Crowding the Grill
Packing your grill too tightly can ruin your barbecue. When food is crammed together, it blocks heat and smoke from circulating properly. Instead of that satisfying sizzle and a perfectly seared crust, you might end up with steamed, pale meat. To avoid this, leave some breathing room: about ½–1 inch between smaller items like burgers or chicken thighs, and 1–2 inches for thicker cuts like steaks or bone-in chicken.
Overcrowding isn’t just bad for flavor – it can also be unsafe. A packed grill can cause unpredictable dripping of fats and marinades, increasing the risk of flare-ups. On charcoal grills, it can even block airflow from the bottom vents, smothering the coals and causing uneven cooking temperatures.
If you’re cooking for a crowd, try working in batches. Start with thicker cuts that take longer to cook, and then add quicker items so everything finishes around the same time. A two-zone setup can also help: reserve one side of the grill for high-heat searing and the other for keeping finished food warm. Many grilling pros suggest using only 60–70% of the grill grate at a time to maintain proper airflow and give yourself room to maneuver.
To make things easier, plan ahead. Prepare some side dishes indoors – like salads, baked beans, or coleslaw – so you’re not tempted to overload the grill. This way, you’ll get better sears, tastier food, and a more enjoyable grilling experience without the stress.
3. Not Controlling Temperature
If you’ve ever ended up with burnt edges and undercooked centers, especially on thicker cuts, poor temperature control is likely the culprit. A common mistake is cranking up all burners to high or spreading charcoal evenly across the grill. This creates a "one-dimensional fire" – leaving no flexibility for when your food needs a gentler touch or starts to char.
The solution? Set up distinct heat zones. On a charcoal grill, push the coals to one side for high, direct heat (450–550°F) while leaving the other side cooler. For gas grills, keep one burner on high or medium and another on low or completely off. These zones let you shift food around as needed – avoiding flare-ups and ensuring even cooking.
Precision is key here. Use an instant-read thermometer to check doneness: chicken should hit 165°F, while pork is perfect at 145°F. Just a few minutes of overcooking can turn juicy cuts into dry disappointments. For low-and-slow recipes like brisket, aim for a steady 225–275°F by tweaking the vents. Open them to increase heat, and close them partially to cool things down – but don’t shut them completely, or you’ll kill the fire.
Another tip: keep the lid closed as much as possible. Every time you lift it, heat and smoke escape, which can extend cooking time and lead to uneven results. Only open it briefly for quick temperature checks.
Want to understand your grill’s unique heat zones? Try Raichlen’s white-bread method. Lay slices of bread across the preheated grate, flip them after a moment, and note which areas brown the most. Snap a photo, and you’ve got a custom heat map of your grill. This trick helps you rotate food strategically for consistent results every time.
4. Flipping Food Too Often and Opening the Lid
When it comes to grilling, patience is key – especially if you want those perfect grill marks and rich, caramelized flavors. Constantly flipping your food or peeking under the lid interrupts the Maillard reaction, the chemical process responsible for that delicious sear. At grilling temperatures of 450–550°F, meat needs about 4–6 minutes per side to develop a proper crust and naturally release from the grates without sticking.
Opening the lid too frequently is another common mistake. Each time you lift the lid, precious heat escapes, which not only extends the cooking time but also weakens the smoky flavor you’re aiming for.
The solution? Keep it simple: flip your food just once and resist the urge to open the lid unnecessarily. For low-and-slow cooking – like ribs smoking at 225–250°F – try to limit lid openings to once every 30–60 minutes.
To check doneness, use an instant-read thermometer. For burgers, aim for 160°F, and for chicken, look for 165°F. Insert the thermometer through a small gap in the lid to avoid letting heat escape. Setting a timer can also help you stay on track with flipping and checking intervals.
The bottom line: trust the grill to do its job. Avoid excessive checking, and you’ll be rewarded with juicy, evenly cooked food every time.
sbb-itb-663e316
5. Using Lighter Fluid and Wrong Fuels
Using lighter fluid might seem like a convenient way to fire up your grill, but it comes with some serious downsides. Since it’s petroleum-based, lighter fluid can leave behind a kerosene-like taste, especially if you start cooking before it has completely burned off. Those lingering vapors can seep into fatty meats and vegetables, leaving an unpleasant "fuel" flavor behind.
Beyond ruining the taste of your food, lighter fluid also poses safety risks. Adding it to already lit coals can cause dangerous flashback fires, increasing the risk of burns. According to the U.S. Consumer Product Safety Commission, this practice is especially hazardous when grilling around family or guests. To keep your food flavorful and your cookout safe, it’s best to skip lighter fluid altogether and opt for safer methods.
A chimney starter is a great alternative. Simply fill it with natural lump charcoal or additive-free briquettes, place crumpled newspaper or a natural fire starter underneath, and light it up. In about 15–20 minutes, your coals will be glowing and ready to cook – no chemicals, no odd flavors. If you have access to an outlet, electric charcoal starters are another dependable option.
When it comes to fuel, choose wisely. Stick to natural lump charcoal or briquettes labeled "all natural" without chemical additives. Lump charcoal heats up quickly and burns hot, making it perfect for searing steaks, while natural briquettes provide consistent, longer-lasting heat, ideal for slow-cooking ribs. On the other hand, avoid instant-light briquettes soaked in accelerants – they can cause the same flavor and safety problems as lighter fluid.
Lastly, never burn treated wood, painted scraps, construction debris, or softwoods like pine. These materials release toxic fumes that are harmful to breathe and can contaminate your food. Keeping your grill fuel clean and natural ensures both safety and great-tasting results.
6. Adding Sauce Too Early
Timing is everything when it comes to saucing your barbecue. If you brush on the sauce too early, the sugars in it can burn under high heat (anything above 350°F), leaving you with a charred, bitter crust rather than the glossy, caramelized finish you’re aiming for. This is especially true for American BBQ sauces, which are loaded with sugar that caramelizes around 320°F but starts to burn once you hit 350–375°F – temperatures that are common over direct flames.
To avoid this pitfall, wait until the last 10–15 minutes of cooking over direct heat before applying the sauce. For meats cooked low and slow, start saucing 10–20 minutes before they hit their target temperature, basting once or twice during this time. When it comes to burgers, a light coat of sauce during the final 3–5 minutes of cooking is just right. Some pitmasters skip saucing pulled pork or brisket on the grill altogether, opting instead to serve the sauce on the side or mix it with the meat after cooking.
If you’re using a gas grill, move the sauced meat to medium or indirect heat to finish cooking. On a charcoal grill, sear the meat in the hot zone, then transfer it to the cooler area for the final touches. In a smoker set to 225–275°F, you can apply the sauce earlier since the ambient heat is lower and there are no direct flames to worry about. This approach works well with your established heat zones, ensuring the sauce cooks evenly without burning.
A good rule of thumb: when the meat is within 10–15°F of its target temperature (like 150–155°F for chicken), shift it to indirect heat, apply a thin layer of sauce, and let it cook just long enough for the sauce to set and achieve that signature glossy finish.
7. Not Resting Meat and Skipping Grill Cleaning
A common grilling misstep is cutting into meat the moment it comes off the heat. When meat cooks, its muscle fibers contract, pushing the juices toward the center. If you slice it too soon, those hot juices spill out, leaving your meat disappointingly dry. To keep it tender and flavorful, let the meat rest after cooking. Cover it loosely with foil – this keeps it warm without trapping steam and softening the crust. Resting times vary: burgers and thin steaks need about 5 minutes, thicker cuts like pork chops and steaks do well with 5–10 minutes, and larger items like brisket, pork shoulder, or whole chickens may need 15–30 minutes. Aim for the internal temperature to drop by 5–10°F during this time, allowing the juices to redistribute. Once rested, slice against the grain with a sharp knife to ensure maximum tenderness.
Another mistake that can ruin your grilling experience is neglecting proper grill maintenance. A dirty grill not only leaves behind bitter, burnt flavors and black flakes on your food but also increases the risk of flare-ups and uneven cooking. Plus, built-up grease and residue can attract bacteria. To avoid these issues, clean your grill after every use. While the grill is still warm, burn off any leftover residue, then scrape the grates with a sturdy brush or even balled-up aluminum foil held with tongs. After it cools slightly, wipe the grates with a paper towel dipped in canola oil to remove lingering debris and lightly season the metal. If you’re grilling frequently, take the time every few weeks to do a deeper clean – remove and scrub components like the grates, heat deflectors, lid, firebox, and burner ports. This helps maintain proper airflow and reduces grease buildup, ensuring safe, efficient grilling.
For step-by-step guides to perfecting your grilling routine, Comfy Kitchen has you covered. From tips on letting meat rest to detailed checklists for post-grill cleanup, they also recommend affordable tools like thermometers, brushes, and cleaning supplies to match your setup.
Comparison Table
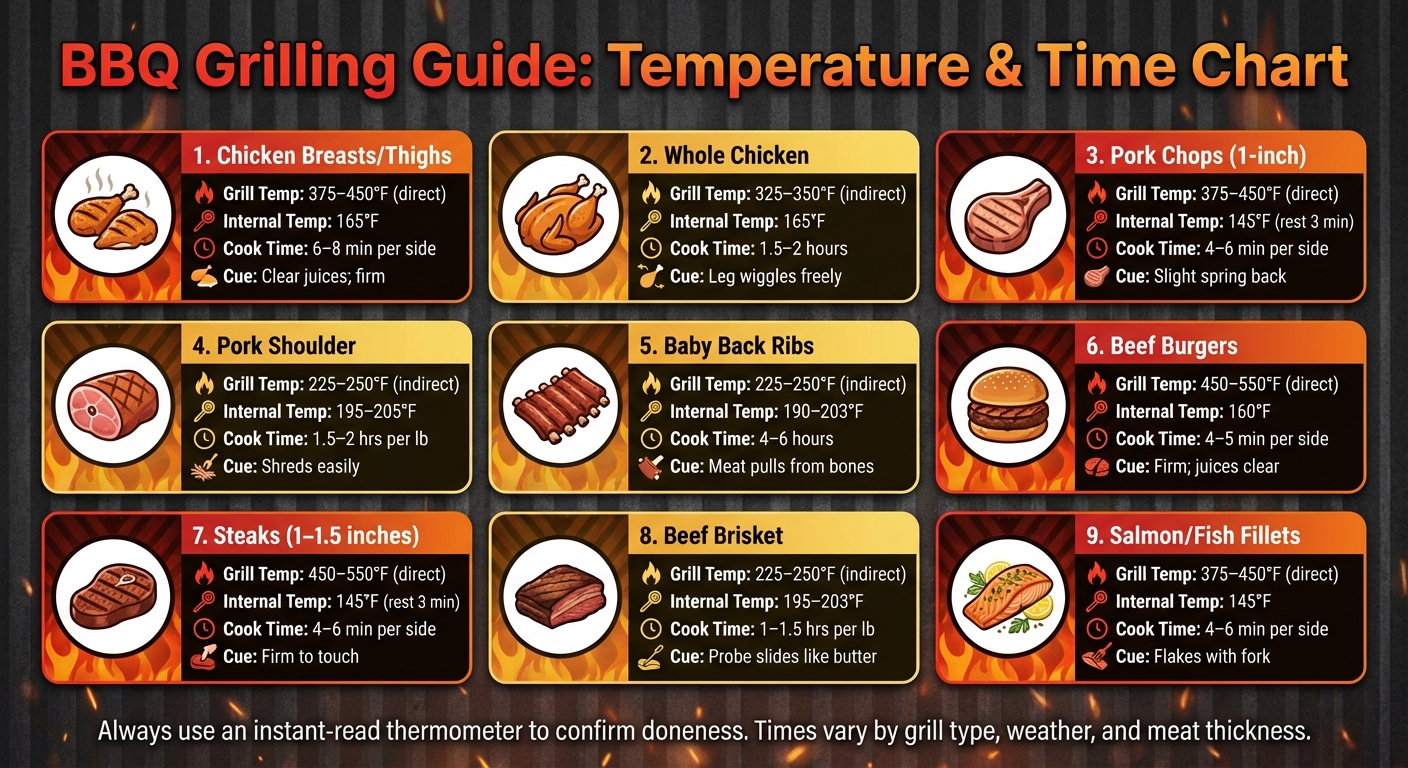
BBQ Grilling Temperature and Time Guide for Different Meats
Getting the right temperature and timing for your BBQ is key to avoiding dry, undercooked, or burnt food. Below, you’ll find tables that outline grilling temperature ranges, USDA-recommended internal temperatures, and estimated cook times for popular meats. Remember, these are just guidelines – always use an instant-read thermometer to confirm doneness. The first table focuses on meat cooking parameters, while the second compares different fuel types to help you fine-tune your grilling setup.
When it comes to cooking meat, the method matters. For low-and-slow smoking (like brisket or ribs), stick to 225–250°F. Indirect grilling is ideal for whole chickens at 325–350°F, while direct grilling is best for steaks, burgers, and chops at 450–550°F to get that perfect sear. For internal temperatures, follow these USDA-safe guidelines: poultry at 165°F, ground beef at 160°F, and pork or whole beef cuts at 145°F (with a 3-minute rest). If you plan to let the meat rest, pull it off the grill a few degrees early – carryover cooking will handle the rest. These details align with earlier tips on managing heat and timing.
| Meat | Grill Temp (°F) | Safe Internal Temp (°F) | Approx. Cook Time | Doneness Cues |
|---|---|---|---|---|
| Chicken breasts/thighs | 375–450 (direct) | 165 | 6–8 min per side (1-inch) | Clear juices; firm but not dry |
| Whole chicken | 325–350 (indirect) | 165 | 1.5–2 hours total | Leg wiggles freely; juices run clear |
| Pork chops (1-inch) | 375–450 (direct) | 145 (rest 3 min) | 4–6 min per side | Slight spring back; center is pale |
| Pork shoulder (pulled pork) | 225–250 (indirect) | 195–205 (probe tender) | 1.5–2 hrs per lb (8–12 hrs total) | Meat shreds easily; bone detaches |
| Baby back/St. Louis ribs | 225–250 (indirect) | 190–203 | 4–6 hours total | Meat pulls back from the bones |
| Beef burgers (¾-inch patties) | 450–550 (direct) | 160 | 4–5 min per side | Firm to the touch; juices mostly clear |
| Steaks (1–1.5 inches) | 450–550 (direct) | 145 (rest 3 min) | 4–6 min per side | Firm to the touch |
| Beef brisket | 225–250 (indirect) | 195–205 (probe tender) | 1–1.5 hrs per lb (10–14 hrs total) | Probe slides in easily (like butter) |
| Salmon/firm fish fillets | 375–450 (direct) | 145 (or 135–140°F) | 4–6 min per side | Flakes easily with a fork |
Note: These times assume a preheated grill with proper heat zones and minimal lid opening. Variables like grill type, weather, and meat thickness can affect cooking times.
Beyond meat, choosing the right fuel can shape your grilling experience. Each fuel type offers different advantages in terms of flavor, heat control, and ease of use.
| Fuel Type | Heat Control | Flavor/Smoke | Startup Time | Typical Cost | Convenience/Cleanup |
|---|---|---|---|---|---|
| Charcoal briquettes | Manual (build zones) | Moderate smoke | 15–20 min | ~$10–20 per 20–30 lb bag | Requires ash cleanup |
| Lump charcoal | Manual (build zones) | Strong smoke | 10–15 min | ~$15–25 per 20 lb bag | Requires ash cleanup |
| Hardwood pellets | Good (auger-fed) | Consistent smoke | 10–15 min | ~$20–30 per 20 lb bag | Needs electricity; refills |
| Propane | Excellent (burner knobs) | Minimal smoke | Instant | ~$15–25 per tank refill | Easy; no ash |
| Natural gas | Excellent (burner knobs) | Minimal smoke | Instant | Varies by utility | Easy; no ash |
Charcoal gives a rich, smoky flavor but requires more effort to control heat and takes longer to start. Propane and natural gas, on the other hand, ignite instantly and offer precise temperature control, though they produce less smoke. Hardwood pellets balance flavor and convenience with consistent smoke output but require electricity and occasional refilling. Avoid using lighter fluid, self-lighting charcoal, or treated wood to prevent off-flavors and harmful fumes.
For more grilling tips, detailed meat charts, and gear advice, head over to Comfy Kitchen.
Conclusion
Steer clear of these seven grilling missteps to elevate your BBQ game. By following the techniques outlined earlier, you’ll cover every crucial step – from firing up the grill to the final cleanup. Proper preheating guarantees a flawless sear, leaving enough space ensures even cooking, and creating heat zones helps maintain consistent temperatures. Opt for clean-burning fuel to preserve the natural flavors, save the sauce for the final moments to avoid burning, let the meat rest to seal in its juices and maximize tenderness, and always clean your grill to prevent unwanted residue and off-flavors. With these tips, you’ll be well on your way to BBQ perfection every time.
FAQs
Why is it important to preheat your grill before barbecuing?
Preheating your grill is a key step for achieving delicious barbecue results. It allows the grill to reach the proper temperature for consistent cooking, minimizes the chances of food sticking to the grates, and sets the stage for that perfect, flavorful sear.
Taking the time to preheat also helps ensure your food cooks evenly and thoroughly, reducing the risk of serving undercooked meals. For the best results, let your grill heat up for 10–15 minutes before adding any food.
What’s the best way to prevent flare-ups when grilling for a crowd?
Grilling for a crowd can be a challenge, especially when flare-ups threaten to ruin your perfectly cooked meats. Start by trimming any extra fat from the meat – less fat means fewer grease drips, which are a major cause of flare-ups. Give your food some breathing room on the grill; overcrowding traps heat and makes it tougher to handle unexpected flames.
If a flare-up does happen, don’t panic. Move the food to a cooler section of the grill right away and close the lid. This cuts off the oxygen supply and helps tame the flames. For smaller flare-ups, keep a spray bottle filled with water within arm’s reach – it’s a quick and easy way to keep things under control.
What type of fuel is best for safe and flavorful grilling?
For a safe and tasty grilling experience, natural lump charcoal and propane are top contenders. Natural lump charcoal burns cleanly and infuses your food with a rich, smoky flavor – without the worry of harmful chemicals. On the other hand, propane offers convenience and consistent heat while preserving the natural essence of your ingredients.
It’s best to steer clear of fuels with additives, like briquettes soaked in lighter fluid. These can alter the flavor of your food and may emit unwanted chemicals. Choosing high-quality, clean-burning fuels ensures a better grilling experience every time.