

Want a safer, cheaper, and more eco-friendly way to clean your kitchen? You can make a non-toxic cleaner at home in just minutes using simple ingredients like distilled white vinegar, water, and essential oils.
- Why switch? Store-bought cleaners often contain harsh chemicals linked to health risks like asthma, hormone imbalances, and even cancer. Plus, they can harm aquatic ecosystems and contribute to plastic waste.
- What’s the cost? DIY cleaners cost only $5–$10 per batch and can replace multiple commercial products.
- How does it work? Vinegar’s 5% acetic acid cuts grease, kills bacteria, and disinfects surfaces. Essential oils add natural antibacterial properties and pleasant scents.
Quick Recipe: Mix 1 cup vinegar, 1 cup distilled water, and 10–15 drops of your favorite essential oil in a glass spray bottle. Shake well before use and avoid using on marble or granite.
This easy solution is safer for your family, better for the planet, and lighter on your wallet. Let’s dive into the details!
Why Make Your Own Kitchen Cleaner?
Health and Safety Benefits
Store-bought kitchen cleaners often come with hidden health risks. Many contain harsh chemicals like quats, formaldehyde, ethylene oxide, phthalates, and synthetic fragrances. These substances have been linked to serious health issues, including infertility, birth defects, asthma, skin conditions, hormone imbalances, and even cancer risks. Synthetic fragrances, in particular, are a concern – they’re made up of thousands of undisclosed chemicals, with around 1,200 of the 3,000 commonly used for scents identified as toxic. As the BCPP Partner at Ecologic put it, "Many of these chemicals [in fragrances] have been linked to breast cancer, hormone disruptions and other health problems".
Switching to DIY cleaners can help you avoid these risks. Natural ingredients like white vinegar (with 5% acetic acid) and essential oils, such as cinnamon, oregano, and thyme, are powerful antibacterial agents. This is especially important for households with babies or pets, where reducing exposure to chemical residues is a top priority. Plus, the health perks of DIY cleaners often go hand in hand with environmental benefits.
Better for the Environment
Homemade cleaners are also a win for the planet. Plastic bottles from commercial cleaners can release microplastics, phthalates, and PFAS into the environment. By using reusable glass spray bottles or repurposing vinegar containers, you can cut down on single-use plastic waste. Moreover, a study analyzing over 1,000 ingredients in commercial cleaners found that more than half included substances harmful to lung health, and about 20% contained asthma-triggering ingredients.
Save Money
Making your own kitchen cleaner isn’t just healthier and greener – it’s also easier on your wallet. DIY cleaners cost around $5–$10 per batch, and they can replace multiple specialized products, saving you money over time. Affordable ingredients like distilled white vinegar and baking soda are far cheaper than most commercial "organic" or "all-natural" brands. Plus, a simple mix of vinegar and distilled water can last indefinitely, making it a cost-effective solution. Buying in bulk and choosing generic brands can stretch your savings even further.
Easy 2 Ingredient All-Purpose Cleaner Recipe
Ingredients You’ll Need
Making your own cleaner is surprisingly simple – just a few everyday ingredients can tackle grease, fight bacteria, and leave your surfaces shining.
Distilled White Vinegar
Distilled white vinegar plays a starring role in this recipe. With 5% acetic acid, it works as a natural disinfectant, reducing harmful bacteria like E. coli, Salmonella, and Listeria. Its acidity is also great for dissolving mineral deposits, removing hard water stains, and cutting through stubborn grease. Plus, it’s gentle on most surfaces and won’t leave stains. If you prefer a milder scent, you can swap in diluted apple cider vinegar.
Distilled or Filtered Water
Using distilled or filtered water helps avoid the trace minerals found in tap water, which can leave streaks or scratches on surfaces. It also keeps your cleaner free from impurities that could promote bacterial growth in the bottle over time. If distilled water isn’t handy, boiling tap water and letting it cool before use works just as well. These simple ingredients create a solid base for adding freshness and extra cleaning power.
Essential Oils for Scent and Disinfection
Essential oils do double duty – they make your cleaner smell amazing and add extra antimicrobial properties. For example, lemon oil brings antibacterial and antiviral benefits with a bright, citrusy aroma, while wild orange oil is excellent at cutting through heavy kitchen grease. Tea tree oil offers powerful antiseptic and antifungal properties. If you’re looking for even stronger antibacterial action, try cinnamon bark, oregano, or thyme oils. Use about 15 drops of essential oil for every 25 ounces of liquid, and give the bottle a good shake before each use since oils tend to separate naturally.
| Essential Oil | Cleaning Benefits | Scent |
|---|---|---|
| Lemon | Antibacterial, antiviral | Bright, citrusy |
| Wild Orange | Cuts grease effectively | Sweet, citrusy |
| Tea Tree | Antiseptic, antifungal | Medicinal, earthy |
| Cinnamon | Strong antibacterial properties | Warm, spicy |
| Lavender | Antibacterial, antifungal | Floral, calming |
| Peppermint | Antibacterial | Cool, minty |
Tools and Supplies
To safely mix and store your homemade cleaner, you’ll need a few essential tools.
Glass Spray Bottle
A 16 oz glass spray bottle is ideal for storing your cleaner. Unlike plastic, glass doesn’t react with vinegar or essential oils, which can break down plastic over time. Cleaning expert Mary Marlowe Leverette explains:
Essential oils, even diluted in the liquids, can still be concentrated enough to degrade some types of plastic bottles and cause leaks.
Reusable glass bottles with silicone bases, typically priced around $5.99, are sturdy and stable on hard surfaces.
Keep in mind that vinegar can wear down the rubber components inside spray nozzles over time. To extend the life of your sprayer, rinse the nozzle with plain water after each use, or store the bottle with a regular cap and attach the spray top only when needed. If the nozzle clogs, soak it in a 50/50 mixture of water and vinegar for about 10 minutes, then rinse thoroughly .
Funnel and Labels
A few additional items can make mixing and storing your cleaner easier and safer.
- Funnel: Using a funnel helps you pour ingredients into the bottle without spills or mess.
- Labels: Proper labeling is crucial for safety. Note what’s inside, the date you made it, and any surfaces to avoid – like marble or granite, which vinegar can damage. This prevents mix-ups with other household products and ensures safe use. Use a waterproof marker to keep the label readable, even if the bottle gets wet during cleaning.
Homemade cleaners with water generally last about three months when refrigerated, so marking the date is a helpful way to track freshness. Labels can also serve as a reminder to shake the bottle before each use.
sbb-itb-663e316
How to Make Non-Toxic Kitchen Cleaner
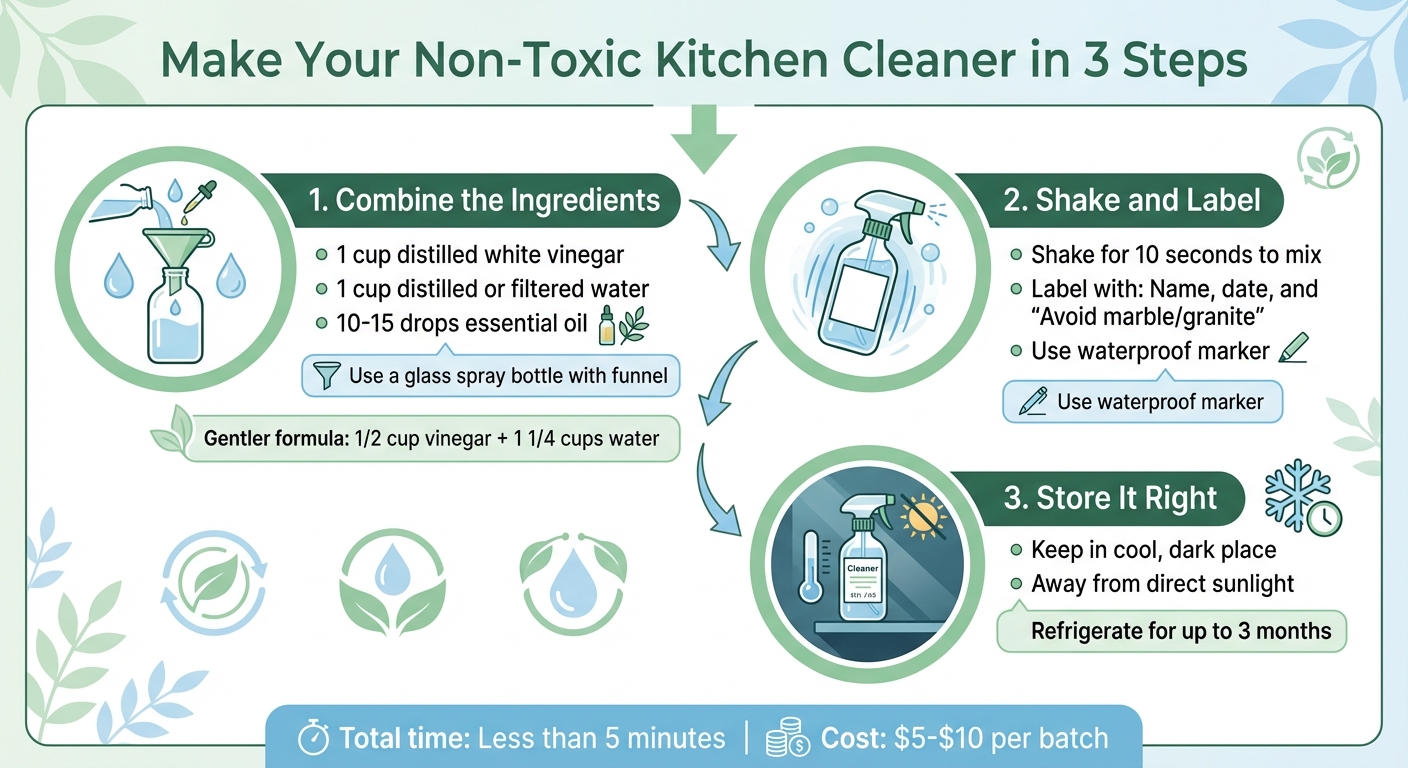
How to Make Non-Toxic Kitchen Cleaner in 3 Easy Steps
You can whip up this simple, effective cleaner in less than five minutes using a basic 1:1 ratio.
Step 1: Combine the Ingredients
Grab a glass spray bottle and place a funnel in the opening for easy pouring. For the standard recipe, mix 1 cup of distilled white vinegar with 1 cup of distilled or filtered water. If you prefer a gentler formula, adjust to 1/2 cup of vinegar and 1 1/4 cups of water.
Next, add 10–15 drops of essential oil to your 16-ounce bottle. Essential oils like lemon, tea tree, or eucalyptus are great choices – they not only soften the vinegar’s sharp scent but also bring antibacterial properties to the mix. As Lauren Kodiak, Copy Chief at The Kitchn, explains, white vinegar contains 5% acetic acid, which offers natural antimicrobial benefits.
Once everything is in the bottle, you’re ready to blend it all together.
Step 2: Shake and Label
Take out the funnel, screw on the spray nozzle, and give the bottle a good shake for about 10 seconds to make sure the ingredients are evenly mixed.
Don’t forget to label your bottle! Use a waterproof marker to jot down the cleaner’s name ("Kitchen Cleaner"), the date you made it, and a quick reminder like "Avoid marble/granite" to prevent damage to delicate surfaces.
Step 3: Store It Right
To keep your cleaner effective, store it in a cool, dark spot, away from direct sunlight. If you prefer, you can refrigerate it – it will stay good for up to 3 months.
How to Use Your Kitchen Cleaner
Using your homemade cleaner is straightforward – just shake, spray, and occasionally amp it up with a bit of baking soda for tougher messes.
Shake It Up Before Using
Before each use, give the bottle a good shake for about 10 seconds. Since essential oils naturally separate and float to the top, shaking ensures the ingredients mix properly. This keeps your cleaner working consistently and smelling great. Once mixed, double-check that the surface you’re cleaning is suitable for this solution.
Where It Works (and Where It Doesn’t)
This cleaner is perfect for non-porous surfaces like stovetops, glass, stainless steel, and tables. You can spray it directly onto the surface or onto a clean cloth before wiping. The 5% acetic acid in the solution is powerful enough to cut through grease while eliminating over 80% of viruses and bacteria.
However, avoid using it on surfaces like marble, granite, hardwood, electronics, or raw egg spills. For delicate stone surfaces, a simple mix of non-toxic dish soap and hot water is a safer alternative.
When you’re dealing with stubborn messes, the baking soda method below can give you an added edge.
Boost Cleaning Power with Baking Soda
For tough stains on sinks or stovetops, sprinkle a little baking soda directly onto the spot. Spray your cleaner over the baking soda to create a fizzing action, let it sit for a few minutes, and then wipe it clean with a microfiber cloth.
Conclusion
Creating your own non-toxic kitchen cleaner is quick, cost-effective, and a healthier choice for your home. With just three simple ingredients – distilled white vinegar, water, and a few drops of essential oils – you can mix up a powerful cleaner in less than five minutes. Not only does this save money, but it also gives you full control over what you’re using to clean your kitchen. Plus, it eliminates the risk of exposure to the harmful chemicals often found in store-bought cleaners.
Beyond the benefits to your health, this DIY cleaner is also a smart choice for the environment. A single 64-ounce bottle of vinegar can replace eight to ten plastic bottles of commercial cleaners, cutting down on plastic waste. It’s a small change that can make a big difference for the planet and for your family’s well-being.
This homemade cleaner is tough on grease and grime, leaving most kitchen surfaces spotless without leaving behind any toxic residue. Give it a try – it’s an easy way to create a cleaner, safer kitchen while doing your part for the environment.
FAQs
Is this non-toxic cleaner safe for all kitchen surfaces?
This cleaner works well on a variety of kitchen surfaces, such as countertops, appliances, and fixtures. But steer clear of using it on stone surfaces like marble, granite, or travertine, as its acidic components can lead to damage. If you’re uncertain, always test it on a small, hidden spot first.
Why should I add essential oils to my DIY kitchen cleaner?
Essential oils can elevate a simple DIY cleaner into an effective, all-natural cleaning solution. Oils like lemon or tea tree bring antibacterial and antiviral properties to the mix, making them a great choice for keeping kitchen surfaces safe for food preparation – without the need for harsh chemicals. They’re also fantastic degreasers, cutting through tough grease on counters and stovetops. On top of that, their natural scents help neutralize odors, leaving your kitchen smelling clean and inviting.
Another bonus? Essential oils make your cleaner more pleasant to use and safer for the whole family. They can tone down the strong smell of vinegar, creating a more enjoyable cleaning experience. Plus, when used correctly, they’re safe around kids, pets, and even sensitive skin. A few drops of lemon, lavender, eucalyptus, or tea tree oil can transform your DIY cleaner into a non-toxic, effective solution that smells great and gets the job done.
What’s the best way to store my homemade non-toxic kitchen cleaner?
To store your homemade non-toxic kitchen cleaner properly, use a clean, airtight spray bottle. Glass bottles are a great choice, especially if your cleaner includes essential oils, as these oils can degrade plastic over time. Keep the bottle in a cool, dry spot, away from direct sunlight, to help maintain its effectiveness.
Make sure to label the bottle with the ingredients and the date you made it. Since homemade cleaners lack preservatives, they’re usually best when used within a few weeks. If you notice any changes in the cleaner’s smell, color, or texture, it’s time to whip up a fresh batch.