

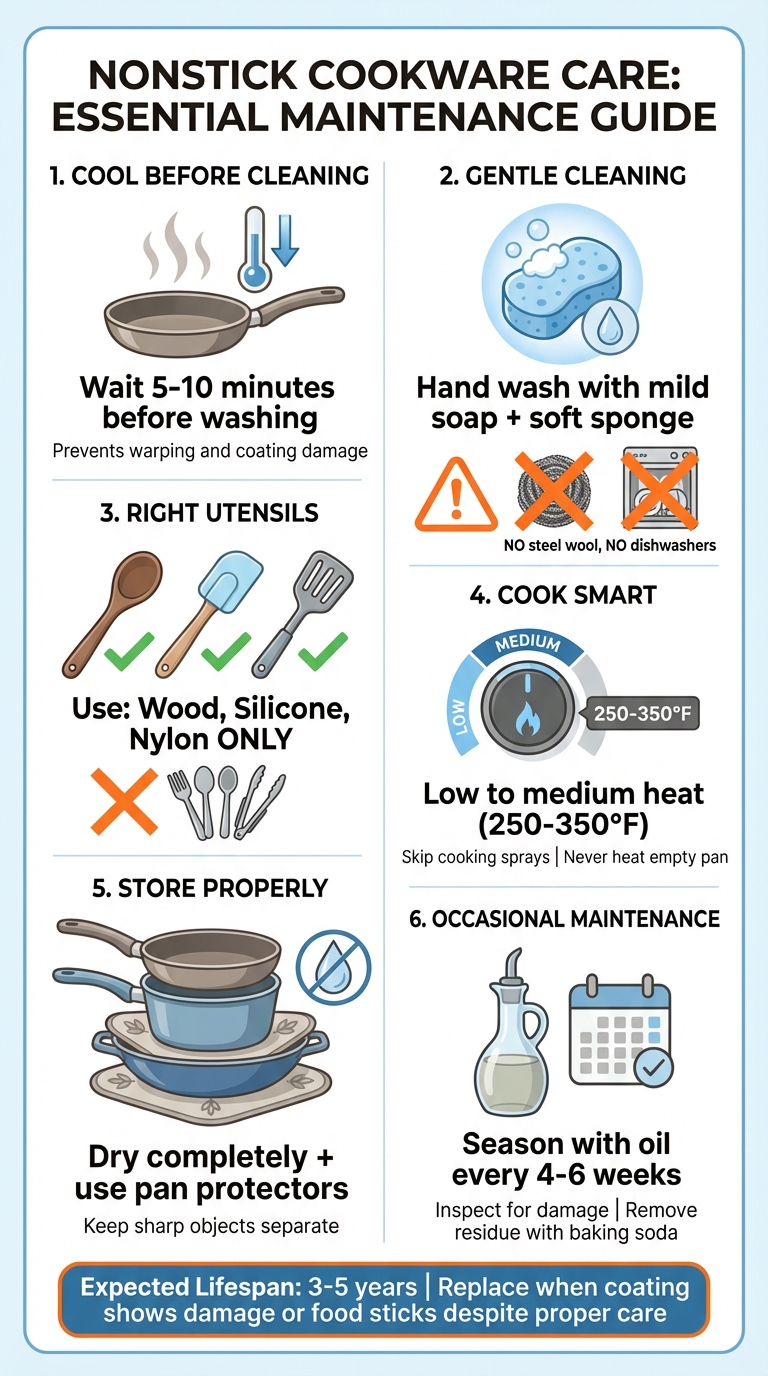
Nonstick cookware is a kitchen favorite, but it requires proper care to maintain its performance and extend its lifespan. Without the right habits, pans can warp, scratch, or lose their coating, leading to sticking and even health concerns. Here’s how you can keep your nonstick pans in great shape:
- Cool Before Cleaning: Let pans cool to room temperature before washing to prevent warping.
- Gentle Cleaning: Hand wash with mild soap and a soft sponge. Avoid abrasive tools and dishwashers.
- Use the Right Utensils: Stick to wooden, silicone, or nylon utensils to avoid scratching.
- Cook Smart: Use low to medium heat, skip cooking sprays, and never heat an empty pan.
- Store Properly: Dry pans completely, use soft liners when stacking, and keep sharp objects separate.
- Occasional Maintenance: Season pans with oil every 4–6 weeks, inspect for damage, and tackle residue with baking soda or vinegar.
Even with care, nonstick pans typically last 3–5 years. Replace them when the coating shows visible damage or food starts sticking despite proper maintenance. These simple steps will help you enjoy effortless cooking while protecting your investment.
Essential Nonstick Cookware Care Guide: 6 Key Maintenance Steps
Daily Cleaning Practices
Let Cookware Cool Before Washing
Before washing your nonstick pan, give it time to cool down to room temperature. According to the American Heart Association, exposing a hot nonstick pan to cold or lukewarm water can cause sudden temperature changes that warp the pan and damage its coating. For example, plunging a hot pan into cold water can distort its aluminum core, leading to an uneven cooking surface. Instead, let the pan rest for 5–10 minutes while you finish plating your meal.
Use Mild Soap and Soft Sponges
Once the pan has cooled, hand wash it using mild dish soap and a soft cleaning tool like a sponge, microfiber cloth, or gentle nylon brush. These tools effectively remove grease and food residue without scratching the nonstick surface. Rinse the pan with warm water, gently scrub it with soap, and focus on both the interior and exterior. If stubborn residue persists, soak the pan in warm, soapy water for 10–15 minutes to loosen it before wiping clean. Once washed, dry the pan thoroughly with a soft towel to avoid water spots and oxidation.
Avoid Abrasive Cleaners
Steer clear of abrasive materials like steel wool, scouring pads, gritty powdered cleaners, or harsh detergents when cleaning your nonstick cookware. These can scratch or strip the coating, reducing its nonstick properties and possibly voiding the warranty. Even small scratches can trap residue, signaling the need for a replacement. Additionally, avoid using dishwashers, as high temperatures and strong detergents can erode the nonstick surface. Hand-washing takes just a minute or two longer and helps extend the life of your pan, saving you money in the long run. Stick to these simple practices to keep your nonstick cookware performing at its best.
Choosing the Right Utensils
Use Non-Metal Utensils
The utensils you use every day can make or break the lifespan of your nonstick pans. Wooden, silicone, and nylon utensils are your best allies – they’re sturdy enough to handle flipping and stirring while being gentle on the delicate nonstick coating. On the other hand, metal tools like spatulas, whisks, tongs, and ladles can scrape, chip, or gouge the surface, causing irreversible damage.
Experts remind us that while nonstick pans may be "stick-proof, [they’re] not scratch-proof".
Many home cooks unknowingly treat nonstick pans like stainless steel ones, using metal utensils that can significantly shorten their lifespan. To address this, some cookware brands include safe utensils with their products and emphasize avoiding metal tools as a key care tip. Switching to non-metal utensils not only protects your investment but also ensures that food releases effortlessly during cooking.
Each type of non-metal utensil has its own perks. Wooden utensils are gentle and durable but may stain or absorb odors over time. To keep them in good shape, wash and dry them promptly to prevent cracking. Silicone utensils are a convenient option – they resist heat up to 400–600°F (depending on the brand) and are dishwasher safe. Nylon tools are another choice, but their lower heat tolerance means they may warp if exposed to high temperatures.
Choosing the right utensils is a simple yet effective way to preserve your nonstick pan’s performance and extend its life. It’s just as important as avoiding sharp tools that can cause damage.
Avoid Sharp or Pointed Tools
Sharp tools and nonstick surfaces are a recipe for trouble. Knives, forks, metal skewers, carving forks, and sharp-edged tongs can leave deep scratches or chips in your pan. These gouges not only ruin the coating but can also trap food residue and bacteria, turning a small scratch into a potential food safety issue.
To prevent this, always use a cutting board for slicing or carving instead of doing it directly in the pan. Keep a set of wooden or silicone spoons, spatulas, and ladles within reach to encourage the use of cookware-safe tools. When serving, transfer food to a plate or platter before cutting or portioning with metal utensils – this ensures sharp edges stay far away from your pan.
When shopping for new utensils, look for those labeled as "safe for nonstick cookware" or check that they’re made from smooth materials like silicone, wood, bamboo, or nylon. Avoid any tools with rough seams or sharp edges that could harm your pan. By sticking to these guidelines, you can keep your nonstick cookware in great shape for years to come.
Cooking Habits That Extend Cookware Life
Cook on Low to Medium Heat
High heat is one of the quickest ways to ruin nonstick cookware. When temperatures go above 500°F, PTFE-based coatings start to break down, which can lead to discoloration, peeling, and a loss of that smooth nonstick surface you rely on. The good news is that most everyday cooking doesn’t require such high heat. Nonstick pans, typically made from thick aluminum, are designed to distribute heat evenly. Sticking to low to medium settings – about 250–350°F or gas stove settings 3–5 – keeps your cookware in great shape.
Brands like Our Place, known for their Always Pan, recommend medium heat for the best results. Not only does this protect your pan, but it also delivers an effective sear without causing long-term damage. Over time, frequent use of high heat can warp the pan’s base, cutting its lifespan significantly.
How can you tell if the heat is right? Look for even browning without any smoke. If your pan smokes or food burns too quickly, it’s a clear sign the heat is too high. Using the proper utensils also goes a long way in preserving your cookware.
Skip Cooking Sprays
Aerosol cooking sprays may seem convenient, but they’re not your pan’s best friend. These sprays often leave behind a sticky residue due to their fine droplets and propellants, which can be tough to clean off. Over time, this buildup hardens into a stubborn, gummy layer that makes food stick, defeating the purpose of a nonstick pan.
For a better alternative, reach for high-smoke point oils like avocado or sunflower oil – or even butter. Add 1–2 teaspoons of oil to a cold pan and spread it evenly with a brush or paper towel. This method ensures even coverage without the residue that cooking sprays leave behind.
Don’t Heat an Empty Pan
Preheating an empty nonstick pan is a recipe for disaster. Without oil or food to absorb and distribute the heat, the pan’s coating can heat unevenly, often exceeding 450°F. This uneven heating can cause the coating to blister, flake, or even fail entirely.
The fix is simple: always add oil, butter, or your ingredients before turning on the heat. Start with a cold pan, add 1–2 teaspoons of oil, and gradually heat it on medium. This approach prevents thermal shock and keeps the coating intact. In fact, skipping this step can cut your pan’s lifespan in half.
How to Store Nonstick Cookware
Dry Completely Before Storing
Leaving moisture on nonstick pans can lead to trouble. Water left behind can cause spots, mineral buildup, corrosion around rivets or rims, and even unpleasant odors.
To avoid this, dry your pan right after washing using a soft cloth, then let it air dry on a rack for good measure. Pay attention to areas like the handle, rivets, and rims where water can hide. If you’re stacking pans, give each one a few extra minutes to air dry before putting them away. Once they’re fully dry, use protective layers to prevent scratches when stacking.
Use Pan Protectors or Soft Cloths
Stacking pans directly on top of each other can lead to tiny scratches that, over time, wear down the nonstick surface. To keep your cookware in top shape, always use a barrier when stacking. Felt or foam pan protectors work great, but you can also use folded paper towels, cotton dish towels, or thin silicone mats.
If space is tight, stack pans from largest to smallest, making sure the nonstick surfaces don’t touch bare metal. Store lids separately or place them on a soft cloth to avoid scratching. Alternatively, hang lighter pans from hooks by their handles, and save stacking for heavier ones, always using soft liners in between.
Keep Sharp Objects Separate
Nonstick coatings are great for cooking but aren’t scratch-proof. Sharp tools like knives, metal spatulas, or whisks can damage the surface, leaving scratches that trap food and shorten your pan’s lifespan. Tossing pans into a drawer with loose metal utensils or storing knives inside the pans is a recipe for disaster.
To prevent this, keep knives in a knife block, on a magnetic strip, or in a dedicated drawer organizer away from your cookware. Metal utensils like spatulas and tongs should go in a separate utensil crock or divided drawer bin. Dedicate one drawer or cabinet exclusively for your nonstick cookware and another for metal tools. This simple habit can help your pans last for years.
sbb-itb-663e316
Occasional Maintenance Tasks
Apply a Thin Layer of Oil
Every 4–6 weeks, give your nonstick pan a little TLC by seasoning it to maintain its slick surface. Start by cleaning and thoroughly drying the pan. Warm it on low heat for 1–2 minutes, then add about ½ teaspoon of a high-smoke point oil, like avocado or vegetable oil. Using a paper towel or soft cloth, spread the oil evenly across the interior until it has a light sheen. Be sure to wipe off any excess oil – too much can lead to stickiness. This process helps rebuild the protective layer, keeps moisture at bay, and prevents residue from sticking. After about 20–30 uses, check the pan’s surface. Over-oiling can cause issues, and skipping this step altogether can wear down the coating faster. Regular inspections will help you catch any signs of wear early.
Check for Damage
After seasoning, take a moment to inspect your pan for any signs of damage. A quick monthly check can save you from bigger problems later. Once the pan has cooled and been cleaned, hold it under bright light and run a soft cloth over the surface to feel for any rough patches or snags. Look out for scratches that expose the metal underneath, flaking or chipping of the coating, bubbling from overheating, deep discoloration beyond the usual patina, or cracks. These are all signs that the nonstick coating might be failing, which could pose health concerns. Not sure if the pan is still in good shape? Try frying an egg. If it sticks even after proper oiling, it’s a clear sign that it might be time for a replacement.
Remove Stubborn Residue
If stubborn residue won’t budge after your usual cleaning routine, try these targeted methods. For burnt-on bits, mix 2 tablespoons of baking soda with 1 tablespoon of water (or vinegar for tougher spots) to make a paste. Spread the paste over the cooled pan and let it sit for 15–30 minutes. Then, gently scrub with a non-abrasive sponge, rinse with warm water, and dry thoroughly. For fresh burnt residue, deglaze the pan by boiling 1–2 cups of water with 1 tablespoon of baking soda for about 5 minutes to loosen the debris before applying the paste. If you notice light mineral buildup, a 1:1 mixture of vinegar and water can work wonders. Tackling residue regularly – especially after high-heat cooking or every couple of months – can help extend the life of your pan, potentially lasting you 2–5 years.
How to Properly Maintain Your Non Stick Pans | Made In Cookware
When to Replace Your Nonstick Cookware
Taking care of your nonstick cookware can extend its life, but there are clear signs that it’s time to let go and invest in a new one.
Visible Coating Damage
Deep scratches, peeling, or exposed metal are major red flags. While small surface scuffs might not pose a problem, significant damage can affect both the safety and performance of your pan. If the coating is bubbling, flaking, or chipping – and especially if you can see the metal underneath – it’s time to replace it. As Made In Cookware points out, deep scratches that expose the metal can become a:
"risk for bacteria".
To check for damage, inspect your pan under good lighting. Gently run your finger across the surface to feel for rough spots, tilt it to spot exposed areas, and use a soft cloth to reveal any hidden scratches. A quick monthly check can help you catch these issues early, keeping your cooking safe and effective.
Food Sticks Despite Proper Care
If your eggs or pancakes start sticking – even when you’ve preheated the pan and used minimal oil – it’s a strong indicator that the nonstick coating has worn out. The problem becomes even more obvious if simple foods like vegetables stick, despite using non-metal utensils and cleaning gently. A good test? Try cooking an egg on medium-low heat. If it sticks badly despite proper care, the coating is likely no longer doing its job.
If you’ve been following all the right practices – cooking on low-to-medium heat, avoiding abrasive sponges, and skipping cooking sprays – yet food still sticks consistently, it’s time to replace the pan. This sticking confirms the coating’s failure, even with proper care.
Expected Lifespan
Under normal use, nonstick cookware typically lasts 3–5 years. With extra care, you might stretch that to 8 years, but heavy daily use or harsh cleaning can shorten its lifespan. Experts suggest replacing your pan every 3–5 years – or sooner if you notice a decline in performance. After all, even the best-maintained cookware has its limits.
Conclusion
Taking care of your nonstick cookware doesn’t have to be complicated. A few simple habits can make a big difference. Let your pans cool before cleaning, hand-wash them with mild soap and a soft sponge, use non-metal utensils, cook on low to medium heat, and always dry them thoroughly before putting them away. These small steps help protect the coating from damage, prevent warping, and ensure your food slides out effortlessly every time.
Beyond daily care, proper storage and occasional maintenance are equally important. Manufacturers recommend avoiding steel wool and dishwashers, as these can wear down the coating. Instead, store your pans with soft cloths or pan protectors to avoid scratches. When cooking, skip aerosol sprays and never heat an empty pan – these mindful practices can extend your cookware’s performance and save you from frequent replacements.
Want to keep these tips handy? Consider posting a quick reminder inside a cabinet door or near your stove. And remember, if your pan’s coating starts peeling, scratches become severe, or food constantly sticks, it’s time to replace it. These signs indicate that the pan is no longer safe or effective, no matter how well it’s been cared for.
For more kitchen tips and recipe inspiration, check out Comfy Kitchen. A little extra care today means better meals and cookware that lasts longer. Happy cooking!
FAQs
When should I replace my nonstick pan?
If your nonstick pan has scratches, peeling, or a worn-down coating, it’s time to replace it. Damage like this not only impacts performance but can also raise safety concerns. Another red flag? When food begins to stick despite proper care or if the pan becomes warped. Most nonstick pans, when properly maintained, last about 3–5 years, so it’s important to monitor their condition as they age.
What kind of utensils should I use with nonstick cookware?
To maintain your nonstick cookware’s quality, stick to utensils made from wood, silicone, or plastic. These materials are gentle and help protect the nonstick surface from scratches or wear. Steer clear of metal utensils – they can quickly scrape and damage the coating, shortening the life of your cookware.
Why is it best to avoid using cooking sprays on nonstick pans?
Cooking sprays tend to leave behind a sticky residue on nonstick surfaces, which can accumulate over time. This buildup isn’t just tough to clean – it can also harm the pan’s coating, making it less effective and shortening its lifespan.
A smarter option is to use a small amount of butter or oil. Not only does this help preserve the surface, but it also ensures your food cooks evenly without sticking.