
A leaking dishwasher can lead to costly damage and health risks if not addressed promptly. Here’s a quick guide to help you identify and fix common dishwasher leaks:
- Start with Safety: Disconnect power and water before inspecting.
- Check the Door Seal: Look for cracks, tears, or stiffness in the gasket.
- Inspect Hoses and Connections: Tighten clamps and check for cracks or punctures.
- Examine Internal Components: Inspect the pump, tub, and spray arms for damage.
- Fix Common Issues: Replace worn gaskets, damaged hoses, or faulty parts like spray arms or float switches.
Regular maintenance – cleaning filters, checking seals, and using the correct detergent – can prevent future leaks and extend the life of your dishwasher. Always act quickly to minimize damage and avoid expensive repairs.
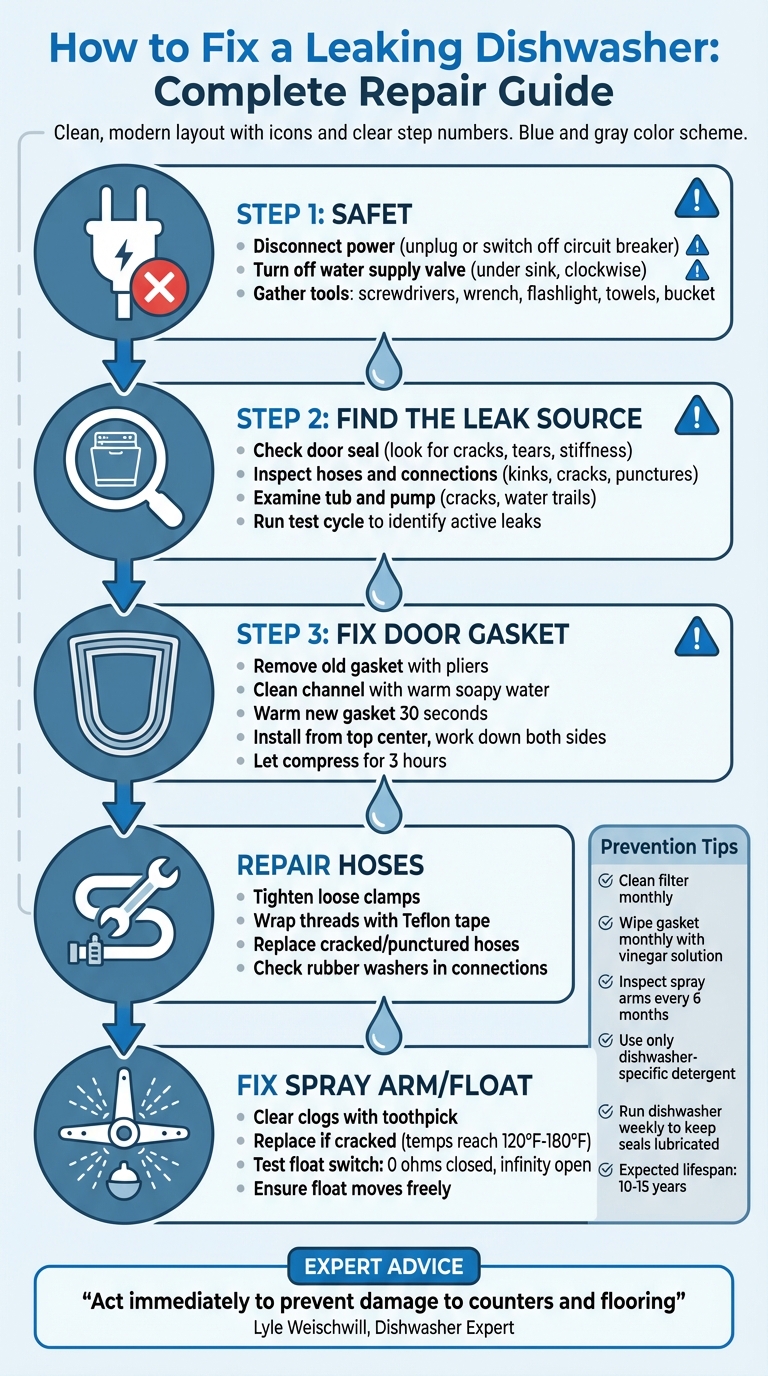
Step-by-Step Guide to Diagnosing and Fixing a Leaking Dishwasher
️🔥 Dishwasher Leaking?➔ How to DIY Diagnose & Fix It WITHOUT Calling The Repairman!
Safety Precautions Before Starting
Before diving into dishwasher repairs, it’s crucial to take steps to prevent electrical shock and water damage. Dishwashers combine water and electricity in close proximity, which can pose serious risks if not handled carefully. As Lyle Weischwill, a Dishwasher Expert at Sears Home Services, emphasizes:
Shut off the house circuit breaker for the dishwasher to prevent any chance of electrical shock until you can find and fix the leak.
Disconnect Power and Water
Start by cutting off the power. If your dishwasher plugs into an outlet, simply unplug it. For hard-wired models, switch off the dedicated circuit breaker.
Next, turn off the water supply. Locate the valve – usually under the sink – and turn it clockwise to shut it off. Be prepared for some leftover water to spill. Use a towel or a shallow pan to catch any drips and protect the area.
Tools and Materials You’ll Need
Having the right tools on hand can make the repair process much smoother. Here’s what you’ll need:
- Phillips and flathead screwdrivers
- Adjustable wrench or pliers
- Flashlight
- Towels and a bucket
For diagnosing issues, a multimeter is essential. For example, you can test the water inlet valve; it should show a resistance between 500 and 1,500Ω. If you’re replacing parts, keep items like replacement gaskets, hoses, or clamps nearby. A telescoping inspection mirror can help you spot leaks in hard-to-reach areas, and thread-sealing tape (Teflon tape) is great for ensuring watertight connections when reassembling water lines.
Once safety measures are in place and tools are ready, you can move forward to pinpoint the source of the leak.
Finding the Source of the Leak
Before diving into repairs, make sure the power and water supply to the dishwasher are turned off. Once that’s done, it’s time to locate the source of the leak. Most leaks tend to occur around or underneath the door. Grab a flashlight and some towels, and carefully inspect each part of the dishwasher.
Check the Door Seal and Latch
Start by examining the door gasket. This is the soft rubber or vinyl seal that runs along the edge of the door or the tub opening. Look for any cracks, tears, or missing sections. Feel the gasket – if it’s become stiff or brittle, it won’t be effective at keeping water inside.
Gevorg Grigorian, an Appliance Repair Expert, shares an important tip:
"A leak coming from the sides of the dishwasher usually indicates the gasket is worn out".
Pay special attention to the lower corners of the door. According to Scott Flint, an Appliance Repair Technician:
"Eventually, all dishwashers end up with a dribbling leak from the lower corner of the door. It’s almost always caused by… a dirty or compressed black rubber door seal".
Also, check for any buildup of food particles, mineral deposits, or detergent residue on the seal and the tub surface. If the gasket looks compressed, try gently pulling it forward about 1/4 inch to improve its fit. Close the door to see if it latches snugly. If there are still gaps, tighten any loose screws around the latch.
Once you’ve ruled out issues with the door seal, shift your focus to the hoses and connections.
Examine Hoses and Connections
Next, remove the bottom access panel to inspect the water inlet and drain hoses. Look for any signs of damage, such as kinks, cracks, or punctures. As Gevorg Grigorian notes:
"A stray piece of glass or even a rodent infestation can puncture the tubing causing a leak".
Check all the connection points where hoses attach to the water inlet valve, drain pump, and sink. Ensure the hose clamps are tight and secure. If the inlet coupling feels damp, use pliers to tighten it an additional 1/4 to 1/2 turn beyond hand-tight.
Inspect the Tub and Pump
If the door and hoses seem fine, it’s time to take a closer look at the tub and pump components. With the access panel still off, use your flashlight to examine the pump housing and motor for cracks or water trails. Pay close attention to the point where the motor shaft connects to the sump – this is a common spot for leaks. Inside the tub, check for cracks along the base or seams, and inspect the spray arm for damage. A cracked spray arm can create a "wave effect" that pushes water over the front edge of the tub.
To narrow down the issue further, run a short test cycle with the access panel removed. Watch closely for leaks that might only appear when the system is under pressure. Monitor the water level – if it rises above the heating element, the float switch could be malfunctioning and causing an overflow. Also, listen for unusual noises. A loud buzz might signal a blocked pump, while squealing or scraping could point to pump failure or a damaged impeller.
Once you’ve identified the source of the leak, you’ll be ready to tackle the necessary repairs in the next steps.
sbb-itb-663e316
How to Fix the Leak
Once you’ve identified where the water is escaping, it’s time to roll up your sleeves and fix the issue. Most dishwasher leaks can be handled with a few basic tools and some patience. Below are steps to address three of the most common problems.
Replace a Worn Door Gasket
Start by removing the bottom dish rack to give yourself clear access. Use pliers to grab the old gasket at a bottom corner and pull it out of its channel. Once the gasket is removed, clean the channel thoroughly with warm soapy water and a cotton swab. Any leftover debris or soap scum can prevent the new gasket from creating a proper seal.
To make the new gasket easier to install, warm it up on low heat for about 30 seconds. Fold it in half to find the center, then press it into the channel starting at the top, working your way down both sides. Be careful not to stretch the gasket as you go. If your model requires trimming, use a utility knife to cut the excess, leaving 3–4 inches extending on each side.
Close the dishwasher door and latch it for at least three hours. This allows the gasket to compress and mold to the door’s shape, ensuring a tight seal when the dishwasher is back in use.
Repair or Replace Damaged Hoses
If the issue lies with a hose, start by tightening any loose hose clamps. Ensure the drain hose’s clamp is positioned directly over its connection to the garbage disposal or sink drain. For threaded metal connections, such as the 90-degree elbow joint on the water inlet valve, wrap the threads with Teflon tape before reconnecting.
If the hose is cracked or punctured, you’ll need to replace it. Begin by shutting off the water supply and disconnecting the power. Remove the dishwasher’s kickplate, then use pliers to loosen the clamps holding the damaged hose. Carefully remove the old hose, catching any leftover water with a towel. Slide new clamps onto the replacement hose, secure it to the connections, and tighten everything firmly. If the water supply line still leaks after tightening, the internal rubber washer might be worn out. In that case, disconnect the line and replace the washer rather than the entire hose.
Fix Spray Arm or Float Switch Problems
A damaged spray arm can cause water to splash out of the dishwasher. Lyle Weischwill from Sears Home Services explains:
"A cracked or damaged spray arm can create a wave action in the water inside the dishwasher tub. The wave created by a cracked or damaged spray arm can cause water to slosh over the front lip of the dishwasher tub and leak out through the bottom of the door".
To address this, remove the spray arm by unscrewing it counter-clockwise. Use a toothpick or bamboo skewer to clear any clogs in the spray holes, and inspect the arm for cracks or warping. If you find damage, replace the spray arm – glue won’t hold up to the high temperatures inside the dishwasher, which can reach 120°F to 180°F. When installing the new arm, hand-tighten it clockwise and ensure any support screws are secure.
For float switch issues, check if the float moves freely by lifting it up and down. Remove any food particles or debris trapped underneath. If your dishwasher is overfilling – where water rises above the heating element – test the float switch with a multimeter. A functioning switch should show nearly zero ohms when closed and infinity when open. If the readings don’t change, replace the switch by accessing it through the lower kickplate panel.
Once these repairs are complete, make sure to establish a regular maintenance routine to keep leaks at bay.
How to Prevent Future Leaks
Keeping your dishwasher in good shape is the key to avoiding future leaks. Once repairs are done, regular maintenance ensures your dishwasher continues to perform efficiently while protecting your investment.
Clean and Maintain Regularly
A clean filter is your first line of defense against leaks. When the filter gets clogged, it disrupts proper drainage, causing water to seep through the door seals. To avoid this, rinse the drain filter under warm water and remove debris with a soft brush at least once a month. If you use your dishwasher daily or clean heavily soiled dishes, you might need to check it more often.
Don’t overlook the door gasket, as debris can weaken its seal over time. Wipe it down monthly using a damp cloth or a diluted vinegar solution. For tougher grime, gently scrub with a toothbrush dipped in warm soapy water or a 3% hydrogen peroxide solution. As Puls emphasizes:
Extend the life of your door gasket by regular cleaning to wipe away foreign substances.
Every six months, inspect the spray arms for any mineral buildup or blockages. Use a soft brush or a bamboo skewer to clean them thoroughly. Also, check that your dishwasher is level both front-to-back and side-to-side. An uneven dishwasher can lead to water spilling over the tub. Lastly, make it a habit to run your dishwasher at least once a week – this keeps the motor seals lubricated and in good working order.
By keeping filters, gaskets, and spray arms clean and functional, you help ensure the repairs you’ve made hold up over time.
Use Detergent Correctly and Load Properly
Routine cleaning isn’t the only way to prevent leaks – using the right detergent and loading dishes correctly also plays a big role.
Using the wrong kind of detergent can quickly lead to leaks. Stick to products specifically labeled for automatic dishwashers, and never use liquid hand soap or laundry detergent. Milton Shaw, an appliance repair expert, shares:
Most of the leaks I saw were from getting Dawn (handwashing detergent) in the dishwasher which suds over the dishwasher… and runs out the air gap in the dishwasher front door bottom seal and across the kitchen floor.
Follow the recommended detergent dosage: use "15" for lightly soiled loads or soft water, and "25" for heavily soiled loads or hard water. Adding extra detergent won’t make your dishes cleaner – it’ll just create excessive suds, which can push water out of the door.
When loading the dishwasher, make sure water can circulate freely. Avoid overcrowding, ensure spray arms can spin without obstruction, and keep tall items away from the detergent dispenser and vents.
Conclusion
Before diving into any inspection or repair, always start by disconnecting the power and shutting off the water supply – safety first! Once that’s done, pinpoint the source of the leak. It could be something as straightforward as a worn door gasket, a loose hose connection, or an issue with internal components. Many common fixes, like replacing a gasket, tightening hose clamps, or cleaning spray arms, are relatively simple and can save you from costly repairs down the line.
After completing the repair, test your work by running a normal cycle and checking for any lingering moisture. This step ensures that the issue is fully resolved. As Lyle Weischwill from Sears Home Services advises:
Acting immediately can help you resolve the problem and prevent damage to counters and flooring.
To keep your dishwasher running smoothly for its typical 10–15-year lifespan, regular maintenance is key. Clean the filters, care for the door gasket, and always use detergent specifically designed for dishwashers. These small habits can go a long way in extending the life of your appliance.
FAQs
What causes a dishwasher to leak, and how can I fix it?
Dishwasher leaks are often caused by worn-out or damaged parts that fail to keep water where it belongs. Here are some of the most common culprits:
- Worn door gasket: The rubber seal around the door can crack or become brittle over time, allowing water to seep out.
- Clogged or broken spray arm: If the spray arm is blocked or damaged, it might cause water to splash out of the tub.
- Loose or damaged drain hose: A compromised drain hose can lead to water pooling underneath the dishwasher.
- Faulty pump or water-inlet valve: These components can leak from the base or let water into the tub when it’s not supposed to.
- Clogged filter: A blocked filter can prevent proper drainage, forcing water out through the door seal.
- Improper detergent use: Using the wrong type or too much detergent can create excessive suds, leading to overflow.
Take a closer look at these areas to pinpoint the source of the leak. Fixing the issue might involve replacing worn parts, clearing out clogs, or adjusting how you use detergent. For step-by-step instructions, check out Comfy Kitchen’s detailed how-to guides.
How do I know if my dishwasher door gasket needs to be replaced?
Inspecting your dishwasher door gasket is an easy way to spot potential issues before they become major headaches. Start by examining the gasket for any visible damage – things like cracks, tears, or missing sections. Give it a gentle press to check its flexibility. If it feels stiff, brittle, or doesn’t bounce back into place, it might not be forming a proper seal. Also, take a moment to check for food particles or detergent residue, as these can interfere with the gasket’s ability to seal tightly.
For a more thorough check, run a short cycle without any dishes inside. If you notice water pooling at the bottom of the door or leaking onto the floor, it’s a clear sign the gasket isn’t doing its job. Another clue is an uneven gap between the door and the tub when the dishwasher is closed. If the gap looks off or leaks persist, it’s likely time to replace the gasket.
Swapping out a worn gasket is a straightforward fix that can help you avoid bigger problems later. According to Comfy Kitchen, these simple steps can keep your dishwasher working efficiently and your kitchen hassle-free.
What are the best ways to prevent my dishwasher from leaking in the future?
To keep your dishwasher leak-free and running efficiently, regular upkeep is essential. Start with monthly filter cleaning – this helps remove food debris that might block drainage and cause water to seep out. Next, give the door seals a good wipe with a damp cloth and mild dish soap to remove grime and maintain a proper seal. Every six months, take a look at the spray arm; if you find any clogs, clear them out with a toothpick or a small brush.
Make sure to run your dishwasher at least once a week. This keeps the motor seals lubricated and prevents internal parts from rusting. If you notice the door gasket is soft or cracked, clean it regularly and replace it if needed – worn gaskets are a frequent culprit behind leaks. Also, stick to your dishwasher’s recommended cleaning cycle and refer to the owner’s manual for any specific maintenance tips.
By committing to these simple tasks – cleaning the filter monthly, checking the spray arm twice a year, using the dishwasher weekly, and replacing gaskets when necessary – you can reduce the chances of leaks and keep your dishwasher in top shape. For more in-depth guidance, check out Comfy Kitchen for step-by-step instructions and handy tips.