

Your garbage disposal is a workhorse in the kitchen, but without proper care, it can lead to clogs, odors, and costly repairs. Here’s the quick takeaway:
- Daily Habits: Always use cold water before, during, and after running the disposal. Add food waste gradually to avoid jams, and run the unit daily to prevent rust.
- Cleaning: Weekly clean the splash guard and grinding chamber with dish soap and a toothbrush. Monthly, use ice, salt, and baking soda with vinegar for a deeper clean.
- What to Avoid: Never put fats, oils, grease, fibrous veggies (like celery), starchy foods (like rice), or hard items (like bones) into the disposal.
- Troubleshooting: For jams, use a hex key to rotate the blades manually. For clogs, try a baking soda and vinegar flush or clean the P-trap. Persistent issues may require professional help.
With these simple practices, you can keep your garbage disposal running smoothly for 8–15 years.
Complete DIY Guide To Garbage Disposals | What Is Inside?
Daily Habits for Proper Garbage Disposal Use
Taking care of your garbage disposal doesn’t have to be complicated. With a few simple daily habits, you can avoid breakdowns and keep your unit running smoothly. Here are three key practices to follow.
Run Cold Water Before, During, and After Use
Cold water plays a crucial role when using your garbage disposal. Always turn on the cold water before starting the unit, keep it running while grinding food waste, and let it flow for an extra 10 to 20 seconds after shutting the disposal off. Why cold water? It keeps fats, oils, and grease solid, making them easier for the disposal to grind up. On the other hand, hot water can melt these substances, causing them to cling to the blades and pipes, which may lead to clogs.
"When you are using the garbage disposal, run the cold water to help carry the food waste down into the blades and through the drainpipes. Do not use hot water, as the heat can melt fat and make it stick to the blades of the disposal." – Timothy Dale, Home Repair Expert
Cold water also helps flush ground particles through the grinding chamber and out of the drain, reducing the risk of blockages and unpleasant odors. After ensuring proper water flow, the next step is to feed food waste correctly.
Add Food Waste Slowly
Feeding food waste into your disposal gradually is key to preventing jams and unnecessary strain on the motor. Instead of dumping an entire bowl of scraps in one go, start the disposal first and then add small amounts of food waste at a time. For larger pieces, break or cut them into smaller chunks to avoid overwhelming the unit.
"Don’t just dump a bowl of waste in all at once, especially things like rice or pasta that swell in water." – Shaylin King, Licensed Plumber
Listen to the sound of your disposal while it’s running. When the grinding noise changes to a hollow, whirring sound, it’s a sign that the chamber is clear and ready for more waste. Along with proper feeding, regular use is another important habit to maintain.
Turn On the Disposal Regularly
Even if you’re not using your garbage disposal often, make it a point to run it at least once a day with cold water. This simple step helps prevent rust and corrosion on the blades and internal parts. It also clears out any lingering debris, ensuring the motor and moving components stay in good working condition.
"One of the best things you can do to keep the garbage disposal in good working order is to run it at least once a day." – Timothy Dale, Home Repair Expert
If you’re planning to be away for a few days, run the disposal before you leave. This helps clear out any food particles or moisture that could lead to bacterial growth, keeping your unit fresh and ready for use when you return.
How to Clean and Maintain Your Garbage Disposal
Keeping your garbage disposal clean and functioning well doesn’t have to be a chore. With just 10–15 minutes of regular upkeep, you can prevent odors and ensure it operates efficiently. A simple routine is all it takes to avoid most common issues.
Weekly Cleaning Steps
Before you start cleaning, always disconnect the power – either unplug the unit or turn it off at the breaker. The rubber splash guard is often the main culprit when it comes to bad smells. Food particles and grease tend to collect on its underside, forming what some call "smelly slime."
"Most odors that come out of the garbage disposal are coming from food buildup on the splash guard." – Alyssa Wiegand, Product Manager, Moen
To tackle this, lift the splash guard and scrub the underside thoroughly using an old toothbrush and grease-cutting dish soap. Use a flashlight to inspect the grinding chamber for trapped debris, and carefully remove any items using tongs or long-nosed pliers – never use your hands. Next, scrub the upper chamber with a soapy sponge. Once that’s done, restore power and run the disposal with cold water at full force for 30 to 60 seconds to rinse everything clean.
Monthly Deep Cleaning Techniques
Weekly cleaning takes care of surface grime, but a deeper clean once a month can help remove tougher buildup. Start by pouring 2 cups of ice and 1 cup of rock salt into the disposal. Run the unit with cold water. The ice and salt act like a scrub, knocking off residue from the grinding chamber walls and blades.
For an extra deep clean, pour 1/2 cup of baking soda followed by 1 cup of white vinegar into the disposal. Let the mixture fizz for 10–15 minutes before flushing it out with water. To leave a pleasant scent, grind up citrus peels like lemon, lime, or orange. The natural citric acid not only smells great but also helps break down grease.
"Natural solutions are effective and safe for the plumbing and the disposal. Regular maintenance with ice, salt and citrus will keep the disposal clean and fresh without the need for harsh chemicals." – Alicia Sokolowski, Cleaning Expert, AspenClean
Avoid using harsh chemicals like commercial drain cleaners or bleach, as they can corrode internal seals and damage your disposal. By sticking to these natural methods, you can safely maintain your disposal and help it last its full 8 to 10 years.
What Not to Put in Your Garbage Disposal
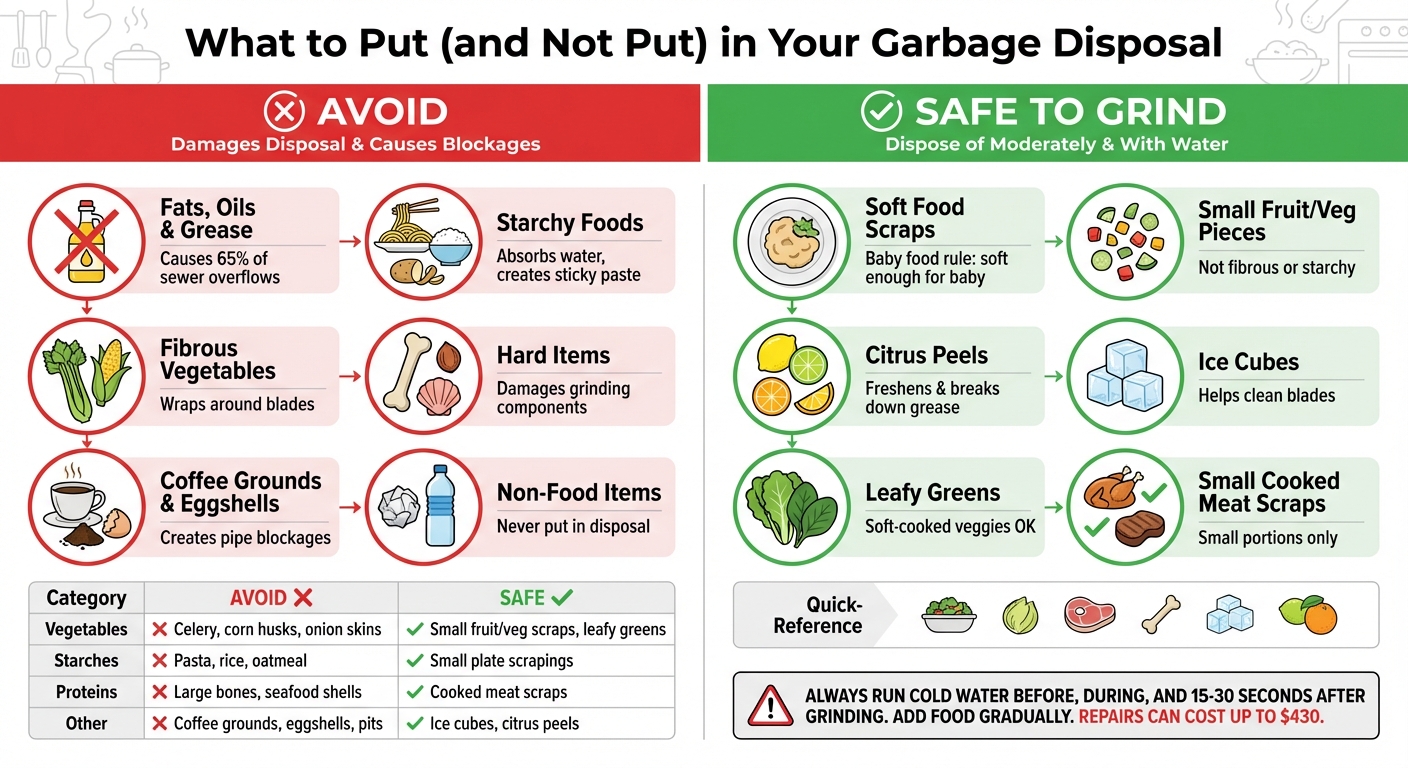
Garbage Disposal Safe vs Unsafe Foods Guide
Knowing how to maintain your garbage disposal is only part of the equation. Equally important is understanding what not to put into it. Your disposal isn’t designed to handle everything, and the wrong items can lead to jams, clogs, or even costly repairs – sometimes as much as $430.
Foods That Cause Problems
Fats, oils, and grease are some of the worst offenders. While they may seem harmless when warm, they solidify as they cool, coating pipes and trapping debris. This buildup is responsible for up to 65% of sewer overflows.
"It may look harmless when it’s a warm liquid you can run through your disposal, but it will cool quickly in a dark, hidden pipe and become a sticky mess that can either create a blockage on its own or grab other debris as it passes through." – Hendrik Vandepoll, Master Plumber
Starchy foods like pasta, rice, oatmeal, and potato peels are another no-go. These foods absorb water and break down into a sticky paste that can clog the disposal and pipes.
"Some of the worst [offenders] are starchy material like potato peels. Anything that might stick to your drain wall can be a problem." – John Porter, Owner, JP Installations Services LLC
Fibrous vegetables such as celery, corn husks, asparagus, and pumpkin "guts" are also problematic. Their tough, stringy fibers can wrap around the disposal’s moving parts, causing jams or blockages. Even onion skins can tangle in the impellers.
"Stringy food waste materials often pass through most standard disposals without being ground properly. This can result in food waste material balling up in the downstream plumbing and potentially causing a clog." – Eric Schultz, Director of Product Management, InSinkErator
Hard items like beef or pork rib bones, fruit pits (e.g., peach or avocado), and seafood shells (like crab or oyster) are too dense for most disposals. They can damage the grinding components or accumulate in older pipes.
Coffee grounds and eggshells might seem harmless, but they create tiny, non-dissolving particles that stick to sludge in the pipes, forming blockages. The thin membrane inside eggshells can also wrap around the impeller.
Non-food items should never go into the disposal. This includes trash like paper towels, plastic bags, candy wrappers, produce stickers, and cigarette butts. Harsh chemical drain cleaners and paint are also dangerous, as they can corrode the disposal’s internal parts or harden inside pipes.
Safe Foods to Grind
When it comes to what is safe, stick to soft food scraps. Items like yogurt, mashed potatoes, and other soft-cooked leftovers are generally fine. A good rule of thumb is the "baby food rule": if it’s soft enough for a baby to eat, it’s safe for the disposal.
Small fruit and vegetable pieces are also acceptable, as long as they’re not fibrous or starchy. Leafy greens and soft-cooked veggies work well. Citrus peels – like lemon, lime, or orange – are especially beneficial because their natural citric acid helps freshen the unit and break down grease.
For best results, chop larger scraps into smaller pieces and feed them into the disposal gradually while it’s running. Always use cold water before, during, and for 15–30 seconds after grinding to ensure everything flushes through properly.
By avoiding harmful items and sticking to safe practices, you can extend your disposal’s lifespan and reduce the need for repairs.
| Category | Avoid | Safe to Grind |
|---|---|---|
| Vegetables | Celery, corn husks, onion skins | Small fruit/veg scraps, leafy greens |
| Starches | Pasta, rice, oatmeal | Small plate scrapings |
| Proteins | Large bones, seafood shells | Cooked meat scraps |
| Other | Coffee grounds, eggshells, pits | Ice cubes, citrus peels |
sbb-itb-663e316
How to Fix Common Garbage Disposal Problems
Garbage disposals can sometimes jam, clog, leak, or develop unpleasant odors. The good news? Most of these issues are pretty straightforward to fix and usually cost around $150 or less to resolve. Here are some practical troubleshooting tips to keep your garbage disposal running smoothly, building on your regular maintenance habits.
Clearing a Jammed Disposal
When your disposal is jammed, you’ll hear a low humming sound – the motor is running, but the blades aren’t moving. Before doing anything, disconnect the power by unplugging the unit or turning off the circuit breaker. Once it’s safe, check for obstructions. Use needle-nose pliers or kitchen tongs to remove any foreign objects (never reach in with your hands).
Most disposals have a hex-shaped hole on the bottom center. Insert a 1/4-inch Allen wrench into the hole and rotate it back and forth to manually free the jammed grinding plate. If your unit doesn’t have this feature, you can use a sturdy wooden spoon handle through the drain opening to manually turn the blades. After clearing the jam, press the small red reset button (located on the bottom or side of the unit) to restore power. Run cold water and test the disposal to ensure it spins freely.
Unclogging the Drain
If water is backing up in your sink, the clog is likely in the drainpipe beyond the grinding chamber. Start by filling the sink with a few inches of water and using a flat sink plunger. Plunge 6–8 times. For double sinks, make sure to seal the other drain and clamp the dishwasher hose to prevent backflow.
For deeper clogs, try a simple home remedy: pour 1/2 cup of baking soda followed by 1 cup of vinegar down the drain. Let the mixture fizz for 5–10 minutes, then flush with cold water while running the disposal. If the clog persists, it may be in the P-trap (the U-shaped pipe under the sink). Place a bucket underneath, remove the P-trap, and manually clear out any debris using a wire or brush. Often, clogs occur because there wasn’t enough water used to fully flush food particles down the drain.
Getting Rid of Bad Smells
Bad odors usually come from food residue building up on the splash guard or blades. One common culprit is the rubber baffle (splash guard), which can collect what plumbers call "stinky slime." Flip or lift the baffle and scrub the underside with dish soap and an old toothbrush.
"Disposals aren’t self-cleaning. Bits of food and grease collect under the splash guard, on the blades, and inside the grinding chamber. Over time, those bits rot and stink." – Dr. Pipes Plumbing
For a more thorough clean, fill the disposal with 2 cups of ice cubes and 1 cup of rock salt. Run the unit with cold water for 15–30 seconds to scrub the internal components. Follow this by grinding a handful of citrus peels (lemon, lime, or orange) to release natural oils that neutralize odors. Avoid using undiluted bleach or boiling water, as these can damage seals or warp PVC pipes. Regular deep cleaning like this helps keep your disposal fresh and efficient.
Dealing with Strange Noises or Leaks
Rattling or grinding noises often mean there’s a hard object – like a bone, pit, or piece of silverware – bouncing around inside the disposal. Turn off the power, use a flashlight to inspect the interior, and carefully remove the debris with pliers. If the noise continues, it might indicate worn grinding components that need professional attention.
Leaks usually happen at connection points, such as where the disposal attaches to the sink or drain pipes. Check these seals and tighten any loose fittings. However, if water is leaking through the body of the unit itself, it means an internal seal is cracked, and the disposal will need to be replaced.
If your disposal hums but still won’t spin, even after trying manual rotation, the motor may be seized. In these cases, it’s best to call a plumber. Professional repairs typically start at $140, but replacing the unit might be more cost-effective, with new disposals available for under $100. Promptly addressing these issues protects both your disposal and your plumbing system.
| Problem | Quick Fix | When to Call a Pro |
|---|---|---|
| Humming/Jammed | Use a hex key to manually rotate the blades | If the motor doesn’t turn after several attempts |
| Slow Drain | Plunge or use the baking soda and vinegar method | If cleaning the P-trap doesn’t solve the problem |
| Bad Smell | Clean with ice, salt, and citrus peels | If odors persist even after deep cleaning |
| Leaking | Tighten connection fittings | If the leak comes from the body of the disposal |
When to Get Professional Help or Buy a New Unit
Proper maintenance and troubleshooting can extend the life of your garbage disposal, but there comes a time when professional help or even a replacement becomes necessary. Like any appliance, garbage disposals wear out over time, and knowing when to repair or replace can save you money and hassle.
Warning Signs Your Disposal Is Failing
Certain issues signal that your garbage disposal might need professional attention – or even a complete replacement. For instance, if you’re dealing with frequent clogs despite using the unit correctly, it might mean the blades are dull or the motor isn’t powerful enough. Another red flag is having to constantly press the reset button, which often points to a motor that’s struggling to keep up.
Unusual noises like metallic clanking or screeching could indicate worn bearings, while a persistent humming sound without grinding action suggests a deeper mechanical issue. Water leaks are another concern: leaks from the top may be patched with plumber’s putty, but leaks from the body often mean internal cracks or failed motor seals, which typically require replacement. If deep cleaning doesn’t eliminate odors, it could mean food waste is trapped in areas you can’t access, which may need professional inspection. And if you notice a burning smell or see smoke, stop using the unit immediately – these are signs of motor distress that shouldn’t be ignored.
These warning signs build on basic troubleshooting efforts, helping you determine whether it’s time to repair or replace your disposal.
Deciding When to Replace Your Disposal
If your garbage disposal continues to malfunction despite repairs, it might be time to invest in a new unit. Most disposals last between 8 and 15 years, so if yours is over a decade old and showing frequent issues, replacement is often the smarter choice.
"If your garbage disposal is leaking from the bottom, coming from the reset button, you may have cracks or a broken seal on the inside of the garbage disposal from normal wear and tear over time. If this is the case, it’s best to get a new garbage disposal." – Valerie Albarda
Replacing a garbage disposal typically costs between $150 and $950, including both the unit and professional installation. Before making a decision, check your warranty – some premium models come with extended coverage. If repair costs are close to the price of a new unit, replacement is usually the better option. Additionally, consider upgrading to a more powerful model if your current disposal struggles. For households of 3 to 6 people, a 1/2 to 3/4 HP motor is usually sufficient, while larger families may need at least a 1 HP motor.
Conclusion
Taking care of your garbage disposal with simple daily and periodic maintenance can make a huge difference. When properly maintained, a disposal can last anywhere from 8 to 15 years. On the other hand, neglecting it can lead to early failure and expensive repairs.
The basics are easy to follow: run cold water every time you use it, add waste gradually, and use the unit regularly to prevent rusting. Regular cleaning not only keeps odors and buildup at bay but also reduces strain on the motor, ensuring your kitchen stays fresh and functional.
It’s also important to avoid common mistakes. Skip fats, oils, and grease, and don’t put fibrous vegetables like celery or asparagus down the disposal. If the unit gets jammed or clogged, you can often fix it yourself by using the reset button or an Allen wrench on the bottom of the disposal. However, if you’re dealing with frequent issues, persistent leaks, or an older unit, replacing it might be the better choice.
Caring for your disposal isn’t just about preventing breakdowns – it’s about getting the most out of your investment. By following these simple practices, you’ll keep one of your kitchen’s hardest-working appliances running smoothly for years to come.
FAQs
How often should I clean my garbage disposal to keep it odor-free?
To keep your garbage disposal running smoothly and free of unpleasant odors, make it a habit to clean it at least once a week. This routine helps get rid of food particles and buildup that can lead to bad smells.
A simple trick for cleaning is to toss in some ice cubes and coarse salt. This combination works to loosen debris stuck inside the disposal. Afterward, rinse thoroughly with cold water. For a natural, fresh scent, drop in a few lemon or orange peels – they’ll leave your disposal smelling great!
What are the signs that my garbage disposal needs repair?
If your garbage disposal isn’t working as it should, there are a few telltale signs that it might need professional help. For instance, if you hear strange noises like grinding, rattling, or humming, it could mean something’s stuck inside, parts are worn out, or components are misaligned. Another warning sign is if you find yourself needing to reset the unit frequently – this might indicate the motor is struggling or nearing the end of its life.
Other common issues include lingering odors that don’t go away even after cleaning, slow drainage, or repeated clogs. These could point to trapped food particles or a damaged grinding mechanism. Also, keep an eye out for water leaks under the unit or around the seal, as these can signal internal problems that need attention.
If you’re noticing any of these problems, it’s best to stop using the disposal and call in a professional plumber. Tackling the issue early can save you from bigger headaches down the line and help keep your kitchen running smoothly.
Should I use hot or cold water when running my garbage disposal?
When you’re using your garbage disposal, always stick to cold water. Why? Hot water can melt grease, which then sticks to your pipes and increases the chance of clogs. Cold water, however, keeps fats and oils solid, allowing the disposal to break them down more effectively and flush the debris out smoothly. To keep things running smoothly, let the cold water flow for a few seconds both before and after using the disposal.