

Scaling recipes is a straightforward way to adjust ingredient quantities to match your serving needs, whether you’re cooking for one or hosting a large gathering. Here’s how it works:
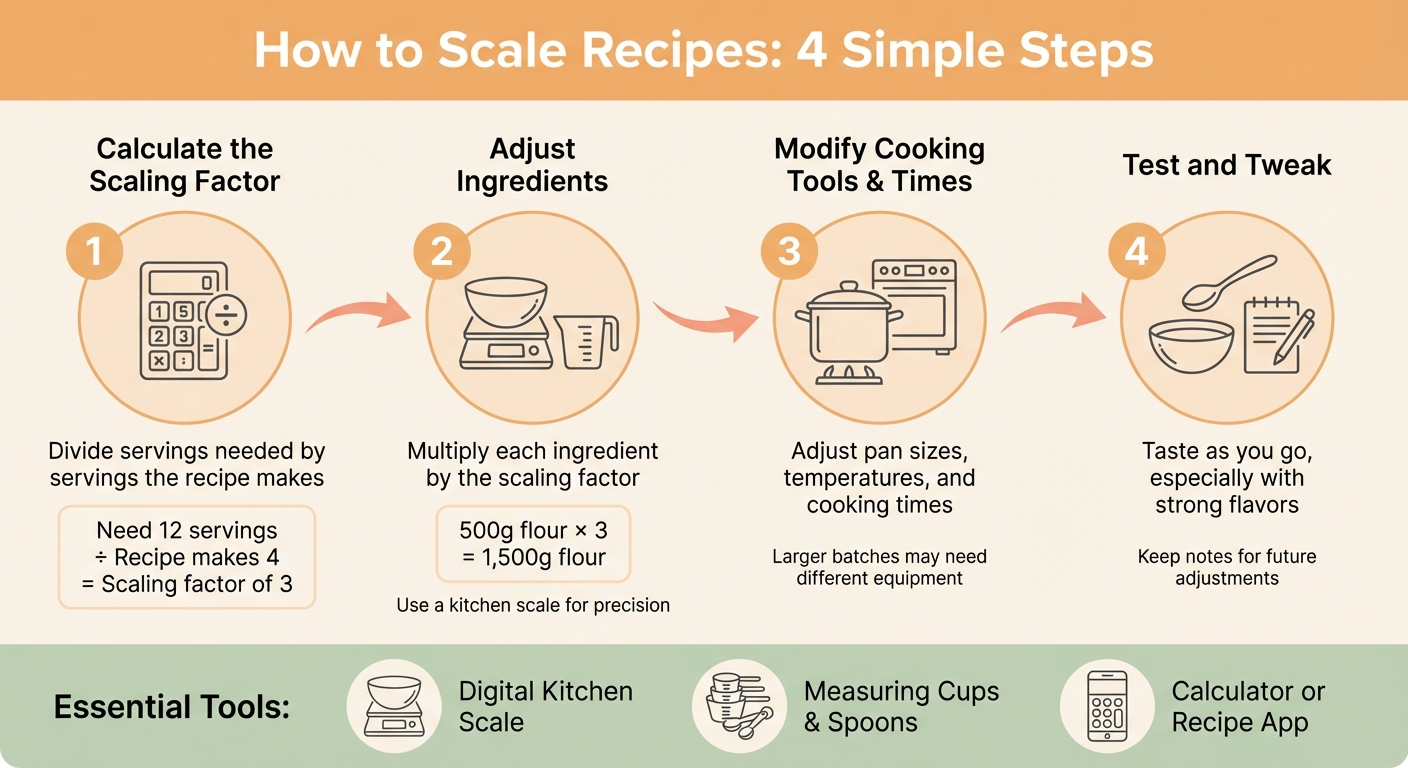
- Calculate the Scaling Factor: Divide the number of servings you need by the number the recipe makes.
- Adjust Ingredients: Multiply each ingredient by the scaling factor. Use a kitchen scale for precision, especially in baking.
- Modify Cooking Times and Tools: Larger or smaller batches may require different pans, cooking times, or temperatures.
- Test and Tweak: Taste as you go, especially with strong flavors, and keep notes for future adjustments.
Key Tools:
- Digital Kitchen Scale: For accurate measurements.
- Measuring Cups and Spoons: Essential for volume-based recipes.
- Calculator or Apps: Simplify scaling calculations.
Scaling recipes reduces food waste, saves time, and ensures you always have the right portions. Start small, test your adjustments, and refine your process to make scaling second nature.
4-Step Process for Scaling Recipes at Home
Scaling Recipes | FRESHFARM FoodPrints

Tools You Need for Scaling Recipes
Having the right tools can make scaling recipes much easier, ensuring that flavors and textures stay consistent – even without a professional kitchen setup. These essentials help you maintain precision and balance, which are crucial when adjusting recipes.
Kitchen Scale: The Key to Precision
A digital kitchen scale is hands down the most important tool for scaling recipes. Why? Because it measures weight instead of volume, eliminating inconsistencies. For instance, a cup of flour can vary by 30–50 grams depending on how tightly it’s packed. That kind of variation can ruin a scaled recipe, especially in baking, where accuracy is everything.
When choosing a scale, look for one that measures in both grams and ounces, offers 1‑gram increments, and has a tare function to reset the weight between ingredients. Most home models can handle up to 11 pounds (5 kilograms), which is perfect for tasks ranging from weighing a pinch of yeast to preparing a large batch of dough. Expect to spend between $15 and $40, with many reliable options around $20.
Using a scale also simplifies the math. For example, doubling 125 grams to 250 grams is straightforward and precise. To keep things tidy, you can use a one-bowl method – resetting the scale (using the tare button) after each ingredient.
Measuring Cups and Spoons for Volume-Based Recipes
Even with a kitchen scale, measuring cups and spoons remain essential for recipes that list ingredients by volume. Dry measuring cups (commonly available in sizes like 1 cup, 1/2 cup, 1/3 cup, and 1/4 cup) are great for items like flour or sugar. For liquids like water, milk, or oil, use liquid measuring cups with spouts for easy pouring.
Measuring spoons are equally important, especially when dealing with small but impactful ingredients like salt, baking powder, or spices. A set that includes sizes as small as 1/8 teaspoon is ideal. For best results, spoon dry ingredients into the cup and level them off with a straight edge. For liquids, place the measuring cup on a flat surface and check it at eye level to ensure accuracy.
Calculator or Recipe Scaling Apps
A simple calculator can be a lifesaver when scaling recipes. By dividing the desired servings by the original servings, you can calculate the scaling factor and adjust each ingredient accordingly. For example, tripling a recipe involves multiplying every ingredient by three – a task that’s much easier with precise numbers.
For an even smoother process, recipe scaling apps like Paprika Recipe Manager or Samsung Food (formerly Whisk) are game-changers. These apps let you input your recipe, adjust serving sizes instantly, and even convert between measurements like cups, tablespoons, grams, and ounces. Many apps also save your scaled recipes for future use. This is especially handy for tricky calculations or when dealing with baker’s percentages, ensuring even the oddest amounts are rounded sensibly.
How to Scale Recipes: Step-by-Step
Calculate the Scaling Factor
To scale a recipe, start by figuring out the scaling factor. This is done by dividing the number of servings you want by the number of servings the original recipe makes. For example, if the recipe serves 4 and you need it to serve 12, your scaling factor is 3. If the recipe serves 10 and you only need 5 servings, the factor is 0.5. Once you have this number, you’ll use it to adjust the quantity of each ingredient.
Adjust Ingredient Quantities
With your scaling factor in hand, multiply each ingredient amount by that number. For instance, if the recipe calls for 500 grams of flour and your factor is 1.8, you’ll need 900 grams. Using a kitchen scale is especially helpful when dealing with fractional measurements to ensure precision.
Be cautious with spices and strong flavorings. When doubling a recipe, it’s a good idea to start with about 75–80% of the scaled amount for these ingredients. You can always add more after tasting. Eggs can be tricky to scale since they don’t divide easily. To handle this, whisk the eggs together and measure by weight. A medium egg weighs about 50 grams, so half an egg would be around 25 grams. Similarly, leavening agents like baking powder or yeast may require slight adjustments when scaling up to avoid issues like over-rising.
Keep Recipe Balance Intact
Scaling isn’t just about math – it’s also about maintaining the recipe’s flavor and texture. Strong seasonings, especially in dishes like soups or stews, should be added gradually since their flavors can intensify over time. Taste as you go and build flavor in layers rather than dumping everything in at once.
Don’t forget to adjust your pan size and cooking time as well. A larger or smaller batch might require a different pan to ensure even cooking. Start checking for doneness earlier than the original recipe suggests, and make notes of any changes so you can replicate the results in the future.
sbb-itb-663e316
Scaling Different Types of Recipes
Baked Goods and Desserts
Baking is a science, and even small tweaks to ingredient ratios can spell disaster. A slight misstep might leave you with cakes that sink, cookies that spread too thin, or breads that stubbornly refuse to rise. Precision is everything.
When scaling recipes, avoid doubling leavening agents like baking powder or baking soda outright. Instead, use 75–90% of the increased amount. This helps prevent issues like over-rising, strange flavors, or collapsed texture. For larger batches of dough, reduce yeast slightly – fermentation slows down naturally in bigger quantities, and the dough retains heat longer, which can affect the rise.
To maintain consistent baking results, keep batter depth the same as the original recipe. Use two identical pans instead of one deeper pan, ensuring the baking time and temperature stay close to the original. If you must use a deeper pan, lower the oven temperature by about 25°F and start checking doneness earlier with a toothpick or thermometer. For delicate desserts like cheesecakes or custards, it’s better to stick with multiple smaller pans. This ensures even cooking – no overbaked edges or undercooked centers.
Now, let’s look at how liquid-based dishes handle scaling.
Soups, Stews, and Sauces
Liquid-heavy recipes like soups and stews are far more forgiving than baked goods. Ingredients such as broth, vegetables, meat, beans, and neutral fats can usually be scaled proportionally without much trouble. The beauty of these dishes is that you can taste and tweak as they cook – something impossible with a cake in the oven.
When scaling, go easy on salt, spices, acids, and thickeners. Start by multiplying these ingredients by 50–75% of the scaling factor, then adjust gradually as you taste. Thickening agents like flour, cornstarch, or roux should also be used sparingly at first – adding too much upfront can leave you with a gluey mess. You can always whisk in a little more later if needed.
Cooking larger batches brings its own challenges. A big pot of chili, for example, evaporates more slowly due to its size. If you double the liquid, you might end up with a soupier result than intended. Instead, scale liquids to about 1.75× for a 2× recipe. Keep the heat at a gentle simmer, leave the lid slightly ajar if you need more reduction, and stir frequently to prevent scorching – especially with thick or tomato-based dishes.
Now, let’s talk about recipes that require long cooking times.
Recipes with Long Cooking Times
Scaling up recipes like casseroles, braises, and roasts requires extra care to ensure even cooking. Unlike stovetop dishes, where stirring can help distribute heat, these recipes depend on consistent depth and thickness to cook properly. When increasing a casserole, for instance, use a larger pan or multiple smaller pans instead of one deep dish. This keeps the cooking time closer to the original and ensures the food heats evenly.
For large roasts or whole poultry, cooking time is determined more by thickness than by weight. A 6-lb roast might only take 1.5× the time of a 3-lb roast. Always rely on a meat thermometer to check for doneness – 165°F for poultry, 145°F for most pork and beef – rather than using minutes-per-pound estimates. If the outside browns too quickly while the center lags behind, tent the roast with foil and lower the oven temperature by 25°F. This helps the heat penetrate evenly without overcooking the exterior.
When scaling down, the process is just as tricky. Smaller roasts and shallower casseroles cook faster, so start checking for doneness 15–20 minutes earlier than the original recipe suggests. It’s easy to overcook and dry out smaller portions if you stick to the original timing.
Fixing Common Scaling Problems
Correcting Flavor or Texture Issues
Scaling recipes can sometimes lead to unexpected challenges, but the good news is that most flavor or texture mishaps can be fixed with a little creativity. If your doubled soup ends up too salty or overly spiced, try diluting it with unsalted broth or water. Adding more bulk – like extra vegetables, cooked rice, pasta, or beans – can also help tone down overly intense flavors. Creamy dishes that feel too rich can benefit from a splash of milk or cream to soften the seasoning. And if you’ve gone overboard with heat, a dollop of sour cream, yogurt, or even a touch of sugar can bring balance back to the dish. On the flip side, if your dish tastes bland, adjust the seasonings gradually after tasting. A splash of lemon juice or vinegar can also work wonders to brighten up dull flavors without relying on more salt.
Texture issues, especially in baked goods, can also crop up when scaling recipes. A dry cake might have been overbaked or lost moisture during the process. Next time, try checking for doneness earlier, covering the top with foil if it browns too quickly, or adding a tablespoon or two of milk or oil to the batter when scaling up. If your cake or casserole ends up with a gummy or undercooked center, lowering the oven temperature by 25°F and extending the baking time can help ensure even cooking. For sticky dough, add flour one tablespoon at a time until it feels manageable. If the dough is too stiff, gradually mix in water or milk by the teaspoon. Soups or sauces that turn out too thick can be thinned with warm broth or water, added in small amounts while simmering. Conversely, if they’re too thin, let them simmer uncovered to reduce, or whisk in a cornstarch slurry – but add it gradually and let it fully thicken before deciding if more is needed to avoid an overly pasty texture.
Test Your Scaled Recipes
Before committing to a large batch or using expensive ingredients, it’s always smart to test your scaled recipe on a smaller scale – like a half- or quarter-sized version. This trial run allows you to identify any flavor imbalances, texture issues, or timing problems without wasting too many resources.
During the test, keep detailed notes. Record the scaling factor, adjusted ingredient amounts, pan sizes, oven temperature, and cooking times. Pay close attention to when you first check for doneness and jot down any observations, like whether the center is undercooked, the top browns too quickly, or the seasoning feels off. These notes will be invaluable for fine-tuning the recipe and ensuring it works seamlessly in your kitchen. If you often scale recipes, resources like Comfy Kitchen, which offers practical tips and tools for home cooks, can help you stay organized and refine your adjustments over time.
Think of these smaller test runs as an opportunity to perfect your process for future scaling projects. With a little effort upfront, you can create reliable, delicious results every time.
Conclusion
Scaling recipes opens up a world of possibilities in the kitchen. Whether you’re cutting down a casserole for a cozy dinner for two or multiplying a soup recipe to feed a crowd, the process becomes much easier once you’ve nailed the basics. With tools like a digital kitchen scale, measuring cups, and a calculator or recipe-scaling app, you can adjust almost any recipe to suit your needs.
Keep in mind that some ingredients – like salt, spices, and leavening agents – require more precise adjustments, and you might need to tweak cooking times or pan sizes to get the best results. Testing and jotting down your observations will help you perfect your approach, creating a reliable collection of scaled recipes for future use.
Scaling recipes isn’t just practical – it’s budget-friendly and helps reduce food waste. Cooking the right amount means fewer leftovers sitting in the fridge, while doubling or tripling freezer-friendly dishes like stews or chili can save time and money on hectic weeknights. Start with recipes you know well, adjust as you go, and don’t hesitate to experiment. Over time, scaling will feel natural, giving you the confidence to cook for any occasion.
For more tips and easy-to-scale recipes, check out Comfy Kitchen and make mealtime even more convenient.
FAQs
How should I adjust spices when increasing or decreasing a recipe?
When scaling up a recipe, it’s important to handle spices with care to maintain the right balance of flavors. Rather than doubling the amount of spices outright, try increasing them slightly less than the recipe’s scale – say, by 1.5 times instead of doubling. As you cook, taste frequently and adjust as needed. Since spices can pack a punch, it’s always safer to add them gradually rather than risk overpowering the dish.
What mistakes should I avoid when scaling recipes for baking?
Scaling recipes for baking can be tricky, and a few missteps might throw off your entire batch. One common error is not adjusting baking times properly. When you scale up or down, the size of your batch often calls for changes in oven time – bigger batches usually need longer, while smaller ones might bake faster.
Another mistake to watch out for is overmixing the batter. While it’s tempting to keep stirring for a smooth consistency, overdoing it can result in baked goods that are dense or tough. Aim to mix just enough to combine the ingredients.
Miscalculating ingredient proportions is another common issue. Baking is all about precision, so even a slight misstep in measurements can alter the texture, flavor, or rise of your creation. Finally, don’t overlook the importance of using the right pan sizes and double-checking your oven’s temperature. These details can prevent uneven baking or, worse, a burnt batch.
Can I use a kitchen scale to measure all types of ingredients?
A kitchen scale is an incredibly handy tool that can measure just about any ingredient – dry, liquid, or solid. When working with liquids, you’ll likely need to use a container. To get an accurate reading, use the tare function to subtract the container’s weight. This precision is especially valuable for recipes like baking, where exact measurements can make all the difference.