
Boiling and simmering are two common cooking methods that involve heating liquids, but they differ in temperature, intensity, and purpose:
- Boiling: Happens at 212°F (at sea level) with vigorous, rolling bubbles. It’s ideal for cooking pasta, root vegetables, or blanching.
- Simmering: Occurs between 180°F and 205°F with gentle bubbling. It’s best for soups, stews, and tenderizing tough meats.
Key takeaway: Boiling is fast and intense, while simmering is slower and gentler, allowing flavors to develop.
| Criteria | Boiling | Simmering |
|---|---|---|
| Temperature | 212°F | 180°F–205°F |
| Bubbles | Large, rolling | Small, gentle |
| Best For | Pasta, vegetables | Soups, stews, meats |
| Heat Level | High | Medium to medium-low |
Understanding when to use each method can improve texture, flavor, and overall results in your cooking.
Boiling vs Simmering Temperature Guide and Visual Comparison Chart
The Difference Between Boiling And Simmering | Cooking Techniques | Whole Foods Market

sbb-itb-663e316
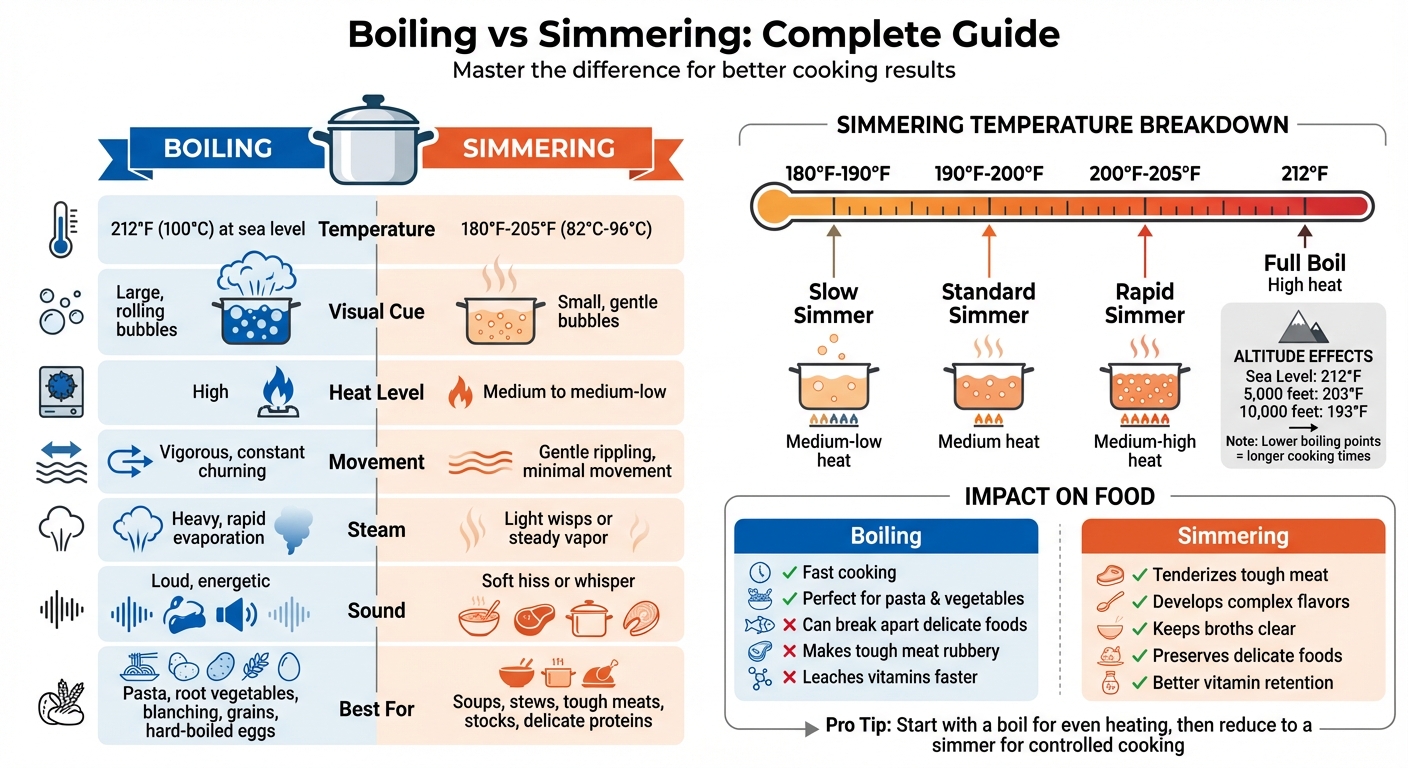
Temperature Ranges and Heat Levels
Boiling happens at exactly 212°F at sea level, producing large, rolling bubbles. Once water reaches this point, the temperature doesn’t increase further – even if you turn up the heat. Instead, the water evaporates more quickly.
Simmering, on the other hand, occurs between 180°F and 205°F, with three distinct levels within this range:
- Slow simmer (180°F–190°F): Minimal movement with just a few bubbles.
- Standard simmer (190°F–200°F): Gentle and consistent bubbling.
- Rapid simmer (200°F–205°F): Frequent, smaller bubbles, just shy of a full boil.
| Temperature Range | Technique | Visual Cue | Heat Level |
|---|---|---|---|
| 180°F–190°F | Slow Simmer | Few sporadic bubbles | Medium-low |
| 190°F–200°F | Simmer | Gentle, consistent bubbling | Medium |
| 200°F–205°F | Rapid Simmer | Frequent, smaller bubbles | Medium-high |
| 212°F | Boiling | Large, rolling bubbles | High |
Altitude also affects boiling points. At 5,000 feet, water boils at about 203°F, while at 10,000 feet, it drops to around 193°F. These lower boiling points mean longer cooking times, making precise heat control even more important for achieving the right results.
Why Temperature Precision Matters
The difference between a simmer and a boil can significantly impact the texture and flavor of your food. Boiling’s intense heat can be too harsh for delicate ingredients. For example, fish may fall apart, or meats can become tough. As Elizabeth Laseter, Senior Digital Editor at Allrecipes, explains:
"Simmer a pot roast and it becomes tender and moist. Boil it, and you’ll be left with tough, chewy meat".
Simmering’s gentler heat allows flavors to develop slowly and helps tenderize connective tissues without drying out the dish. It also preserves water-soluble vitamins, like Vitamin C and B, and prevents fats and proteins from coagulating, which keeps broths and stocks clear.
Many recipes recommend starting with a boil to ensure even heating before lowering the temperature to maintain a controlled simmer. This method balances efficiency with precision for the best cooking outcomes.
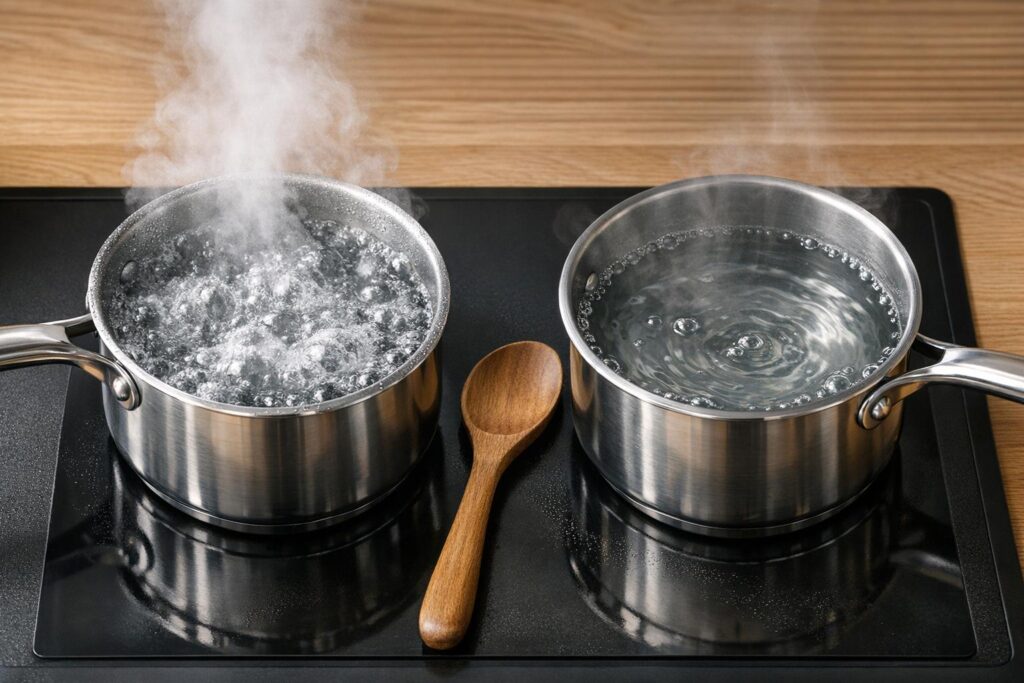
Visual Cues: How to Tell Boiling from Simmering
Understanding the visual differences between boiling and simmering can make it easier to master these cooking techniques. By focusing on the bubbles and steam, you can quickly figure out what’s happening in your pot. Each technique has a distinct "look" that reveals its intensity.
Identifying Boiling
Boiling is unmistakable. You’ll notice large, forceful bubbles constantly breaking the surface of the liquid. The entire pot moves with vigorous energy, creating a steady, rolling motion that doesn’t waver, even if you stir or add ingredients. As Cory Fernandez, Associate Food Editor at The Kitchn, explains:
"When liquids are at a full, rolling boil, you’ll see big bubbles and lots of churning, frantic activity in the pot."
Boiling also generates a lot of steam due to rapid evaporation. The bubbling is accompanied by noticeable splashing and a loud, energetic sound.
Identifying Simmering
Simmering, on the other hand, is much more subdued. You’ll see smaller bubbles gently rising to the surface at a slower pace. The liquid itself moves with a soft, rippling motion or a light quiver, without the chaotic activity of boiling. A slow simmer may only produce the occasional bubble, while a rapid simmer shows more frequent – but still restrained – bubbling. Steam appears as faint wisps or a steady, light vapor, and the sound is soft, like a quiet hiss or whisper.
If the bubbling becomes too vigorous and noisy, lower the heat until the liquid returns to a gentle simmer.
When to Boil vs. When to Simmer
Knowing when to boil and when to simmer can make or break your dish. Each technique has its place in the kitchen, and using the wrong one could lead to disappointing results. Boiling’s high heat is perfect for hearty ingredients, while simmering’s lower temperature is ideal for delicate foods and recipes that need time to develop flavor. Check out the earlier sections on temperature and visual cues for a deeper dive into how these methods influence your cooking.
Common Uses for Boiling
Boiling is all about speed and intensity. It’s the method to choose when you need rapid heat and constant movement in the pot. One of the most frequent applications is cooking dried pasta. The rolling boil at 212°F (100°C) keeps the noodles moving, preventing them from sticking together and forming a gummy mess.
Hard root vegetables like potatoes and carrots also thrive in boiling water, as the high heat ensures they cook evenly and quickly. Boiling is also key for blanching green vegetables, which helps lock in their vibrant color while cooking them in just a few minutes. Other common uses include preparing grains like rice and quinoa, softening dried beans, and making hard-boiled eggs. And if you’re into baking, boiling bagels before they hit the oven gives them their classic chewy texture and helps them brown beautifully.
But not every dish benefits from such intense heat. That’s where simmering steps in.
Common Uses for Simmering
Simmering is your best bet for recipes that require patience and a gentle touch. It’s the go-to method for soups, stews, and braises, where the goal is to let flavors meld and deepen over time.
For tough cuts of meat like beef shanks, pork shoulder, or lamb shanks, simmering at 180°F to 190°F works wonders. This slow cooking process breaks down connective tissues, turning tough meat into tender, melt-in-your-mouth bites. For example, a hearty beef stew often needs 2 to 3 hours of simmering to fully tenderize the meat, while lighter soups can come together in about 25 minutes.
Simmering also plays a critical role in keeping stocks and broths clear. As America’s Test Kitchen explains:
"Less agitation means delicate foods won’t break apart and fats and soluble proteins in stock won’t coagulate and turn the liquid cloudy".
This gentle approach is perfect for cooking fragile proteins like fish or poaching eggs without them falling apart. It’s also ideal for thickening sauces gradually, avoiding the risk of burning or sticking to the pan. These examples highlight why simmering is such a versatile and essential technique for dishes that need a softer touch.
Impact on Food Quality and Texture
When it comes to cooking, the heat level you choose does more than just determine how quickly your dish is ready – it fundamentally shapes the texture, flavor, and nutritional value of your ingredients. The difference between boiling and simmering, for instance, can mean the difference between a perfectly cooked dish and a culinary mishap.
How Boiling Affects Food
Boiling, which happens at 212°F, creates vigorous, rolling bubbles that can be harsh on ingredients. This aggressive movement can break apart delicate foods. As Cory Fernandez, Associate Food Editor at The Kitchn, explains:
"A rolling boil causes ingredients to bump around a lot, causing them to disintegrate and also making the outsides mushy before the insides are fully cooked".
Tough cuts of meat fare poorly under these conditions. The intense heat causes muscle fibers to contract too quickly, squeezing out moisture and leaving the meat dry and rubbery. Beyond texture, boiling also has a downside for nutrition – it tends to leach out water-soluble vitamins like Vitamin C and B vitamins at a faster rate.
That said, boiling has its strengths. It’s perfect for tasks that need speed and precision, such as cooking pasta to an al-dente texture or blanching vegetables to lock in their vibrant color.
How Simmering Enhances Flavor and Texture
Simmering, on the other hand, operates at a gentler 180°F to 190°F. This lower heat level creates minimal movement, which is ideal for preserving the structure of delicate foods like fish fillets or poached eggs. For tougher cuts of meat, simmering works wonders. The slower cooking process gradually breaks down connective tissue, resulting in tender, melt-in-your-mouth textures that are perfect for dishes like stews and braises.
When it comes to flavor, simmering is a game-changer. The extended cooking time allows seasonings to blend seamlessly and ingredients to develop rich, complex flavors. According to Anderson House Foods, "boiling can mute flavors, while simmering enhances them". Simmering also keeps stocks and broths clear, as the gentle heat prevents fats and proteins from coagulating into cloudy particles. Additionally, it’s a better choice for preserving delicate vitamins, making it a smarter option for nutrition-conscious cooking.
These differences highlight the importance of choosing the right heat level. Whether you’re aiming for tender textures, vibrant flavors, or maximum nutrition, the decision between boiling and simmering can make all the difference.
Switching Between Boiling and Simmering
Mastering the transition between boiling and simmering is a crucial skill for achieving the best results in cooking. Many recipes instruct you to bring a liquid to a boil first, then reduce it to a simmer – and there’s a good reason for this. Starting with a rolling boil ensures the entire pot reaches the same temperature, eliminating any uncertainty about uneven cooking. Plus, it’s much quicker than trying to slowly heat the liquid to a simmer. As Cory Fernandez, Associate Food Editor at The Kitchn, explains:
"It’s faster to bring it to a boil, then cut the heat back. It’s also easier to control the simmer when you do it this way".
This approach combines the speed of boiling with the precision of simmering, giving you more control over your dish.
When to Transition from Boiling to Simmering
Once your liquid reaches a rolling boil, reduce the heat to medium-low and observe for about a minute to ensure it settles into a steady simmer. Liquids that have already boiled respond more quickly to temperature adjustments, making it easier to stabilize the simmer.
If the boil becomes too vigorous, lower the heat further or move the pot to a cooler burner. Stirring the liquid can also help release excess steam and bring down the temperature more quickly. This method works especially well for soups, stews, sauces, and braised meats – dishes that benefit from a "low and slow" cooking process to develop rich flavors and tender textures.
When Simmering Shouldn’t Be Replaced by Boiling
While reducing a boil to a simmer is ideal for many recipes, some dishes need constant boiling. Pasta, for instance, requires the vigorous motion of boiling water to cook evenly. On the other hand, delicate foods like poached eggs or fish can fall apart or become rubbery if boiled – these are best cooked at a gentle simmer.
For clear broths and stocks, stick to a gentle simmer rather than a boil. The calm surface allows you to skim off fats and proteins that rise to the top, resulting in a clearer liquid. Keep in mind that stovetops can vary, so while "medium-low" is often suggested for simmering, you’ll need to adjust and monitor to maintain consistency.
Conclusion
Getting the hang of boiling and simmering can make all the difference when it comes to cooking consistently in the kitchen. Boiling relies on high heat and vigorous bubbling, perfect for cooking pasta, grains, or blanching vegetables. Simmering, on the other hand, uses gentler heat with occasional bubbles, ideal for soups, stews, and more delicate proteins like fish or chicken.
The key is recognizing the visual cues: a rolling, active surface means you’re boiling, while gentle ripples or small bubbles indicate a simmer. These distinctions can impact the outcome of your dish – whether a pot roast turns out tender or tough, a broth stays clear or becomes cloudy, or delicate fish holds its shape or falls apart.
Since stovetops can vary, it’s important to get familiar with how your burners behave and adjust the heat accordingly. Mastering these techniques – and knowing when to switch between them – gives you the control needed to bring out the best in your cooking. The right heat level can transform both everyday meals and special dishes, ensuring better textures and flavors every time.
FAQs
How can I simmer without a thermometer?
To simmer without a thermometer, rely on visual cues. Look for small bubbles slowly rising from the bottom of the pot and occasionally breaking the surface. The water should move gently, not boil vigorously. This indicates a temperature range of about 185–205°F. Watching for these subtle signs will help you keep the right simmering temperature.
Does boiling change at high altitude?
At high altitudes, boiling behaves differently because the reduced atmospheric pressure lowers the temperature at which water boils. This means water reaches its boiling point faster but at a lower temperature, which can affect how food cooks. As a result, recipes may need adjustments, such as longer cooking times or changes in technique, to account for these conditions.
When should I start with a boil, then simmer?
When you need to prepare food quickly or blanch ingredients, start by bringing the liquid to a boil. Once that initial step is done, lower the heat to a simmer. This gentler cooking method allows flavors to develop deeply while preventing delicate foods from overcooking or falling apart. It’s a perfect technique for dishes like soups, stews, and sauces, where slow and steady cooking brings out the best results.