

Cooking meat perfectly is all about hitting the right temperature. Whether you prefer rare steak or well-done chicken, understanding meat doneness ensures flavor, tenderness, and safety. Here’s the gist:
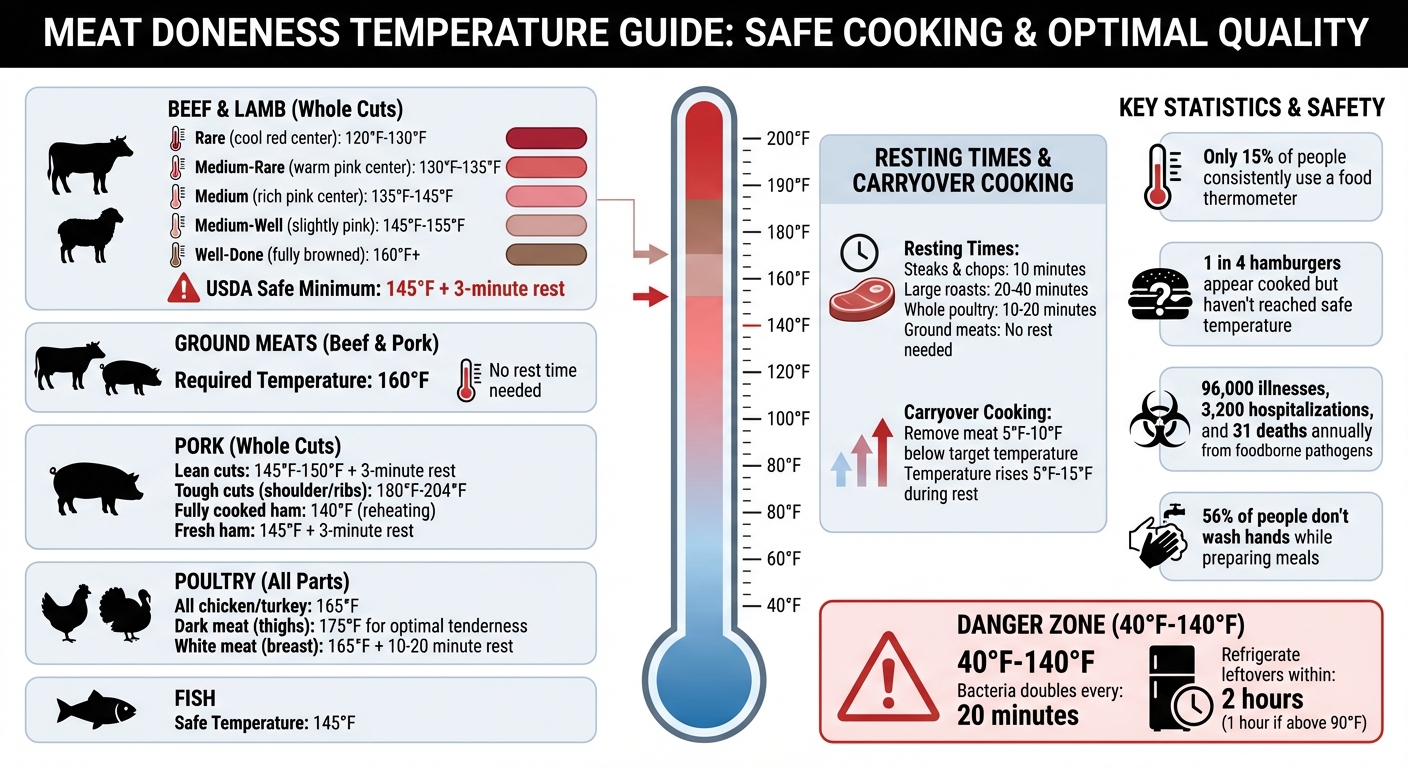
- Use a thermometer: Only 15% of people consistently use one, but it’s the most reliable tool for cooking meat properly.
- Know the safe temperatures:
- Beef and lamb: 145°F (3-minute rest)
- Ground meats: 160°F
- Poultry: 165°F
- Pork: 145°F (3-minute rest)
- Rest your meat: Let it sit after cooking to lock in juices and finish cooking with carryover heat.
- Avoid visual guesswork: Color and texture can mislead – temperature is what matters.
Using these tips, you can cook meat that’s juicy, flavorful, and safe every time.
Safe Internal Cooking Temperatures for Meat and Poultry
Tools for Measuring Meat Doneness
Meat Thermometers
When it comes to cooking meat to perfection – and safely – a meat thermometer is your go-to tool. As Wilder Davies from Bon Appétit explains:
"The two most important features of an instant-read thermometer are its accuracy and its speed."
Instant-read thermometers are designed for quick temperature checks, delivering results in just a few seconds. For instance, the ThermoWorks Thermapen One provides readings in as little as 1 second and is priced around $109. Budget-friendly options like the Kizen Instant Read thermometer are available for $15–$16. Keep in mind that these are meant for spot-checks and not for continuous monitoring.
Leave-in probe thermometers, on the other hand, stay in the meat throughout the cooking process. Many models come with alarms to notify you when the desired temperature is reached, making them ideal for larger cuts or slow-cooking methods like smoking. Wireless options, such as the ThermoWorks RFX ($159) and Meater Pro ($130), even send temperature updates directly to your smartphone via Bluetooth or radio frequency.
To use these thermometers effectively, insert the probe into the thickest part of the meat, steering clear of bones, which can interfere with accuracy. Digital probes generally require about 0.5 inches of insertion, while analog thermometers need 2–2.5 inches. For thinner cuts, like burgers, insert the probe sideways through the edge to ensure the sensor reaches the center without touching the cooking surface.
Don’t forget to clean the probe thoroughly with warm, soapy water after each use to avoid cross-contamination. Armed with these tools, you’ll be ready to tackle the specific temperature needs of various meats.
Visual Cues and Cutting Methods
While a thermometer should always be your main tool, visual and texture cues can serve as useful secondary methods. For instance, the "finger test" compares the firmness of the meat to the tension in your palm. Touch your thumb to different fingers: the area below your thumb feels like rare meat when paired with your index finger, medium-rare with your middle finger, medium with your ring finger, and well-done with your pinky.
For poultry, clear juices (not pink or red) when pierced and a loose, wiggly leg joint indicate doneness. Fish, on the other hand, is ready when it turns opaque and flakes easily with a fork. As Jessica Goldman Foung from The Kitchn explains:
"Cooked fish becomes opaque, flakes easily, and pulls away from the bone or skin."
That said, a thermometer is still the best way to confirm that fish has reached the safe temperature of 145°F.
If you need to cut into meat to check its color, do so sparingly. A small incision in the thickest part can help you gauge doneness without losing too much moisture. However, visual cues can sometimes be misleading. For example, ground beef may appear brown before hitting 160°F, or it might stay pink even after surpassing that temperature. A thermometer ensures accuracy.
While these backup methods can provide some guidance, thermometers remain the most reliable way to ensure your meat is cooked to perfection. Up next: learn the recommended temperature guidelines for different types of meat.
Internal Temperature Guidelines by Meat Type
Beef and Lamb Temperatures
For whole cuts of beef and lamb, the USDA advises cooking to a minimum internal temperature of 145°F, followed by a 3-minute rest period. That said, many chefs opt for slightly lower temperatures to preserve the meat’s texture and juiciness. As Martin Earl, Culinary Editor at ThermoWorks, explains:
"Color can lie, and minutes per side doesn’t take YOUR steak into account. In truth, the only objective way to know if your steak is done is to take its temperature."
Here’s a breakdown of doneness levels:
- Rare (120°F–130°F): A cool, red center with a very tender texture.
- Medium-rare (130°F–135°F): A warm, pink center with a hint of red. This is a popular choice for flavor and tenderness.
- Medium (135°F–145°F): A rich pink center and firmer texture.
- Medium-well (145°F–155°F): Slightly pink in the center, with a firmer bite.
- Well-done (160°F and above): Fully browned throughout, with a drier, firmer texture.
Ground beef is a different story. Because bacteria can spread during processing, it must reach 160°F to be safe. To avoid overcooking, remove meat from heat when it’s 5°F–10°F below your target temperature – carryover cooking will take care of the rest.
Next, let’s talk about pork, which has its own temperature requirements.
Pork Temperatures
For fresh pork cuts like chops, roasts, and loins, aim for an internal temperature of 145°F, followed by a 3-minute rest. At this temperature, the center might still have a slight pink hue, which is completely safe and often preferred for juiciness. Ground pork, however, needs to reach 160°F to ensure safety.
Here’s how different cuts of pork should be handled:
- Lean cuts (e.g., tenderloin): Cook to 145°F–150°F for the best balance of flavor and moisture.
- Tougher cuts (e.g., shoulder, ribs): These require higher temperatures – 180°F–204°F – to break down connective tissue and achieve tenderness.
- Fully cooked ham: Simply reheat to 140°F.
- Fresh ham: Follow the 145°F guideline with a 3-minute rest.
For accurate readings, insert your thermometer into the thickest part of the meat, avoiding bone or fat. For thin cuts like chops, insert the probe from the side. Resting the meat for a few minutes allows the juices to redistribute, improving both flavor and tenderness.
Poultry Temperatures
The USDA sets the safe minimum internal temperature for poultry at 165°F. This applies to all parts of the bird – breasts, thighs, wings, legs, ground poultry, and even stuffing inside the cavity. The USDA Food Safety and Inspection Service emphasizes:
"FSIS recommends cooking whole poultry to a safe minimum internal temperature of 165°F as measured using a food thermometer."
Unlike beef or pork, poultry doesn’t have varying levels of doneness – it’s either safe at 165°F or it isn’t. Always check the thickest part of the breast and the innermost parts of the wing and thigh to ensure even cooking.
For optimal results, cook poultry to 165°F for safety. Dark meat, like thighs, benefits from reaching 175°F for a more tender texture, while white meat should be removed at 165°F and rested for 10–20 minutes to lock in its juices.
Don’t Guess: A Beginner’s Guide to Cooking Temperatures & Storage (Home Cook Basics E06)
sbb-itb-663e316
Why Resting Meat Matters
When you take meat off the heat, the cooking doesn’t stop immediately. Instead, it continues due to something called carryover heat, which can raise the meat’s temperature by 5°F to 15°F. To avoid overcooking, remove the meat from the heat source when it’s about 5°F to 15°F below your target temperature. This post-cooking phase not only impacts food safety but also influences the meat’s texture and flavor.
Here’s what happens: cooking causes muscle fibers to tighten, squeezing the juices toward the center of the meat. Resting gives those muscle fibers a chance to relax, allowing the juices to redistribute and soak back into the meat. This process ensures a juicier, more flavorful bite. As the meat cools slightly, fats and gelatin also thicken, helping to lock those flavorful juices inside instead of letting them spill out onto your cutting board.
Dan Souza, Editor in Chief at Cook’s Illustrated, explains it perfectly:
"If you allow the meat to rest just 10 minutes, it could mean a 60 percent decrease in juices lost to the cutting board."
In fact, controlled tests show that resting meat for 10 minutes can reduce juice loss by as much as 60%. However, the ideal resting time depends on the type and size of the cut.
- Steaks and chops: About 10 minutes.
- Large roasts: Between 20 and 40 minutes.
- Whole poultry: 10 to 20 minutes.
For beef, pork, lamb, and veal, the USDA suggests a minimum rest of 3 minutes. Ground meats, however, don’t require resting. To keep your meat warm during this period, loosely tent it with foil. This simple step can make a big difference in the flavor and juiciness of your meal.
USDA Safe Cooking Guidelines

When it comes to food safety, hitting the right internal temperature isn’t just about perfecting taste – it’s about protecting your health. The USDA has established clear temperature standards to ensure harmful bacteria like Salmonella, E. coli, Listeria, and Campylobacter are eliminated. These pathogens are no small threat, causing an estimated 96,000 illnesses, 3,200 hospitalizations, and 31 deaths in the U.S. annually.
Relying on visual cues, like color or texture, to judge if meat is fully cooked can be risky. For instance, a hamburger might look done but hasn’t actually reached the safe temperature of 160°F. The USDA cautions: “Research has shown that color and texture indicators are not reliable”. The only foolproof method? A food thermometer.
Here’s a quick rundown of USDA temperature recommendations:
- Whole cuts of beef, pork, lamb, and veal: 145°F, followed by a 3-minute rest.
- Ground meats: 160°F.
- All poultry: 165°F.
That 3-minute rest period isn’t just a suggestion. Diane Van, Manager of the USDA Meat and Poultry Hotline, explains, “During the three minutes… its temperature remains constant or continues to rise, which destroys harmful bacteria”. This step is just as vital as reaching the target temperature itself.
Preventing Cross-Contamination
Safe cooking doesn’t stop at temperature – it also means keeping your kitchen clean and organized. Start by skipping the rinse: washing raw meat can spread bacteria to your sink and countertops. Instead, focus on washing your hands thoroughly with warm, soapy water for at least 20 seconds before and after handling raw meat. Shockingly, a USDA study revealed that 56% of people didn’t wash their hands at all while preparing a meal.
Other safety tips include:
- Sanitizing thermometers: Use hot, soapy water after each use.
- Cleaning cutting boards: A solution of 1 tablespoon bleach per gallon of water works well.
- Storing raw meat: Keep it on the bottom shelf of your fridge in sealed containers to prevent juices from dripping onto other foods.
The Danger Zone
Bacteria thrive in what’s known as the “Danger Zone,” between 40°F and 140°F. In this range, bacteria can double every 20 minutes. To avoid trouble, refrigerate leftovers within 2 hours – or within just 1 hour if the temperature is above 90°F. Taking these steps can significantly lower your risk of foodborne illness.
Conclusion
Achieving the perfect meat doneness boils down to three key factors: accurate temperature measurement, proper resting, and following safety guidelines. These elements work together to ensure your meat is not only safe to eat but also packed with flavor.
Relying on visual cues can be misleading – only 15% of people regularly use a food thermometer, and studies reveal that 1 in 4 hamburgers may appear fully cooked but haven’t reached a safe internal temperature.
For the best results, remove meat from heat when it’s 5–10°F below your target temperature. Let it rest for 3–10 minutes, giving carryover cooking time to finish the job while allowing the juices to redistribute evenly throughout the meat.
The USDA recommends the following safe internal temperatures to eliminate harmful bacteria: 145°F for whole cuts of beef, pork, lamb, and veal; 160°F for ground meats; and 165°F for all poultry. Always sanitize your thermometer and check multiple areas, especially on irregularly shaped cuts, for an accurate reading.
FAQs
Why should you let meat rest after cooking?
Letting meat rest after cooking is a crucial step for enhancing both flavor and texture. During this time, the muscle fibers relax and reabsorb the flavorful juices that escape during cooking. This process not only makes the meat juicier but also ensures a more satisfying bite. Plus, it helps the internal temperature even out, so the meat is cooked just right and safe to enjoy.
To do this properly, loosely cover the meat with foil and allow it to rest. For smaller cuts, 5 to 10 minutes will do the trick, while larger roasts may need up to 20 minutes. This small effort can elevate your dish from good to great!
What’s the difference between instant-read and leave-in meat thermometers?
An instant-read thermometer is a handy tool designed to give you a temperature reading in just a few seconds. It’s perfect for checking the doneness of steaks, burgers, or roasts with a quick spot-check. Once you get the reading, you remove it right away, making it ideal for situations where you don’t need to leave anything in the oven or on the grill.
A leave-in thermometer, however, is designed to stay in the meat for the entire cooking process. These often come with a heat-resistant cord or a wireless transmitter, so you can monitor the temperature from a separate display without needing to open the oven or grill. This type of thermometer is especially useful for slow-cooked roasts, barbecue, or recipes that need precise, continuous temperature monitoring.
For home cooks, an instant-read thermometer is perfect for quick checks, while a leave-in thermometer is ideal for hands-off cooking and ensuring perfect results every time.
How can I cook meat so it’s both delicious and safe to eat?
When it comes to making sure your meat is both delicious and safe to eat, an instant-read thermometer is your best friend. Use it to confirm the meat hits the USDA-recommended internal temperature for its specific type. Once it’s cooked, give it a rest for 3–5 minutes. This short pause lets the juices settle, enhancing the flavor, and ensures any lingering bacteria are eliminated. Achieving perfect doneness takes a mix of accuracy and a little patience!