

Resting meat after cooking is the secret to keeping it juicy and tender. When meat rests, its fibers relax, allowing juices to redistribute evenly instead of spilling out when cut. Here’s a quick guide to get it right:
- Steak: Rest 3–20 minutes depending on thickness. Thin cuts need 3–5 minutes, while thicker cuts like Tomahawks need up to 20 minutes. Remove from heat 5–10°F below your target temperature.
- Chicken: Rest 3–20 minutes. Smaller cuts like tenders need 3–5 minutes, while whole chickens benefit from 15–20 minutes. Avoid covering with foil to keep skin crisp.
- Pork: Rest 3–30 minutes. Thin chops rest for 3–5 minutes; large roasts need 15–30 minutes. Pull meat from heat 3–5°F below the final temperature.
Key Tip: Use a meat thermometer to ensure proper carryover cooking and safe internal temperatures. Resting is not just about flavor – it’s about food safety too.
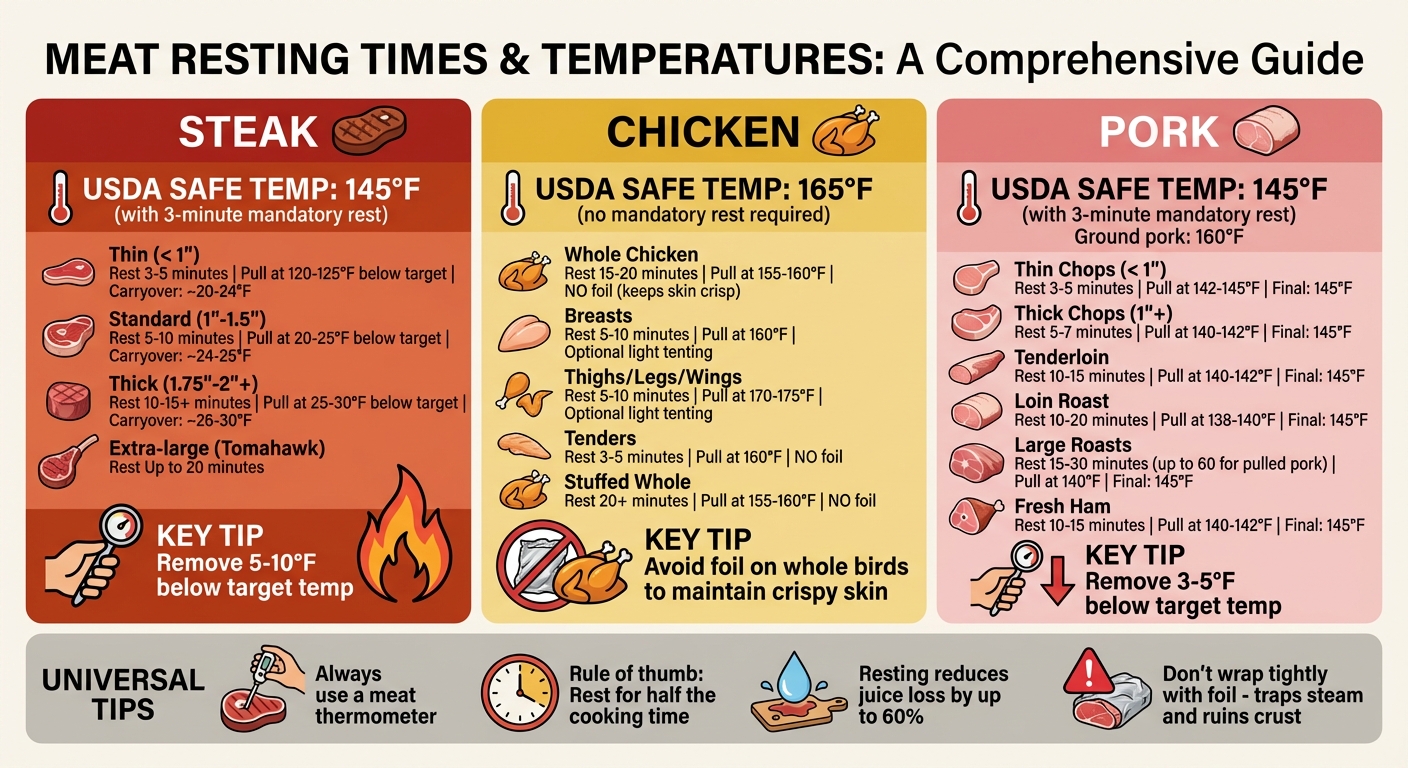
Meat Resting Times and Temperatures Guide for Steak, Chicken, and Pork
Does Resting Meat Matter? | Techniquely with Lan Lam
Food Safety and Temperature Basics
Before diving into the specifics of resting times, it’s essential to grasp two important concepts: how meat continues to cook after being removed from heat and the temperatures required to ensure food safety.
What Is Carryover Cooking
Carryover cooking refers to the phenomenon where meat’s internal temperature keeps rising even after it’s off the heat. This occurs because the outer parts of the meat are significantly hotter than the center, and heat naturally transfers from the hotter areas to the cooler ones until the temperature balances out.
The amount of temperature increase depends on the size of the meat and the cooking method. For example:
- Thin cuts like steaks or pork chops typically rise 3-5°F.
- Larger cuts such as roasts or whole birds can increase by 5-10°F.
- High-heat cooking (e.g., 400°F) results in a greater temperature climb compared to low-and-slow methods (e.g., 200°F).
To avoid overcooking, remove meat from heat 5-10°F below your desired final temperature. For instance, if you’re aiming for medium-rare steak at 135°F, take it off at 130°F and let carryover cooking finish the rest. This method works particularly well for beef and pork. However, poultry should always be cooked to its safe final temperature to avoid foodborne illnesses.
USDA Safe Internal Temperatures

The USDA has established minimum safe internal temperatures to kill harmful bacteria, ensuring your food is safe to eat. Here’s a quick reference:
| Meat Type | USDA Safe Internal Temp | Mandatory Rest Time |
|---|---|---|
| Steak (Beef, Veal, Lamb) | 145°F | 3 minutes |
| Pork (Chops, Roasts, Steaks) | 145°F | 3 minutes |
| Chicken & Turkey (All cuts) | 165°F | None required |
| Ground Meats (Beef, Pork) | 160°F | None required |
For whole cuts of steak and pork, the 3-minute rest is not optional – it’s mandatory for safety. Diane Van, Manager of the USDA Meat and Poultry Hotline, explains:
"During the three minutes after meat is removed from the heat source, its temperature remains constant or continues to rise, which destroys harmful bacteria".
To ensure accuracy, always use a meat thermometer. Insert it into the thickest part of the meat, avoiding bone, fat, or gristle. These guidelines are the foundation for the resting times discussed in the next sections.
Steak Resting Checklist
Steak Resting Times by Thickness
When it comes to resting steak, thickness plays a big role. For cuts less than 1 inch thick, a rest of 3–5 minutes is enough. Standard cuts between 1–1.5 inches need a bit longer – about 5–10 minutes. For thicker cuts over 1.5 inches, aim for 10–15 minutes, and for extra-large cuts like Tomahawks, rest them for up to 20 minutes. A handy rule to remember: let your steak rest for about half the time it spent cooking. So, if you seared a ribeye for 12 minutes, give it a 6-minute rest. This approach helps retain juices – steaks rested for 10 minutes lose 40% less juice compared to those sliced right away.
| Steak Thickness | Recommended Resting Time | Expected Carryover Temperature Rise (High Heat) |
|---|---|---|
| Thin (< 1") | 3–5 minutes | ~20–24°F |
| Standard (1"–1.5") | 5–10 minutes | ~24–25°F |
| Thick (1.75"–2"+) | 10–15+ minutes | ~26–30°F |
How to Rest Steak
After cooking, move your steak to a warm plate or cutting board. To maintain the crust, you can place it on a cooling rack set over a plate, allowing air to circulate freely around the meat. If you notice the steak cooling too quickly, loosely tent it with aluminum foil – but don’t wrap it tightly, as that traps steam and softens the crust. For thinner cuts, skip the foil altogether to avoid overheating.
Resist the urge to slice into the steak during the resting period. Cutting too soon lets the juices escape before they’ve had a chance to redistribute. Want to add a little extra flavor? Place a pat of butter on top and let it melt into the meat. These simple steps help lock in flavor and ensure your steak is cooked evenly and safely.
When to Adjust Steak Resting Times
Carryover cooking – the process where the steak continues to cook after being removed from heat – can influence your resting times. Bone-in and extra-thick cuts generally need more time, around 15–20 minutes, since the bone retains heat differently than the meat. High-heat methods like grilling or pan-searing lead to significant carryover cooking, as reflected in the table above. To hit your desired doneness, pull 1–1.5 inch steaks off the heat when they’re 20–25°F below your target temperature, and for thicker cuts, aim for 25–30°F below.
Adam Wojtow, the founder of Steak Revolution, advises:
"If you want to stop this temperature increase immediately, you could cut the steak into a few pieces right after cooking. However, a better approach is to take the steak off the heat a few degrees before it reaches your target temperature".
If your steak reaches the target temperature while still in the pan, skip resting and slice it right away to avoid overcooking. On the other hand, slow-cooking methods like sous vide or reverse searing don’t require much resting time, as carryover cooking is minimal.
sbb-itb-663e316
Chicken Resting Checklist
Just like with steak, letting chicken rest properly is crucial – but the timing depends on the cut.
Chicken Resting Times by Cut
The size of the chicken cut determines how long it should rest. A whole chicken needs about 15–20 minutes for its juices to redistribute and for carryover cooking to finish. For smaller cuts like breasts, thighs, legs, and wings, a 5–10 minute rest is sufficient. Chicken tenders, being smaller, only require 3–5 minutes. When it comes to stuffed chicken, plan for at least 20 minutes to ensure both the meat and stuffing reach safe temperatures.
| Chicken Cut | Recommended Resting Time | Pull Temperature | Tenting Recommended? |
|---|---|---|---|
| Whole Chicken | 15–20 minutes | 155–160°F | No (to keep skin crisp) |
| Chicken Breasts | 5–10 minutes | 160°F | Optional (lightly) |
| Thighs, Legs, & Wings | 5–10 minutes | 170–175°F | Optional (lightly) |
| Chicken Tenders | 3–5 minutes | 160°F | No |
| Stuffed Whole Chicken | 20+ minutes | 155–160°F (breast) | No |
These guidelines help ensure your chicken is rested properly, as explained further below.
How to Rest Chicken
To apply carryover cooking effectively, remove the chicken from heat when the thickest part hits 155–160°F. The residual heat will bring it up to the safe 165°F. Place the chicken on a warm cutting board or plate near the stove to retain heat. You can preheat the cutting board by running hot water over it beforehand.
Avoid covering whole roasted chickens with foil. While tenting can help keep the chicken warm, it traps steam, which can make crispy skin soggy. Dan Souza, Editor in Chief at Cook’s Illustrated, highlights that resting meat for just 10 minutes reduces juice loss by up to 60%. In fact, test kitchen experiments found that a whole roasted chicken stayed above 140°F internally for 20 minutes without tenting.
When to Adjust Chicken Resting Times
Resting times may need adjustment based on the size of the cut and cooking temperature. Larger cuts require longer resting periods, while thinner pieces, like cutlets or tenders, only need a short rest since they cool quickly.
For high-temperature roasting, such as at 450°F, the outer muscle fibers contract more intensely, leading to greater juice loss if carved too soon. In these cases, waiting at least 10 minutes is essential to retain moisture.
Stuffed chickens require extra attention – both the meat and stuffing must hit 165°F. This may mean adding 15–30 minutes to the total cooking time and extending the resting period. Always check the thickest part of the breast and the innermost areas of the thigh or wing to ensure they’ve reached a safe temperature.
Pork Resting Checklist
Pork benefits from resting just like steak or chicken, but the ideal resting time depends on the size and thickness of the cut.
Pork Resting Times by Cut
For thin pork chops (less than 1 inch thick), a 3–5 minute rest allows the juices to redistribute. Thicker chops (1 inch or more) need a bit longer – around 5–7 minutes. Pork tenderloin benefits from a rest of 10–15 minutes, while pork loin roasts should rest for 10–20 minutes. Larger cuts, like pork shoulder or fresh ham, typically need 15–30 minutes. For very large cuts intended for pulling, such as pork shoulder, resting can extend up to an hour.
| Pork Cut | Recommended Resting Time | Initial Pull Temp | Final Safe Temperature |
|---|---|---|---|
| Thin Pork Chops | 3–5 minutes | 142–145°F | 145°F |
| Thick-Cut Chops | 5–7 minutes | 140–142°F | 145°F |
| Pork Tenderloin | 10–15 minutes | 140–142°F | 145°F |
| Pork Loin Roast | 10–20 minutes | 138–140°F | 145°F |
| Large Roasts (Shoulder, Leg) | 15–30 minutes (up to 60 minutes for pulled pork) | 140°F (or 195–205°F for pulled pork) | 145°F (or 195–205°F for pulled pork) |
| Fresh Ham | 10–15 minutes | 140–142°F | 145°F |
Pork Temperature and Safety
Just like other meats, pork requires careful attention to temperature. Fresh cuts of pork should reach a final safe temperature of 145°F, followed by a mandatory 3-minute rest. During this time, carryover cooking can raise the internal temperature by 3–5°F, ensuring the meat reaches a safe level without becoming dry.
"The safe internal pork cooking temperature for fresh cuts is 145°F." – National Pork Board
Ground pork, however, is an exception to this rule. It must be cooked to 160°F and does not require resting.
How to Rest Pork
To get the best results, remove pork from heat when it’s 3–5°F below the target temperature (pull at 140–142°F for a final 145°F). Place the meat on a warm surface to prevent it from cooling too quickly. For larger roasts, loosely tent the pork with foil to keep it warm while still allowing air circulation.
If you’ve roasted the pork at high heat (around 450°F), it will need a longer rest. High temperatures cause the muscle fibers to contract more, meaning the meat needs extra time to relax and retain its juices. Studies show that pork roasted at 450°F lost 7.9% of its weight in juices after a 10-minute rest, compared to just 4.3% for pork roasted at 250°F.
Quick Reference and Troubleshooting
All Resting Times at a Glance
Steak needs 3–5 minutes of resting for thinner cuts, while thicker ones can take up to 20 minutes. Chicken calls for about 5 minutes for smaller pieces like breasts or thighs, but a whole roasted chicken benefits from a rest of 15–20 minutes. Pork follows a similar pattern: thin chops rest for 3–5 minutes, whereas larger cuts like roasts or loins need 10–20 minutes.
The size of the meat dictates the resting time. Thin cuts cool down quickly and only need a short rest, while larger roasts retain heat longer and require more time. Since temperature retention depends on the thickness of the cut, adjust the resting time accordingly. Check out the common mistakes below to avoid compromising these ideal resting periods.
Common Mistakes and How to Fix Them
Cutting into meat too soon can drain away those flavorful juices. When you slice immediately after cooking, the internal pressure forces the juices to spill onto the cutting board instead of staying in the meat.
Wrapping too tightly with foil is another common error. This traps steam and can ruin a crisp, seared crust or skin by making it soggy. If you must tent a roast, keep the foil loose and avoid sealing the edges around the plate. For chicken or turkey, it’s best to skip the foil entirely to maintain crispy skin.
A meat thermometer is your best friend to avoid guesswork. Remove the meat from heat when it’s 5–15°F below your target temperature to account for carryover cooking. Keep an eye on the core temperature during the resting period and slice the meat as soon as it reaches your desired temperature, rather than relying on a fixed time guideline.
Tips for Using This Checklist
To streamline your cooking process, plan resting times into your schedule from the beginning. For example, if dinner is at 6:00 PM and your roast needs 20 minutes to rest, aim to remove it from the oven by 5:40 PM. This way, you’ll have perfectly juicy meat ready to serve at the right time.
Coordinate this checklist with your meal prep to ensure side dishes are ready to serve alongside your main course, all at the ideal temperature. Proper timing makes all the difference!
FAQs
Why should you let meat rest after cooking?
Letting meat rest after cooking is an essential step if you want the best flavor and texture. When meat cooks, the heat forces its juices toward the center. By allowing it to rest, those juices have a chance to redistribute evenly throughout the meat, making every bite juicier and more tender.
Resting also plays a role in carry-over cooking – a process where the internal temperature of the meat continues to rise slightly after being removed from the heat. This ensures your steak, chicken, or pork reaches the ideal level of doneness without the risk of overcooking.
What is carryover cooking, and how does it affect the final temperature of meat?
Carryover cooking happens when meat’s internal temperature keeps rising even after it’s taken off the heat. This occurs because the heat from the outer layers of the meat moves inward. For smaller cuts, the temperature might climb by 3–8°F, while larger cuts can see an increase of 5–15°F, depending on their size and the cooking temperature.
This is why it’s crucial to pull the meat off the heat just before it hits your target doneness. Letting it rest not only stabilizes the temperature but also allows the juices to redistribute, giving you a juicier, more tender, and flavorful dish.
What are the recommended safe internal temperatures for different meats?
To make sure your meals are both safe to eat and delicious, stick to these recommended internal temperatures when cooking meat:
- Beef, pork, lamb, and veal (whole cuts): Cook to 145°F, then let it rest for 3 minutes.
- Poultry (chicken, turkey, etc.): Aim for 165°F.
- Ground meats (like beef or pork): Heat to 160°F.
- Fish and shellfish: Cook to 145°F.
A meat thermometer is your best friend in the kitchen for checking temperatures. And don’t skip the resting time – it allows the juices to redistribute, making the meat juicier and more flavorful.