
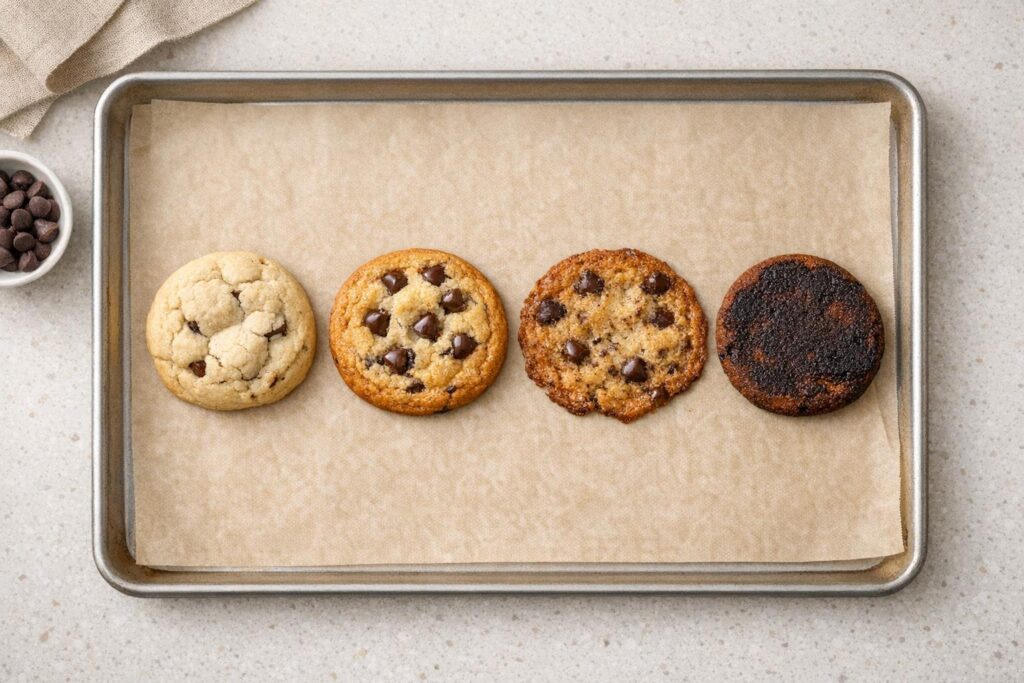
Baking cookies isn’t always as simple as it seems. From cookies spreading too much to burnt bottoms or dry, crumbly textures, small mistakes can lead to disappointing results. But here’s the good news: most cookie issues have straightforward fixes.
Key Takeaways:
- Measure accurately: Use a kitchen scale for flour to avoid adding too much (25–30% extra can happen with cups).
- Control temperature: Keep butter at 65–67°F for the right consistency, and use an oven thermometer to ensure proper baking temperatures.
- Chill the dough: Prevent spreading by refrigerating dough for at least 10–15 minutes.
- Use proper tools: Light-colored aluminum baking sheets and parchment paper can prevent burnt bottoms.
- Avoid overmixing: Stop mixing as soon as the dough comes together to prevent tough cookies.
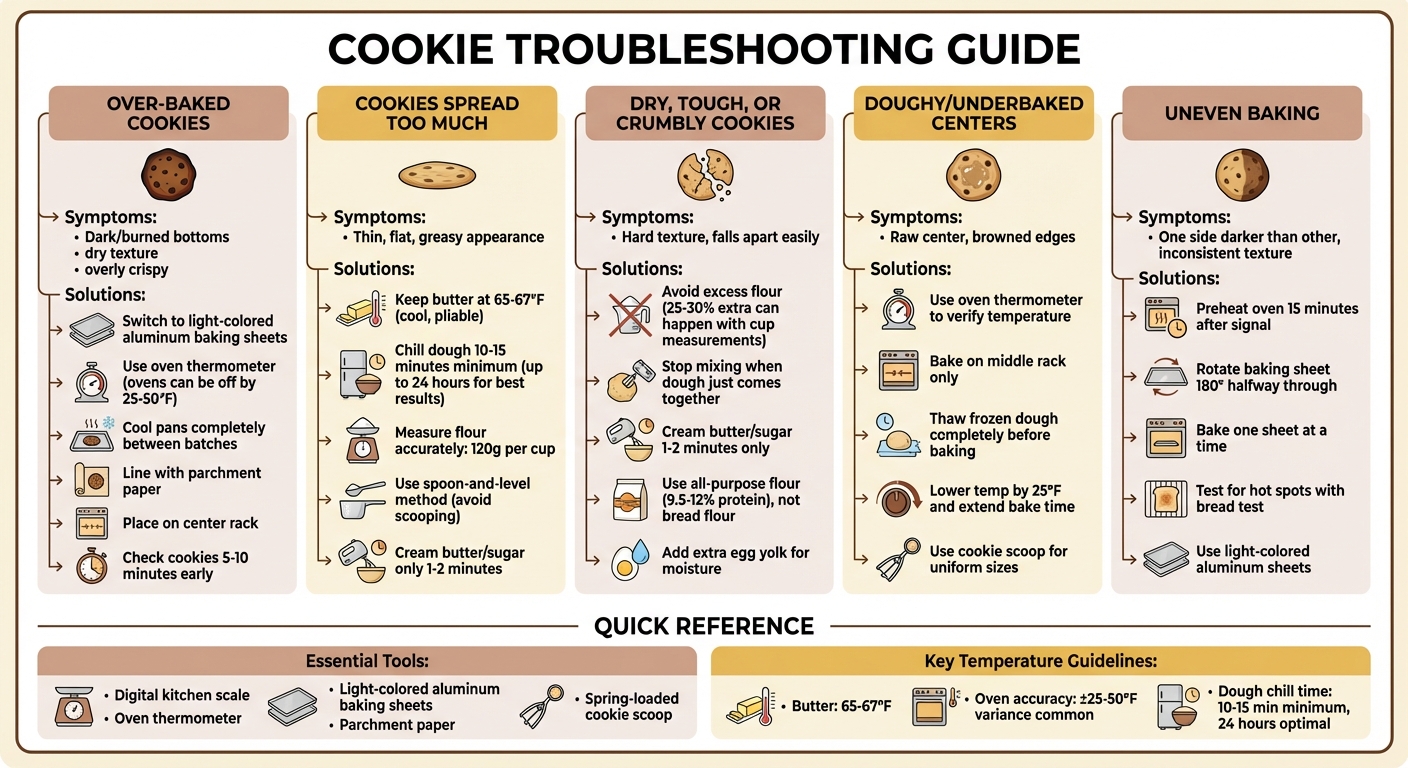
Cookie Troubleshooting Guide: Common Problems and Solutions
10 Most Common Cookie Baking Mistakes
sbb-itb-663e316
How to Fix Over-Baked Cookies
Over-baked cookies often result from three key factors: oven temperature, baking time, and the type of pan used. Even small missteps can lead to dry, burnt cookies. Fortunately, once you pinpoint the cause, the solutions are simple. Here’s how to address common over-baking problems.
Dark or Burned Cookie Bottoms
One common culprit for burnt bottoms is the type of baking sheet. Dark or nonstick pans absorb more heat than they reflect, which can cause the bottoms to brown or burn faster than the tops.
"All of the dark nonstick cookie sheets we’ve tested consistently overbrown the bottoms of cookies." – America’s Test Kitchen
Switch to light-colored aluminum baking sheets, which reflect heat more evenly. If your cookies still end up with burnt bottoms, check your oven’s temperature using a standalone thermometer. Many ovens run hotter or cooler than their settings indicate – sometimes by as much as 25°F.
Another tip? Avoid placing dough on a baking sheet that’s still warm from the last batch. Residual heat can cause the butter in the dough to melt too quickly, leading to over-browning. Let your pans cool completely between batches, or speed up the process by running the underside under cool tap water.
Lining your baking sheets with parchment paper can also help. It creates a barrier between the dough and the hot surface, reducing the risk of burning. And skip greasing the pan – this can cause cookies to spread too much and brown excessively.
Preventing Uneven or Over-Baked Tops
Once you’ve tackled the issue of burned bottoms, it’s time to focus on the tops. Uneven or over-baked tops are often caused by poor rack placement or inconsistent oven heat.
Cookies bake unevenly when placed too close to a heating element or in an oven hot spot. To ensure even baking, always use the center rack, where the cookies are equidistant from the top and bottom heat sources. If one side of the cookies browns faster than the other, rotate the baking sheet 180° halfway through baking.
Timing is another critical factor. Start checking your cookies 5 to 10 minutes before the recipe’s suggested bake time. Remove them as soon as the edges are set and golden, even if the centers seem slightly underdone – they’ll continue to firm up as they cool. Transfer the cookies to a wire rack immediately to stop the cooking process.
These adjustments can make a big difference in achieving evenly baked, delicious cookies every time.
| Cause | Solution |
|---|---|
| Dark/Nonstick Baking Sheets | Use light-colored aluminum pans |
| Oven Rack Too Low | Place cookies on the center rack |
| Oven Running Hot | Use a thermometer and adjust the temperature |
| Greased Baking Sheet | Use parchment paper or silicone baking mats |
| Reusing Hot Pans | Cool pans to room temperature between batches |
| Excessive Baking Time | Check cookies 5 minutes early; use a timer |
Why Cookies Spread Too Much and How to Fix It
Cookies that spread excessively often fall victim to a few common issues: butter that’s too warm, dough that hasn’t been chilled, or not enough flour to give the dough structure. When butter melts too quickly in the oven, the edges of the cookie can’t set in time, causing the dough to spread outward instead of holding its shape.
Butter Temperature and Dough Chilling
The temperature of your butter plays a huge role in how your cookies turn out. If the butter is too soft, it behaves more like a liquid fat in the oven, causing the dough to spread too quickly before the cookie structure can form. The sweet spot for butter is between 65–67°F – it should feel cool to the touch, hold its shape, and give slightly under light pressure. Butter that’s too warm will feel greasy and lead to spreading.
"Too-warm butter will melt and spread in the oven before your cookies set. Room-temperature butter is pliable but cool to the touch."
– Dawn, Baker’s Hotline Expert, King Arthur Baking
To counteract this, chill your dough in the refrigerator for 10–15 minutes to firm it up. This step is especially useful if you’ve accidentally over-creamed your butter and sugar. Over-creaming, which happens when you beat the mixture for more than 1–2 minutes, can incorporate too much air, causing cookies to puff up and then collapse into flat discs. Chilling the dough helps mitigate this by solidifying the fats and allowing the flour to hydrate, which strengthens the dough.
Even a short chill of 30–60 minutes can make a noticeable difference, but refrigerating the dough overnight (up to 24 hours) can enhance the flavor and yield thicker, bakery-style cookies. For convenience, portion the dough into balls before chilling. That way, you can pop them straight into the oven without wrestling with rock-hard dough.
Accurate Flour Measurement
Flour is the backbone of cookie structure, and getting the measurement right is essential. Without enough flour, the dough can’t hold its shape as the butter melts and the sugar liquefies, leading to cookies that spread into puddles.
Using a digital scale ensures precision. A cup of flour can weigh anywhere from 120 g to 160 g depending on how it’s packed, but King Arthur Baking defines their standard cup of all-purpose flour as exactly 120 g.
"Make sure there is enough flour to absorb the fat; otherwise, they will melt into puddles in the oven."
– Kierin Baldwin, Chef-Instructor, Institute of Culinary Education
If you don’t have a scale, use the spoon-and-level method. Fluff the flour in its container, gently spoon it into your measuring cup until it’s overflowing, and then level it off with the back of a knife. Avoid scooping directly from the bag, as this can pack the flour tightly and lead to inconsistent results.
How to Fix Dry, Tough, or Crumbly Cookies
Dry, tough, or crumbly cookies often happen because of too much flour, overmixing, or not enough fat. These mistakes throw off the balance of moisture and binding, leading to disappointing results.
Excess Flour and Over-Mixing
One common culprit for dry cookies is using too much flour. When there’s an overload of flour, it soaks up the dough’s moisture and fat, leaving cookies dry and crumbly.
"Using too much flour is a key reason for rigid cookies. Excess flour leads to less moisture and fat for a chewy, soft texture."
– Anna Brooks, CooksDream
The type of flour you choose also makes a difference. All-purpose flour, with its 9.5–12% protein content, works well for cookies. But using bread flour, which has 11.5–14% protein, can make cookies tougher since the higher protein level encourages more gluten to form. For softer cookies, try replacing some all-purpose flour with cake flour or even a bit of cornstarch to reduce gluten development.
Overmixing the dough is another issue. Once you add the dry ingredients, mix just until you no longer see streaks of flour. Mixing too much activates gluten strands, which is great for bread but makes cookies tougher.
"Over mixing the dough allows gluten strands to form, which will create a very tough, chewy dough."
– Bethany Moncel, Professional Blogger and Cookbook Author, The Spruce Eats
To avoid this, stop mixing as soon as the dough comes together. If you’re mixing by hand, use a gentle folding motion instead of vigorous stirring.
The creaming process is equally critical and sets the stage for soft, tender cookies.
Proper Butter Creaming
Balancing flour and fat is important, but the way you cream butter and sugar also affects texture. Creaming these ingredients creates tiny air pockets that give cookies a lighter structure and prevent them from getting dense or tough. Ideally, cream the butter and sugar for 1 to 2 minutes on medium-high speed.
If you don’t cream enough, the mixture will be gritty and dense, leading to heavy cookies with muted flavors. On the other hand, over-creaming can introduce too much air and warm the butter. This often causes cookies to puff up in the oven and then collapse into flat discs.
"Remember you only need to beat [butter and sugar] for 1 to 2 minutes on medium-high speed. Overbeating can cause the butter to warm too much and weaken its ability to hold air."
– Tessa Arias, Professionally Trained Chef and Author, Handle the Heat
For best results, make sure your butter is at cool room temperature – about 67°F. When pressed, it should give slightly but not feel greasy or overly soft. If the butter is too warm, your cookies might spread too much and lose their ideal texture.
How to Fix Doughy or Underbaked Cookies
There’s nothing worse than biting into a cookie only to find the center raw and doughy. This common problem often stems from an inaccurate oven temperature or baking frozen dough that hasn’t fully thawed.
Oven Temperature and Rack Placement
Did you know your oven’s thermostat might not be as reliable as you think? It’s not unusual for home ovens to be off by 25°F – or even more – compared to the set temperature.
"Oven temperatures can be off by as much as 50 degrees. Always use an oven thermometer to tell you what’s really going on inside."
– America’s Test Kitchen
If your oven runs cold, the cookie edges might brown while the center stays underbaked. On the flip side, an oven that’s too hot can overcook the edges before the center has a chance to bake through. The solution? Invest in a standalone oven thermometer to check the actual temperature before baking.
Rack placement also plays a big role. The middle rack is your best bet for even heat distribution. Baking on the top or bottom racks exposes cookies to direct heat, which can cause uneven results. To ensure consistency, bake one sheet at a time on the middle rack, and if your oven has hot spots, rotate the pan halfway through baking.
"Ideally, only bake one cookie sheet at a time, placing it on a rack in the middle of the oven."
– Quaker Oats
If your cookies regularly have browned edges but doughy centers, try lowering the oven temperature by 25°F and extending the bake time slightly. This tweak gives the centers more time to cook without overbaking the edges.
Using Thawed Dough
Frozen or partially frozen dough can also lead to raw centers. When dough goes straight from the freezer to the oven, the edges often cook and brown before the center has had a chance to thaw and bake.
"Bake from frozen, adding an additional minute or two to the cooking time or bring to cool room temperature and bake as directed by the recipe. The colder the dough, the thicker the cookies."
– Tessa Arias, Professionally Trained Chef, Handle the Heat
To avoid this, let frozen dough thaw completely until it reaches room temperature for even baking. If you prefer to bake directly from frozen, just add one or two extra minutes to the baking time. Another tip? Use a spring-loaded cookie scoop to portion the dough into uniform sizes. This ensures all your cookies bake evenly, avoiding the frustration of some being overcooked while others stay underdone.
Oven and Pan Usage Tips
Fine-tuning how you use your oven and baking pans can make a big difference in the consistency of your cookies. Here’s how to get it right.
Oven Calibration and Preheating
Did you know your oven’s thermostat might be lying to you? Many home ovens are off by 25°F to 50°F from the temperature you set. That means your "350°F" oven could actually be running at 300°F or 400°F, which can completely throw off your baking.
The solution? Use an oven thermometer – it’s an inexpensive tool (under $10) that can save your cookies from disaster. Place it in the center of the middle rack, and give your oven 15 extra minutes after the preheat signal to make sure the temperature is steady.
"My oven takes 15 minutes to preheat fully, and once I learned that and started waiting before putting anything in it my baking improved dramatically."
– Tessa Arias, Founder, Handle the Heat
Oven hot spots are another common culprit for uneven baking. You can test for them by checking the temperature in different areas or trying the bread test: place nine slices of white bread on a baking sheet, bake at 400°F for 10 minutes, and see which pieces brown first. If you find hot spots, rotate your baking sheet 180 degrees halfway through baking to even things out.
Once your oven is calibrated and ready, it’s time to focus on your baking sheets.
Choosing the Right Baking Sheets
The type of baking sheet you use can make or break your cookies. Here’s how different materials and colors affect your results:
- Light-colored aluminum sheets: These are ideal for most cookie recipes because they reflect heat evenly. This prevents the bottoms from burning before the centers are fully baked, giving you chewy, perfectly baked cookies.
- Dark non-stick sheets: These absorb heat more intensely, which can cause cookies to brown or burn too quickly on the bottom. Cookies baked on these sheets often turn out overly crispy and may need extra time to set properly.
- Insulated baking sheets: These have two layers of metal with air in between, which slows down heat transfer. While this might sound helpful, it actually causes the dough to spread too much before it sets, leading to flat, pale cookies with uneven edges.
"Because insulation slows heat transfer, cookies from these pans often didn’t get heat from below quickly enough to set them before they spread."
– Carolyn Grillo, America’s Test Kitchen
Here’s a quick reference to help you choose:
| Pan Type | Effect on Cookies | Ideal Use |
|---|---|---|
| Light Aluminum | Even browning; chewy centers; prevents burning | Most cookie recipes |
| Dark Non-Stick | Faster browning; crispy or burnt bottoms | Extra-crunchy cookies |
| Insulated | Flat, wide cookies; pale color; uneven edges | Best avoided for most cookies |
Ingredient Ratios and Baking Techniques for Better Cookies
Perfecting your cookie game involves more than just fixing common issues – it’s about nailing ingredient ratios and mastering mixing methods to get consistent, delicious results every time.
Correct vs. Incorrect Ingredient Ratios
The balance of ingredients can make or break your cookies. Get it wrong, and you might end up with cookies that are too flat, too dry, or just plain disappointing.
One common mistake? Measuring flour by volume instead of weight. Scooping flour directly from the bag can pack in 25–30% more than you need, throwing off your recipe. For accuracy, use a digital kitchen scale or the spoon-and-level method.
Another culprit is expired leavening agents, which lead to dense, flat cookies. Baking soda, for example, is four times stronger than baking powder, so precise measurements are crucial. Replace these agents every six months to keep them fresh.
Here’s a quick cheat sheet for common ingredient issues and how to fix them:
| Ingredient Issue | What Goes Wrong | Practical Fix |
|---|---|---|
| Too Much Flour | Hard, dry, cakey texture; lack of spread | Use a scale or the spoon-and-level method for accuracy |
| Too Little Flour | Thin, flat, greasy cookies [1,4] | Add 1–2 tablespoons of flour and chill the dough |
| Too Much Sugar | Crumbly, overly dark edges; excessive spread | Measure sugars carefully and use the correct type |
| Too Little Sugar | Pale, bland, tough cookies [6,19] | Don’t reduce sugar by more than 1/4 cup |
| Too Much Fat | Thin, flat, oily cookies | Keep butter cool and pliable (around 67°F) |
| Expired Leavening | Dense, heavy cookies | Replace leavening agents every six months and test their freshness |
Sugar ratios also play a huge role. More brown sugar (thanks to its molasses content) makes cookies chewier and moister, while granulated sugar creates a crispier texture [28,29]. Want even richer cookies? Add an extra egg yolk. For crispy edges, try adding a tablespoon of milk or corn syrup to encourage spreading and caramelization.
"The moisture in brown sugar promises an extra soft and chewy baked cookie."
– Sally McKenney, Author
Once your ingredients are perfectly balanced, it’s time to focus on mixing and baking techniques.
Mixing and Baking Techniques
The way you mix your ingredients can be just as important as what’s in the bowl. Start by creaming butter and sugar for 1–2 minutes at medium-high speed. This creates a smooth base without over-aerating, which can lead to puffed-up cookies that collapse later. Keep your butter at around 67°F to prevent over-spreading.
Avoid over-mixing once you add the flour – this can develop gluten, making your cookies tough. Chilling the dough for at least 30 minutes (or even up to 72 hours) helps solidify the fat, reduces spreading, and enhances flavor.
For uniform cookies, use a spring-loaded scoop to portion the dough. Arrange them in staggered rows on your baking sheet (like a 3-2-3 pattern) to improve air circulation. Bake one sheet at a time in the center of the oven for even heat distribution.
When the cookies come out of the oven, let them rest on the baking sheet for five minutes before transferring to a wire rack. If you want chewy centers, try tapping the baking sheet on the counter right after baking to deflate the cookies slightly. These small adjustments can make a big difference in the final product.
Conclusion
Mastering cookie troubleshooting starts with getting the basics right. Success in baking often hinges on precise measurements, proper temperature control, and correct technique. For example, using a digital kitchen scale ensures you measure flour accurately, while an oven thermometer helps confirm your oven’s actual temperature – important, since home ovens can sometimes run 25°F to 50°F off.
The tools you use also make a big difference. Light-colored aluminum baking sheets help distribute heat evenly and prevent burnt bottoms. A spring-loaded cookie scoop ensures your cookies are uniform in size, which promotes even baking. Handling ingredients properly is equally important. Butter should be at a cool room temperature (about 67°F), and chilling your dough for at least 30 minutes helps control spreading while enhancing flavor. When adding flour, mix just enough to combine – over-mixing can develop too much gluten, leading to tough cookies.
Addressing common cookie issues becomes easier with this knowledge. If your cookies spread too much, it could be due to overly warm butter or a low oven temperature. Burnt bottoms might point to dark pans or baking on the wrong rack. Crumbly cookies? Double-check your flour measurement and consider adding an extra egg yolk for moisture.
FAQs
How do I know when cookies are done if the centers look soft?
When baking cookies with soft centers, remember they often continue to bake as they cool. The key is to check for lightly browned edges and centers that are set but still slightly soft with just a hint of shine.
For drop cookies, the edges should have a deeper color, while the centers stay pale and puffy. On the other hand, cutout cookies should have dry-looking edges, with the bottoms just beginning to turn golden. These visual cues help ensure your cookies are perfectly baked every time.
Can I fix cookie dough that’s already too sticky or runny?
Yes, you can fix sticky or runny cookie dough, and it’s easier than you might think. This issue usually happens when the ingredients aren’t balanced, the mixing process is off, or the dough is too warm. To fix it, try adding a bit more flour or another dry ingredient to soak up the extra moisture. Another trick? Chill the dough in the fridge – this firms it up and makes it much easier to work with. Paying attention to precise measurements and keeping an eye on ingredient temperatures can also go a long way in preventing this problem altogether.
What changes make cookies chewier versus crispier?
To get chewier cookies, try melting the butter instead of creaming it, swap in brown sugar for extra moisture, and pull them out of the oven a little early to keep them soft. Prefer crispier cookies? Bake them a bit longer or use a bit more flour in the dough. These simple tweaks to your ingredients and baking method can make a big difference, giving you the texture you want – chewy or crispy.