

Want light, fluffy cakes and cookies? It all starts with creaming butter and sugar. This simple but essential baking step creates tiny air pockets in the butter, which help your baked goods rise and achieve a soft texture. Here’s what you need to know:
- What is creaming? Beating softened butter and sugar together until pale, fluffy, and airy.
- Why does it matter? Without it, cakes and cookies can turn out dense and flat, as leaveners like baking powder only expand existing air pockets.
- Key tips:
- Use butter at 65°F–67°F for the best results.
- Granulated sugar works best; avoid powdered sugar.
- Cream for 3–5 minutes with a mixer or longer by hand.
- How to tell it’s done: The mixture should look pale, fluffy, and smooth, with no gritty texture.
Mastering this technique ensures better texture, even baking, and consistent results every time. Ready to perfect your creaming skills? Let’s dive in.
Understanding the Creaming Process
What Does Creaming Butter and Sugar Mean?
Creaming is a technique in baking where softened butter and sugar are beaten together to incorporate air into the mixture. This process creates a light, fluffy base by forcing air into the fat.
As the mixture is beaten, sugar crystals cut through the butter, forming countless tiny air pockets. These air pockets create a delicate network within the butter, which later helps support the structure of your baked goods, like cakes or cookies.
For the best results, butter should be at a temperature of 65°F to 67°F. At this temperature, it’s soft enough to trap air but firm enough to hold the air pockets. If the butter is too cold, the sugar won’t create the necessary pockets, and if it’s too warm – above 68°F – the butter may start to melt, causing the pockets to collapse. This step is essential because those air pockets play a crucial role in the baking process.
Why Creaming Matters in Baking
When it comes to chemical leaveners like baking powder and baking soda, their function is to expand the air pockets created during creaming, not to form new ones. Without proper creaming, these leaveners have little room to work, which often leads to dense and heavy baked goods.
"The air bubbles created by creaming actually provide a space for the gas created by baking soda and/or baking powder to release and expand." – Tessa Arias, Professionally Trained Chef and Author, Handle the Heat
In some cakes with a high level of aeration, up to 80% of their volume can come from these air pockets. Beyond adding volume, creaming ensures an even distribution of ingredients throughout the batter. This results in a uniform texture and gives baked goods the fine crumb and airy, tender quality that defines top-notch baking.
Preparing Butter and Sugar for Creaming
Choosing the Right Butter
When it comes to baking, unsalted butter is the go-to option. Why? It allows you to control the salt content in your recipe with precision. Salted butter, on the other hand, varies in salt levels depending on the brand, which could throw off the flavor balance in your baked goods.
"Using unsalted butter means you know exactly how much salt is in your recipe, giving you more control over the balance of salt and other flavors in the final product." – Nancy Mock, Taste of Home
Stick butter is your best choice for creaming. Unlike tub butter or oils, solid and pliable stick butter is ideal for trapping air. The butter should be at its sweet spot – between 65°F and 67°F. At this temperature, it’s soft enough to incorporate air but still firm enough to maintain its structure. A quick test: press it lightly with your finger. It should feel like clay, yielding slightly without becoming greasy. Avoid melted butter entirely, as it won’t trap air effectively.
To get your butter to the right temperature, let it sit out on the countertop for 30 to 60 minutes. If you’re pressed for time, try cutting the butter into 1-inch cubes or grating it. This speeds up the softening process without altering its texture. Once your butter is perfectly prepped, you’re ready to move on to the sugar – a key player in aeration.
Preparing the Sugar
Granulated white sugar is the classic choice for creaming. Its crystalline structure is perfect for cutting into the butter, creating small air pockets that give your baked goods their light texture. For cakes that need a finer crumb, superfine sugar is a fantastic alternative, as it forms smaller and more numerous air bubbles. If you’re after a moist and slightly richer flavor, you can use brown sugar either on its own or mixed with white sugar.
One sugar to avoid? Powdered sugar. Its ultra-fine consistency doesn’t provide the structure needed to trap air effectively during the creaming process. With the right sugar in hand, you’re all set to create that perfect, airy texture for your baked goods.
Step-by-Step Guide to Creaming Butter and Sugar
Creaming by Hand
If you’re tackling creaming without an electric mixer, get ready for a bit of an arm workout. Start with butter that’s slightly softer than usual – let it sit at room temperature for about two hours. Place the butter and sugar in a large bowl, and begin by beating them together into a smooth paste.
Here’s where technique comes into play: use a sturdy fork and whip with a brisk, whisk-like motion. After a minute or two, switch to a wooden spoon, stirring vigorously and folding the mixture until it lightens in color. While this method won’t create as much airiness as an electric mixer, the mixture should become noticeably smoother.
"Creaming is one of the most important mixing methods used in the entire recipe." – Sarah Phillips, Founder, CraftyBaking
If the butter feels too firm, you can briefly warm the bowl over simmering water, then let it cool before continuing to beat until the mixture becomes fluffy. For a faster and less labor-intensive option, consider using an electric mixer – detailed in the next section.
Creaming with an Electric Mixer
Using an electric mixer makes the process much easier and more efficient. Start by beating the butter alone on low to medium-low speed for 30 to 60 seconds until it’s smooth and creamy. This step ensures the butter is softened and ready for the sugar.
Gradually add the sugar while the mixer is running. Once the sugar is fully incorporated, increase the speed to medium or medium-high (around Speed 3 to 4 on a stand mixer) and continue mixing for 3 to 5 minutes. Pause occasionally to scrape down the sides of the bowl to ensure even mixing.
"If you’re mixing the butter and sugar together for two minutes or less, you’re doing it wrong." – Allison Ferraro, Author, Always Eat Dessert
You’ll know the creaming is done when the mixture looks pale and fluffy, and the sugar feels nearly dissolved when rubbed between your fingers. Ideally, the mixture should reach a temperature between 68°F and 72°F. Always use the paddle attachment on a stand mixer for this task – the whisk attachment isn’t built to handle the density of butter.
sbb-itb-663e316
How to Cream Butter & Sugar | Sally’s Baking
How to Tell If Butter and Sugar Are Properly Creamed
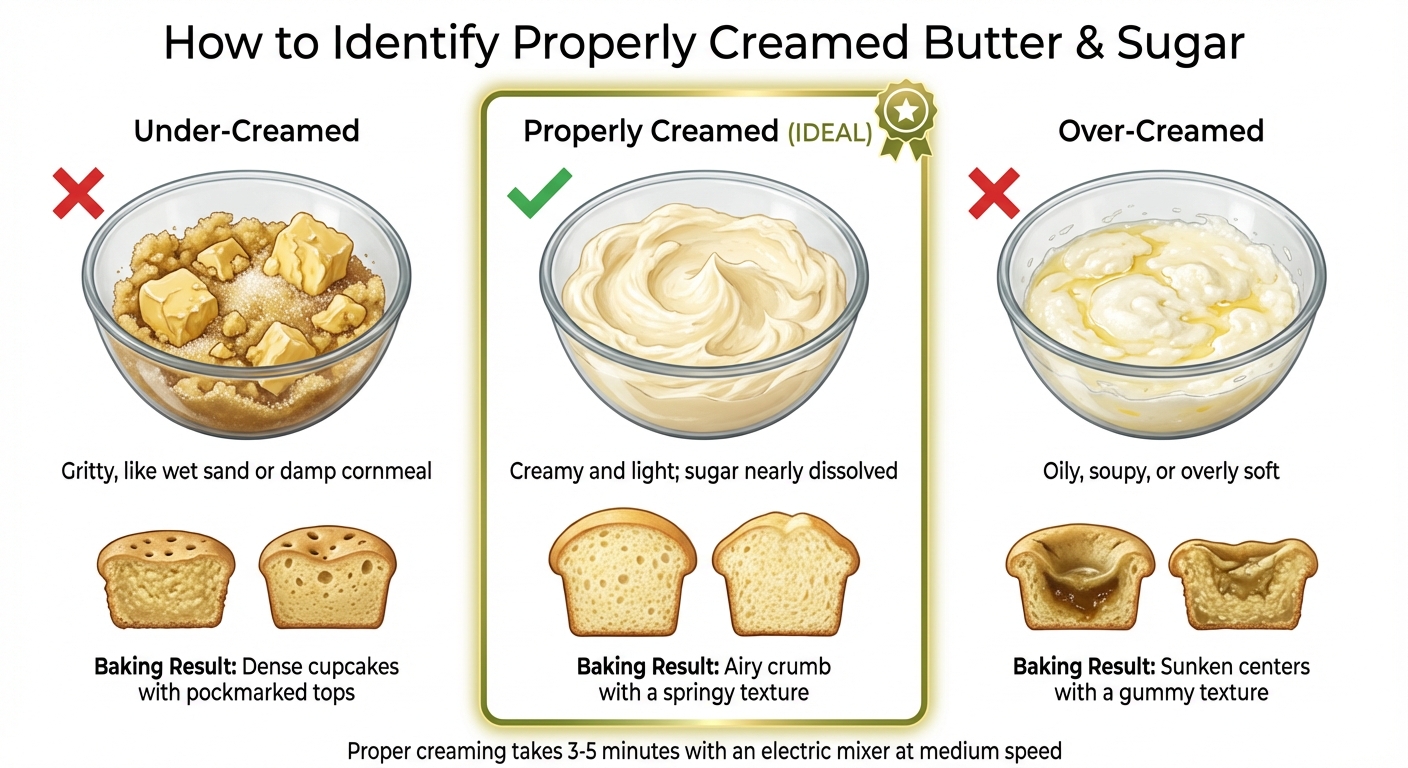
Visual Guide to Properly Creamed Butter and Sugar Stages
Signs of a Properly Creamed Mixture
When mixing butter and sugar, there are some clear indicators that you’ve achieved the perfect consistency for baking. One of the most noticeable signs is a change in color. The mixture should shift from a deep yellow to a pale ivory or very light yellow, showing that air has been incorporated into the blend. You’ll also notice an increase in volume, thanks to this trapped air.
Another clue is the texture. A well-creamed mixture will look fluffy, with light peaks and ridges left behind by the beater blades. It should coat the sides and bottom of the bowl evenly in a thin layer and feel slightly sticky to the touch. When you press it, the mixture should feel moist, airy, and almost dissolved – more like a rich facial cream than gritty sand.
"The mixture is lightened in color, it’s visibly fluffy, and it’s not clinging to the sides of the bowl." – MaryJane Robbins, Employee-owner, King Arthur Baking Company
You can also use the fingerprint test: press your finger into the butter. It should give slightly but not feel greasy.
Once you’ve nailed the texture, it’s important to avoid common mistakes that could throw off your mixture.
Common Mistakes and How to Avoid Them
Getting the right consistency is crucial for producing baked goods with a fine crumb and even texture. For example, a July 2024 experiment by Sally’s Baking Recipes tested vanilla cupcakes with different creaming times. Under-creaming for just one minute resulted in dense cupcakes with pockmarked surfaces. Over-creaming for more than seven minutes caused the cupcakes to rise too quickly in the oven and then collapse, leaving sunken centers. However, creaming for 3–5 minutes until the mixture became pale and fluffy produced cupcakes with a light, airy crumb.
One frequent problem is using butter at the wrong temperature. Butter straight from the fridge is too cold to trap air effectively, while butter that’s too warm (above 68°F) becomes greasy as the air bubbles collapse.
Skipping the step of scraping down the bowl can also lead to issues. Butter clumps that remain unincorporated at the bottom of the bowl may cause holes or uneven textures in your baked goods. To avoid this, pause the mixer a couple of times and use a rubber spatula to scrape down the sides and bottom of the bowl. Additionally, avoid cranking the mixer to its highest speed – medium or medium-high speeds are better, as they prevent friction heat from melting the butter.
Here’s a quick comparison of the stages of creaming to help you identify the ideal consistency:
| Stage | What It Looks Like | What It Feels Like | What Happens When You Bake |
|---|---|---|---|
| Under-creamed | Dark yellow; clumpy with visible chunks | Gritty, like wet sand or damp cornmeal | Dense cupcakes with pockmarked tops |
| Properly Creamed | Pale ivory/yellow; fluffy with peaks | Creamy and light; sugar nearly dissolved | Airy crumb with a springy texture |
| Over-creamed | Nearly white; greasy and curdled-looking | Oily, soupy, or overly soft | Sunken centers with a gummy texture |
If you over-cream your mixture and it starts to look separated and oily, don’t toss it out! You can still repurpose it as a flavored spread – just mix in a bit of cinnamon or honey for a delicious save.
Conclusion
Mastering the art of creaming is a game-changer for anyone looking to elevate their baking skills. This technique is the secret behind light and airy cakes and cookies. By allowing sugar crystals to cut into butter, thousands of tiny air pockets are created – these pockets act as the perfect spaces for gases to expand during baking.
The magic happens when you get the temperature just right. Butter should be between 65°F and 68°F – cool to the touch but soft enough to leave an indent when pressed with your finger. Pay close attention to the visual signs: the mixture should become pale in color, increase in volume by about 50%, and develop a fluffy texture with soft peaks. To maintain these delicate air pockets, use medium to medium-high mixer speeds; too much speed can create friction heat that defeats the purpose.
"In creaming the butter and sugar together, you are using the sugar to aerate the butter and fill it with bubbles that can capture the gasses released by your leavener." – MaryJane Robbins, King Arthur Baking Company
These essential steps are the foundation of successful baking, ensuring your creations rise to perfection.
FAQs
What can I do if my butter is too cold or too soft for creaming?
To properly cream butter and sugar, make sure your butter is softened but not melted – ideally between 60–65°F. If your butter feels too cold, cut it into small cubes and beat it with sugar on medium speed for about 15 minutes until the mixture turns light and fluffy. On the other hand, if the butter is too soft, pop it in the fridge for 5–10 minutes or set the mixing bowl on ice to firm it up. Once your butter reaches the right consistency, beat it with sugar for about 3–5 minutes until the mixture is pale and fluffy.
Tip from Comfy Kitchen: A kitchen thermometer can help you nail the perfect butter temperature for reliable baking results every time.
Can I use a hand mixer instead of a stand mixer to cream butter and sugar?
Yes, you can absolutely use a hand mixer to cream butter and sugar, achieving results similar to a stand mixer. Both tools are designed to incorporate air into the mixture, which is key to creating the light, fluffy texture needed for many baked goods.
Here’s how to do it: Start by softening 1 stick (½ cup) of unsalted butter. Let it sit at room temperature until it’s soft but still holds its shape – avoid letting it melt. Place the softened butter and 1 cup of granulated sugar in a mixing bowl. Begin mixing on low speed to help the sugar blend into the butter, then gradually increase to medium-high speed. Mix for 2–4 minutes until the mixture looks pale, smooth, and fluffy. Keep an eye on it – over-mixing can knock out the air you’ve worked to incorporate, which could affect the final texture of your baked goods.
To ensure even mixing, pause occasionally to scrape down the sides of the bowl with a spatula. With a bit of practice, you’ll master the art of perfectly creamed butter and sugar!
What’s the difference between creaming butter and sugar for cookies versus cakes?
Creaming butter and sugar isn’t just a step – it’s a game-changer for texture in baking. The process introduces air into the mixture, and how that air behaves depends on what you’re making: cookies or cakes.
When it comes to cakes, the trapped air expands as the batter bakes. This expansion gives your cake that light, fluffy crumb and helps it rise into a tender, airy masterpiece. For cookies, creaming does something a little different. It helps the dough maintain its shape and reduces spreading, resulting in cookies that are thicker, chewier, and more satisfying to bite into.
The key to nailing the texture you want? Adjust your creaming time and technique to match the treat you’re baking. It’s a small tweak that makes a big difference!