
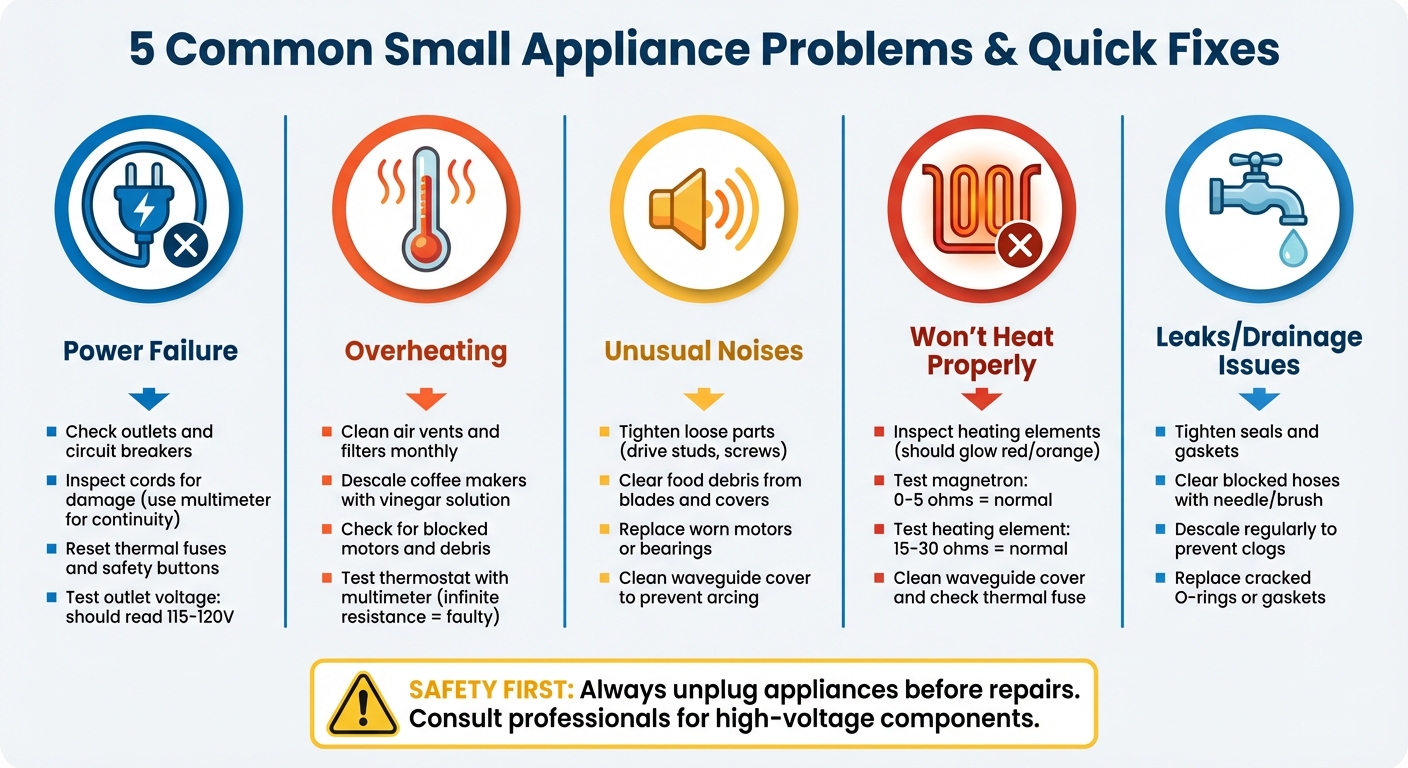
When small kitchen appliances act up, it’s often due to simple, fixable issues. Before spending hundreds on repairs or replacements, try these DIY solutions for common problems like power failure, overheating, strange noises, heating issues, and leaks. Here’s a quick breakdown:
- Power Failure: Check outlets, cords, and reset buttons. Use a multimeter to test for voltage or continuity.
- Overheating: Clean air vents, descale systems, and avoid overloading motors. Test thermostats if needed.
- Unusual Noises: Tighten loose parts, clear debris, and replace worn components like motors or gaskets.
- Heating Issues: Inspect heating elements, test components like magnetrons or fuses, and clean waveguide covers.
- Leaks or Drainage Problems: Tighten seals, clean hoses, and descale appliances regularly to prevent clogs.
Routine maintenance – like cleaning filters, descaling coffee makers, and checking seals – can prevent many of these issues. Always unplug appliances before repairs, and consult a professional for high-voltage components.
5 Common Small Appliance Problems and Quick DIY Fixes
How to Fix Small Appliances
sbb-itb-663e316
1. Power Failure
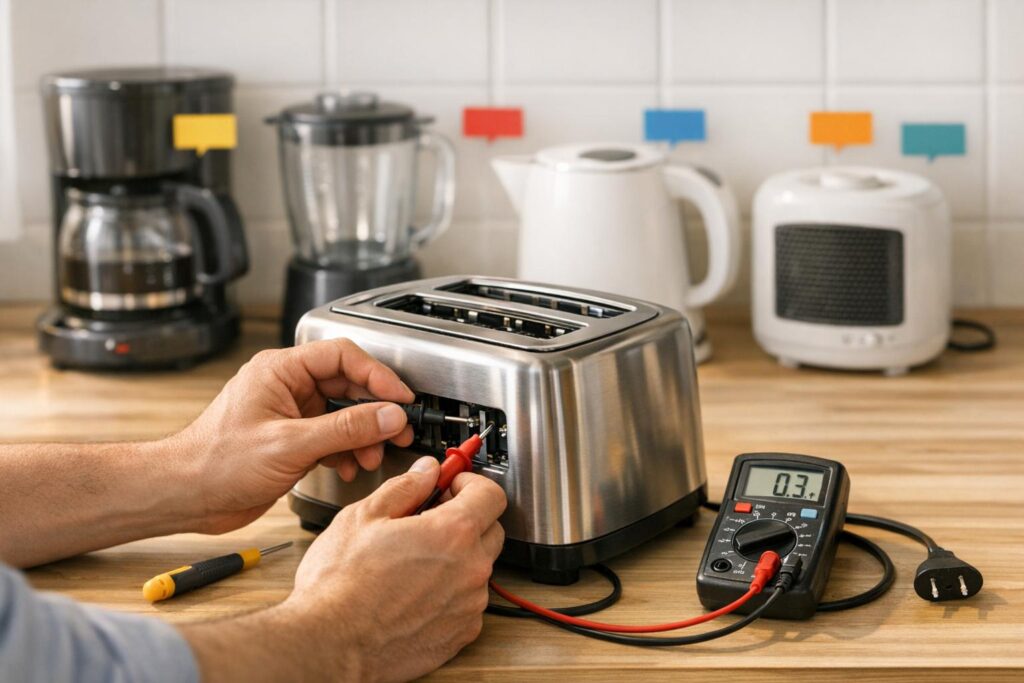
When your coffee maker refuses to start or your blender quits halfway through, the issue is often tied to the power supply. Most small appliances in the U.S. operate on 120-volt electricity. Common culprits for power problems include tripped circuit breakers, damaged power cords, or faulty internal components like thermal fuses.
"Lack of power is often the most basic of problems."
Check the Power Source
Start by testing the outlet. Plug in another device, like a lamp or phone charger, to see if the outlet is working. If nothing powers on, check your home’s breaker box for a tripped switch. In kitchens, look for GFCI outlets with reset buttons and press them if necessary.
A properly functioning 120-volt outlet should read between 115 and 120 volts. If you have a multimeter, test the outlet by inserting the probes into the short (hot) and long (neutral) slots. According to Matt Zieminski from iFixit:
"A reading close to your appliance’s rated voltage (usually 120 or 220 volts) means the voltage is correct. Significantly lower readings indicate a potential power supply problem."
Once you’ve confirmed the outlet is working, move on to inspecting the appliance’s cord and internal wiring.
Inspect the Cord and Internal Wiring
Look for visible damage on the power cord, such as cracks or exposed wires. Even if the cord looks fine, internal breaks can cause intermittent issues. Use a multimeter set to continuity mode to test the cord. Gently flex the cord while testing to detect hidden breaks that appear only when the wire bends.
Reset Breakers or Appliance Safety Features
Modern appliances often include thermal fuses that shut down the motor if it overheats. If your blender suddenly stops, unplug it and let it cool for about 10 minutes before trying again. Some appliances, like garbage disposals, have a reset button on the motor housing – press it once the unit has cooled.
If a circuit breaker has tripped, turn it fully off before switching it back on. For thermal fuses, use a multimeter to check continuity. If the fuse shows infinite resistance, it’s blown and needs replacing with one of the same rating.
Whether to repair or replace the appliance often depends on cost. For example, a basic toaster starts at around $10, while toaster ovens can run up to $75. Weigh the repair cost against the price of a new unit to decide the best course of action.
2. Overheating
If your coffee maker feels scorching hot or your food processor suddenly stops mid-use, overheating could be the issue. This often happens when air vents are clogged with dust, grease, or debris. Overloading the motor or running it for long periods can also lead to overheating. In coffee makers, mineral buildup can place extra strain on the heating system.
Common warning signs include an exterior that’s too hot to touch, a burning smell, or an appliance that shuts off unexpectedly. Darin Detwiler, PhD, a former appliance technician, advises:
"Clean the coils to keep your refrigerator from burning out."
These symptoms mean it’s time to clean and inspect your appliance to avoid further problems.
Clean Air Vents and Filters
Start by unplugging the appliance and letting it cool completely. Use a vacuum or a long-handled brush to clear dust and grease from the air vents. For over-the-range microwaves, remove the grease filter monthly and soak it in hot, soapy water for at least 10 minutes. If the filter is heavily soiled, add 1/4 cup of baking soda to the water. For coffee makers, descale the system by running a cycle with equal parts white vinegar and water, followed by two plain water cycles. Ensure there’s at least two to three inches of space between the appliance and the wall to allow proper airflow.
Check for Blocked or Overworked Motors
If cleaning the vents doesn’t fix the problem, take a closer look at the motor. Appliances like blenders or food processors may stop working if their motors are overburdened. Avoid overloading them with more ingredients than recommended and give the motor short breaks during heavy use. Check that blades and fans can spin freely, as debris can sometimes block their movement. Many appliances feature a thermal fuse that automatically shuts them off when they overheat. Once the appliance cools down, it should work again.
Test or Replace Faulty Thermostats
A malfunctioning thermostat can cause the appliance to overheat by failing to regulate the temperature properly. To test it, grab a multimeter, set it to the ohms or continuity setting, and place the probes on the thermostat’s input and output terminals. If the reading shows infinite resistance when the appliance should be heating, the thermostat is faulty and needs replacement. Be sure to use a replacement with the same amp or ohm rating.
| Symptom | Likely Cause | What to Do |
|---|---|---|
| Sudden shutdown | Overheated motor or tripped fuse | Let it cool and check for obstructions |
| Burning smell | Debris on heating element or parts | Unplug immediately and inspect the appliance |
| Exterior too hot | Blocked airflow or bad thermostat | Clear vents and test the thermostat |
| Slow brewing (coffee maker) | Limescale buildup | Descale with a vinegar solution |
3. Unusual Noises
Unusual noises are often a clear sign that your appliance needs attention. Just like power issues or overheating, addressing these sounds quickly can help you avoid more serious damage and costly repairs.
Strange sounds can reveal specific problems. A grinding noise in a microwave might point to worn-out bearings in the turntable or stirrer motor, while a rattling blender may have loose parts or debris interfering with its blades. Crackling or popping sounds in a microwave often indicate "arcing", which happens when food residue accumulates on the waveguide cover. Dennis Godynuk, Owner of Comfort Appliance Repair, explains:
"Understanding these signs early can be a game-changer in preventing further damage and keeping repair costs low."
Recognizing the type of noise can help you narrow down the issue and take the right steps to fix it.
Tighten Loose Parts
Start by unplugging the appliance and checking for loose components. For example, in a blender, if the motor runs but the blades don’t spin, the drive stud may have come loose. To fix this, flip the blender over to access the drive shaft at the motor’s base. Use a wrench to hold the drive shaft steady, and another wrench to tighten the drive stud by turning it clockwise.
In microwaves, scraping noises often mean the blower wheel or cooling fan blades have shifted. Open the housing and check if the fan blades are rubbing against the casing. If they are, gently push them back into place. Also, inspect screws and panels to ensure nothing has come loose due to vibrations. If the noise continues after securing these parts, it’s time to check for obstructions.
Clear Debris and Obstructions
Debris like food particles and dust can often be the source of unusual sounds. Always unplug the appliance before inspecting it. For blenders, clean any food residue from the blades and assembly. In microwaves, crackling or popping noises usually come from food residue on the waveguide cover. Wipe it clean with a damp cloth to prevent sparks and noise.
Dust buildup can also cause issues. For example, a dusty cooling fan might create humming or whirring sounds. If you have an over-the-range microwave, remove the grease filter underneath and soak it in hot, soapy water for at least 10 minutes. Doing this monthly can prevent fire hazards and noise problems. Finally, ensure air vents are clear and that moving parts, like turntables, can rotate freely without obstruction.
Lubricate or Replace Worn Components
If tightening parts and clearing debris don’t solve the problem, worn components may be to blame. For grinding or screeching noises in a microwave, manually rotate the turntable motor shaft. If it feels stuck or hard to turn, the motor bearings may have seized, requiring a motor replacement. High-pitched or growling sounds could indicate a failing magnetron. Use a multimeter to test it; a working magnetron should show less than one ohm of resistance.
In blenders, a stripped or rounded plastic socket in the blade assembly is another common issue. If you notice this, replace the entire blade assembly.
Important safety tip: Always unplug microwaves before inspecting internal parts. Additionally, have a professional discharge the high-voltage capacitor, as it can retain a dangerous electrical charge even when the appliance is unplugged.
| Noise Type | Likely Cause | What to Do |
|---|---|---|
| Grinding/Screeching | Worn turntable or stirrer motor bearings | Replace the motor |
| Scraping | Dislodged blower wheel or fan blades | Reseat or replace the component |
| Crackling/Popping | Food residue causing arcing | Clean the waveguide cover and cavity |
| Rattling | Loose drive stud or debris in blades | Tighten the stud or clear obstructions |
| High-pitched/Growling | Failing magnetron | Replace the magnetron |
4. Appliance Won’t Heat Properly
If your toaster or microwave powers on but doesn’t heat, the problem likely lies within its internal heating components. In microwaves, the magnetron is responsible for generating the electromagnetic waves that heat food. When the magnetron fails, the appliance may seem to function normally – lights work, the turntable spins, and the fan operates – but the food remains cold.
Stuart Pyburn, Franchise Business Coach at Mr. Appliance, explains:
"There are many parts of a microwave oven that control and adjust the heating process. Any one of them could be broken, leading to your microwave not heating."
For toasters and toaster ovens, broken heating elements are often the culprit. These elements may fail to glow and could show visible signs of damage, such as cracks, blisters, or dark spots. Other potential issues include blown thermal fuses or dirty switch contacts, which can disrupt the electrical flow needed to power the heating elements.
Before diving into repairs, ensure the appliance door is fully closed and that demo mode (if applicable) is turned off, as these settings can prevent proper heating [29, 31]. Once these basics are checked, you can move on to inspecting the heating components.
Inspect Heating Elements
Diagnosing heating issues starts with a visual inspection. For toaster ovens, turn the appliance on and observe the heating elements. Healthy elements should glow red or orange. If they remain dark or appear damaged, they need to be replaced. After unplugging the appliance, use a multimeter set to the RX1 scale to test the element. A functioning heating element typically reads between 15 and 30 ohms. A higher reading or no continuity means the element is faulty and should be replaced.
If you’re dealing with a microwave, check the waveguide cover for food debris. Carbonized particles can cause sparking, which interferes with heating. Clean the waveguide cover and surrounding area with a damp cloth to ensure proper functionality.
For toaster ovens that fail to stay on, inspect the switch contacts. Remove the side panel, and if the contacts appear pitted or discolored, clean them gently with fine sandpaper and isopropyl alcohol.
Test and Replace Faulty Components
If the heating elements pass visual and continuity tests, other internal components could be at fault. Before testing these parts, unplug the appliance and have a qualified professional safely discharge the high-voltage capacitor. Microwaves, in particular, have capacitors capable of storing nearly 5,000 volts, which can be dangerous even after the appliance is unplugged .
Once discharged, use a multimeter on its lowest ohm setting to test the magnetron. A healthy magnetron should show between 0 and 5 ohms of resistance across its terminals. An infinite reading indicates a broken magnetron that needs replacement. To check for a short to ground, place one probe on a terminal and the other on the metal casing. Any reading other than infinity signals a defective magnetron.
Other microwave components that might prevent heating include a burned-out diode, faulty door switches, or a failed transformer. Since these components often involve high-voltage systems, professional repairs are generally recommended. However, for a quick reset, unplug the microwave for one minute, then try heating a cup of water for two minutes at full power.
| Component | Normal Reading | Failure Sign |
|---|---|---|
| Magnetron | 0–5 ohms | Infinite ohms or short to ground |
| Heating Element | 15–30 ohms | Higher than 30 ohms or no continuity |
| Thermal Fuse | Continuity | Open circuit |
5. Leaking or Not Draining
If water is pooling under your coffee maker or your blender isn’t draining properly, you’re likely dealing with drainage or seal issues. These problems often stem from worn-out gaskets, loose connections, or clogs caused by mineral buildup and debris. Coffee makers are particularly prone to this because mineral deposits in the tank and tubing can not only give your coffee an unpleasant taste but also damage seals and lead to leaks, according to Marla Mock, President of Molly Maid.
Blenders, on the other hand, usually leak due to a loose jar base. Start by tightening the jar base. If the leak continues, check the gasket for cracks or loss of elasticity. Be cautious with hot liquids (around 200°F), as they can warp plastic or crack glass, potentially leading to costly replacements exceeding $100.
Inspect and Tighten Seals
The first step is to check all external seals and connections to ensure they’re secure. For coffee makers, pay close attention to the rubber O-rings that seal the connections between the warming plate and the base. These seals can degrade over time from exposure to high heat or harsh cleaning agents. Look for signs like water pooling under the machine or visible cracks in the housing. If your coffee maker has a removable water reservoir, inspect the connection point – damaged O-rings here are a common cause of leaks and might require replacing the reservoir entirely.
Blender leaks typically occur at the jar base. After tightening the base, test it by running the blender with water. If it still leaks, unscrew the base and check the gasket. Replace it if you notice cracks, hardening, or looseness.
Clear Blocked Hoses or Valves
If tightening seals doesn’t fix the issue, the problem might be an internal blockage. In coffee makers, mineral deposits or stray coffee grounds can clog valve pumps and fill tubes, causing water to back up and leak. Use a needle or paperclip to clear small openings and clean water lines with a pipe brush and soapy water. You may need to remove the bottom plate to access internal hoses and confirm that hose clamps are secure.
To prevent future clogs and seal damage, regular descaling is essential. Run a mixture of equal parts white vinegar and water through your coffee maker, followed by two cycles of plain water. However, iFixit advises that "white vinegar will work in a pinch, but it can damage seals and metal components as well as leave its flavor lingering". For routine descaling, consider using a commercial solution like Keurig‘s approved descaler, which costs about $7 for a 14-ounce bottle.
| Appliance | Common Leak Source | Primary Fix |
|---|---|---|
| Coffee Maker | Clogged Valve Pump | Clean with needle/pipe brush; descale |
| Coffee Maker | Damaged O-Ring | Replace reservoir or O-ring |
| Blender | Loose Jar Base | Tighten the base assembly |
| Blender | Faulty Gasket | Inspect for wear; replace gasket |
Conclusion
Taking care of appliance issues as soon as they arise can save both time and money. Most small appliance problems don’t require costly repairs or immediate replacements. Common issues like power failures, overheating, strange noises, heating malfunctions, and leaks can often be resolved with simple steps such as checking the power source, cleaning vents, tightening loose components, inspecting heating elements, or clearing blockages. These fixes are typically quick and easy to handle.
Routine maintenance is key to preventing these minor problems from becoming major headaches. Tasks like descaling your coffee maker monthly, cleaning microwave grease filters, vacuuming refrigerator coils, washing your dishwasher filter, and emptying toaster crumb trays can go a long way in keeping your appliances running smoothly. As Wayne Archer, Technical Expert at Sears Home Services, advises:
Fix any squealing or knocking sounds as soon as possible. Continued use will only cause more damage and a higher repair bill.
Catching and addressing small issues early can help avoid turning a simple fix into an expensive repair.
Before reaching out to a repair technician, try the troubleshooting tips shared here. Your owner’s manual can also be a great resource for specific guidance. Most problems are caused by blockages, loose connections, or regular wear and tear – issues you can often resolve yourself with basic tools and a little time.
Keep your kitchen running smoothly by staying proactive with these fixes and regular maintenance routines.
FAQs
When should I stop DIY and call a pro?
If you’re dealing with high-voltage electricity, gas lines, or water connections, it’s time to set down the tools and call a professional. These situations can be hazardous and are best left to experts. Also, if your appliance is still under warranty, attempting DIY repairs might void it – something you definitely want to avoid. And when repairs start to feel too complex, persistent, or require skills and tools you don’t have, bringing in a professional is the safer route. It can save you from making costly mistakes in the long run.
What basic tools do I need for these fixes?
For fixing small appliances, you’ll usually need a screwdriver, a multimeter or voltage tester, and sometimes a replacement fuse or wire. These tools are essential for safely inspecting electrical connections, testing components, and handling straightforward repairs.
How often should I descale or clean my appliances?
Keeping your small appliances clean is key to keeping them in good working order and avoiding buildup over time. While there’s no one-size-fits-all rule, here are some general guidelines:
- Microwaves: If you use your microwave daily, aim to clean it weekly. If it’s used less frequently, every few weeks should suffice.
- Blenders: Wash the jar thoroughly after each use to prevent residue from hardening.
- Coffee Makers and Toasters: A weekly or bi-weekly wipe-down works well, but consider a deeper cleaning once a month or as needed.
- Other Appliances: Regularly wiping down surfaces can help reduce grime and keep everything looking and functioning better.
Adjust your cleaning schedule based on how often you use each appliance, and you’ll save yourself from dealing with tough stains and buildup later on.