
Managing diabetes can feel overwhelming, but meal prepping simplifies it. By planning and preparing meals in advance, you can control portions, stabilize blood sugar, and save time during busy weeks. Here’s a quick guide to diabetic meal prep:
- Focus on Balance: Use the Diabetes Plate Method – half non-starchy vegetables, one-quarter lean protein, and one-quarter fiber-rich carbs.
- Choose Smart Ingredients: Stock up on lean proteins (chicken, fish, tofu), whole grains (quinoa, brown rice), and healthy fats (avocado, olive oil).
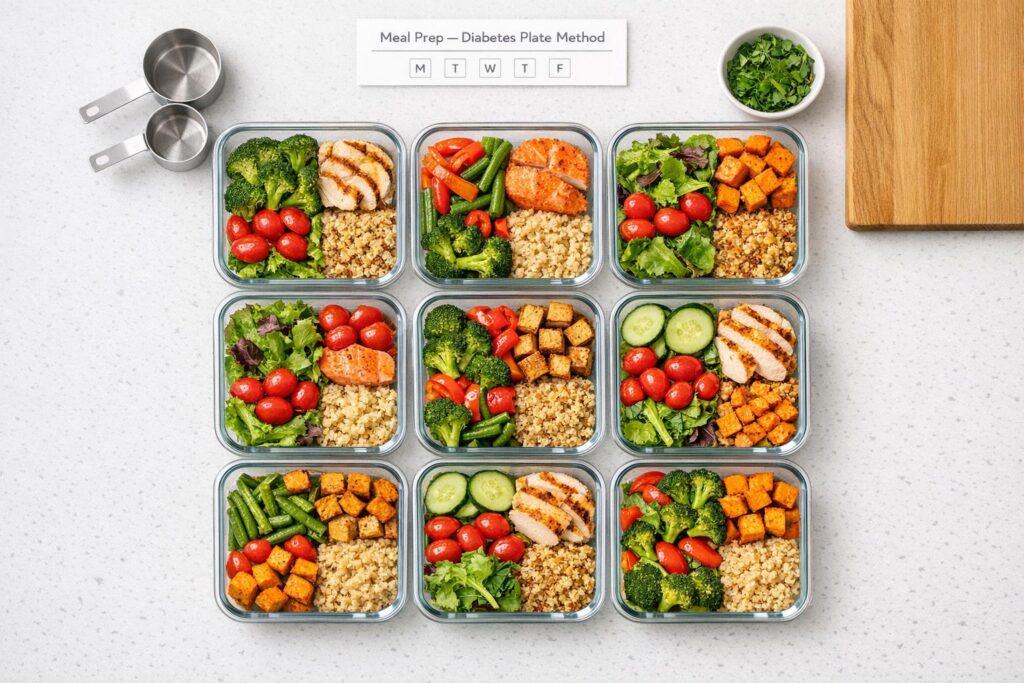
- Batch Cook and Portion: Prepare meals in bulk, divide them into single servings, and store them safely in the fridge or freezer.
- Stick to Carb Targets: Aim for 30–60 grams of carbs per meal and 15 grams per snack to prevent blood sugar spikes.
- Reheat Safely: Always heat food to 165°F and store meals for 3–4 days in the fridge or up to 3 months in the freezer.
Meal prepping not only supports blood sugar control but also helps you avoid processed foods and stay consistent with your dietary goals. Start small – prep a few meals or snacks for the week, and build from there.
Ultimate Diabetic Meal Plan | Full Day Meal Prep For Diabetics
sbb-itb-663e316
Diabetic Diet Basics
Managing diabetes starts with understanding how food choices impact blood sugar levels. The key is maintaining stable blood sugar by selecting the right foods in the right portions. Carbohydrates have the most direct effect on blood sugar, so it’s important to focus on fiber-rich, complex carbs combined with protein and healthy fats. This combination slows digestion and helps your body use insulin more efficiently, whether it’s naturally produced or taken as medication. Tools like the Diabetes Plate Method can simplify meal planning by visually guiding portion sizes.
The Diabetes Plate Method
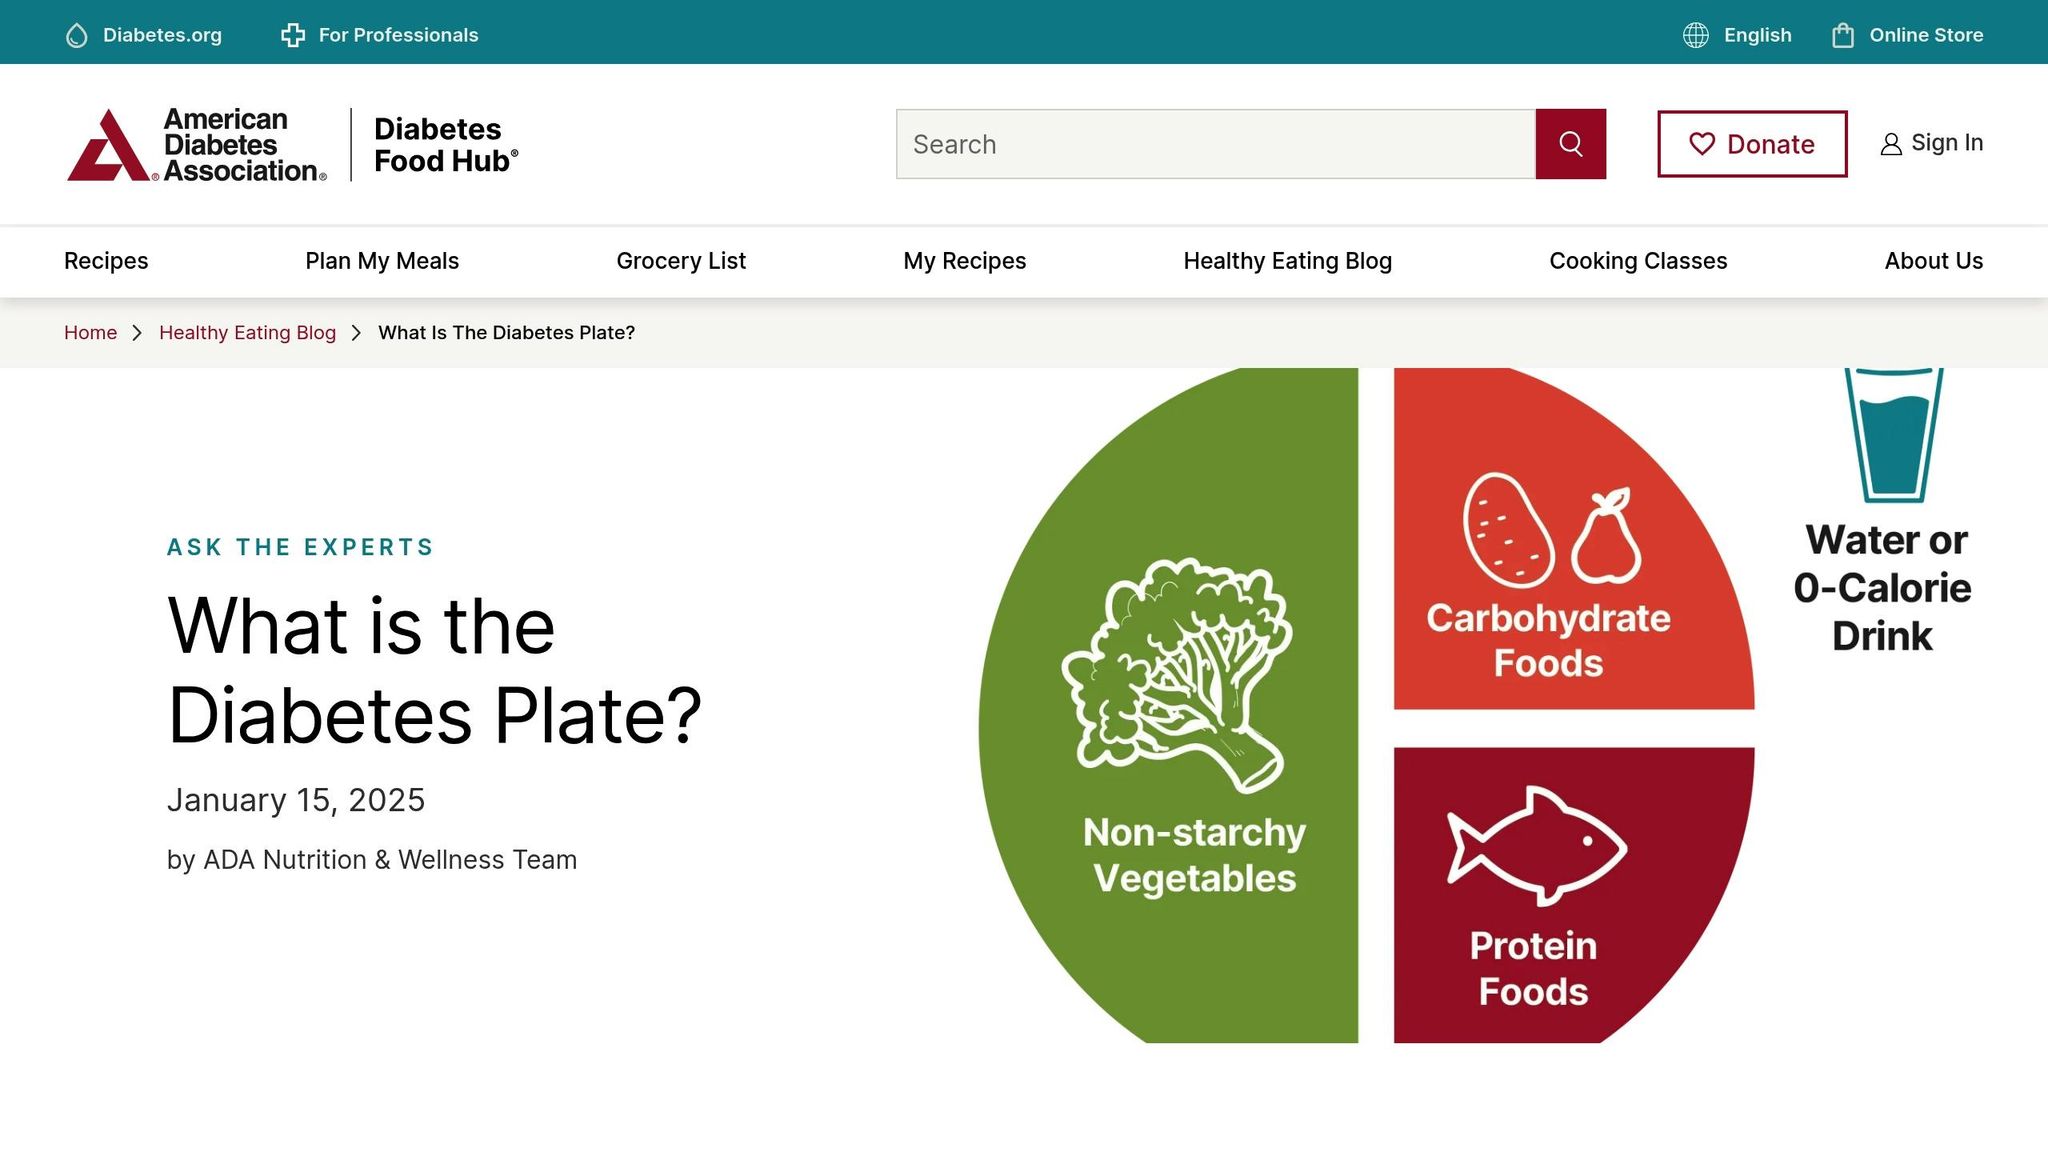
The Diabetes Plate Method offers an easy, no-fuss way to structure meals without needing to weigh or measure ingredients. Here’s how it works:
- Half your plate: Fill this section with non-starchy vegetables like spinach, broccoli, kale, or peppers.
- One-quarter: Reserve this portion for lean protein such as chicken, fish, eggs, or tofu.
- One-quarter: Use this space for carbohydrates like brown rice, quinoa, sweet potatoes, or whole-wheat pasta.
"The Diabetes Plate is the easiest way to create healthy meals that can help manage blood glucose… without any counting, calculating, weighing, or measuring."
– American Diabetes Association
This method helps limit carbohydrate intake, which can trigger blood sugar spikes, while prioritizing fiber and protein to slow digestion. As Emma Rueth, RD, LD, CDCES from Cleveland Clinic explains, "Having a balance of nutrients on the plate helps to slow down digestion, which helps keep blood sugar more stable and makes you feel full and satisfied longer."
While portion control is a cornerstone of this approach, choosing the right foods is equally important for maintaining stable blood sugar.
Foods to Include
Building meals with nutrient-dense, whole foods is essential for stabilizing blood sugar levels throughout the day. Stock your kitchen with these staples:
- Lean proteins: Opt for skinless poultry, fish, eggs, tofu, beans, and lentils. For beef or pork, stick to lean cuts.
- Non-starchy vegetables: Fill half your plate with vegetables like spinach, broccoli, cauliflower, peppers, tomatoes, zucchini, carrots, and asparagus. These are low in calories and carbs but rich in nutrients.
- Carbohydrates: Choose whole grains (like quinoa, brown rice, oats, or whole-wheat pasta), starchy vegetables (such as sweet potatoes and peas), and whole fruits (like berries and apples). Skip fruit juices, as they can cause rapid blood sugar spikes.
- Healthy fats: Incorporate heart-friendly fats like avocado, nuts, seeds, and olive oil. Additionally, aim to keep daily sodium intake under 2,300 mg and cholesterol below 200 mg to support cardiovascular health.
Pair your meals with water or unsweetened tea, steering clear of sugary drinks. Eating every three to four hours can also prevent blood sugar dips that might lead to cravings or overeating.
How to Meal Prep for Diabetes
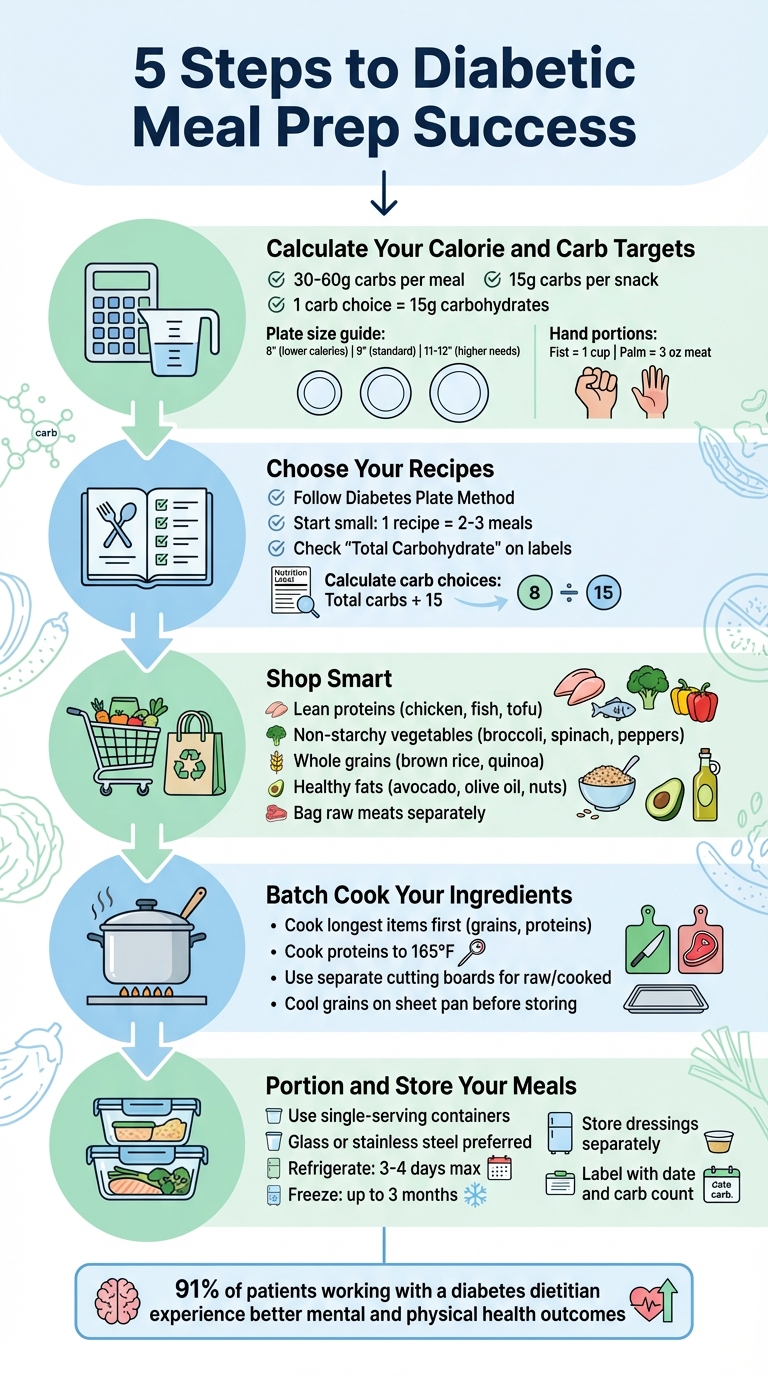
5-Step Diabetic Meal Prep Guide with Portion Control
Meal prepping is a practical way to manage diabetes by helping stabilize blood sugar levels and simplifying daily meals. As Emma Rueth, RD, LD, CDCES from Cleveland Clinic explains, "The more you can do in advance, the less likely you are to show up to a meal unprepared and hungry."
Here’s a step-by-step guide to preparing a week’s worth of balanced, diabetes-friendly meals.
Step 1: Calculate Your Calorie and Carb Targets
Start by consulting a registered dietitian or doctor to determine your specific calorie and carbohydrate needs. For many adults with diabetes, the target is 30–60 grams of carbohydrates per meal, equivalent to 2–4 carb choices (1 choice equals 15 grams of carbohydrates). Studies show that 91% of patients working with a diabetes dietitian experience better mental and physical health outcomes.
If you’re on mealtime insulin or medications like glipizide or glyburide, keeping your carb intake consistent at every meal is crucial to avoid blood sugar swings.
Instead of obsessing over calorie counts, you can estimate portion sizes. A 9-inch dinner plate works for most people, but an 8-inch plate suits lower calorie needs, while an 11- or 12-inch plate is better for those with higher energy demands. You can also use your hands as measuring tools – your fist equals about 1 cup (or one medium fruit), and your palm (excluding fingers) represents roughly 3 ounces of meat.
Step 2: Choose Your Recipes
Pick recipes that align with the Diabetes Plate Method and your carb targets. Look for meals that combine lean protein, non-starchy vegetables, and fiber-rich carbs. To avoid feeling overwhelmed, start small – prep just one recipe that provides 2–3 meals instead of tackling an entire week’s worth at once.
Platforms like Comfy Kitchen offer simple diabetic-friendly recipes with clear nutritional details, making it easier to calculate carbs and portion sizes. When using packaged ingredients, focus on the "Total Carbohydrate" grams on the label, not just "Sugars." To calculate carb choices, divide the total carbohydrate grams by 15. Choose recipes featuring high-fiber ingredients like whole grains, beans, and fresh vegetables, as fiber helps slow glucose absorption and reduces blood sugar spikes.
Once you’ve selected your recipes, it’s time to shop for the right ingredients.
Step 3: Shop Smart
Create a shopping list centered on fresh, whole foods that match your recipes. Prioritize lean proteins like skinless chicken, fish, or tofu; non-starchy vegetables like broccoli, spinach, and peppers; whole grains such as brown rice or quinoa; and healthy fats like avocado, olive oil, and nuts. Always check labels and expiration dates to ensure freshness.
To minimize the risk of foodborne illnesses, which people with diabetes are more susceptible to, take extra precautions. For example, place raw meats and seafood in plastic bags at the store to prevent leaks onto other foods.
Step 4: Batch Cook Your Ingredients
Batch cooking is a time-saver that ensures your meals meet nutritional goals without daily stress. Begin by chopping all your ingredients, then cook items that take the longest, like grains or roasted meats. While those are cooking, prepare quicker components such as dressings or snacks.
For safety, use a meat thermometer to ensure proteins reach 165°F. Use separate cutting boards for raw proteins and ready-to-eat items to avoid cross-contamination. After cooking grains like quinoa or bulgur, spread them on a sheet pan to cool completely before storing to prevent sogginess and maintain texture.
Step 5: Portion and Store Your Meals
Portion meals into single-serving containers immediately after cooking to control portions and reduce the risk of overeating. As Toby Amidor, MS, RD, CDN advises, "Portion and pack. This is an important last step. If you skip it, you can end up overeating, or undereating, at one meal."
Consider investing in glass or stainless steel containers with compartments to simplify portioning and avoid BPA exposure from some plastics. Store dressings, sauces, and crunchy toppings separately to keep meals fresh and prevent sogginess.
Keep cooked meals refrigerated for up to 3 to 4 days. For meals intended for later in the week, freeze them immediately and transfer them to the fridge the night before you plan to eat them to ensure safe thawing.
Diabetic Meal Prep Recipes
These dishes follow the Diabetes Plate Method, ensuring a balance of lean proteins, non-starchy vegetables, and controlled carbs to help maintain steady blood sugar levels. Here are three easy-to-make recipes that fit the bill.
Texas Breakfast Casserole
Packed with protein, this breakfast casserole combines eggs, colorful veggies, and a touch of cheese for a hearty start to your day. Use either egg whites or whole eggs as the base, filling half the casserole with non-starchy vegetables like bell peppers, onions, and spinach. Add a small amount of turkey sausage or lean ground turkey for extra protein, and sprinkle about 1 ounce of reduced-fat cheddar cheese per serving to enhance flavor without adding too much fat. Bake everything in a 9×13-inch pan, then divide into six portions for meal prep.
Green Goddess Avocado Salad
This salad is a refreshing mix of non-starchy vegetables, healthy fats, and lean protein – all in one bowl. Start with a base of mixed greens, shredded Brussels sprouts, or chopped romaine. Add diced cucumber, cherry tomatoes, and radishes for crunch and nutrients. Top with 3 ounces of grilled chicken, tuna, or chickpeas, along with ¼ of a medium avocado (about 2 tablespoons) for a boost of healthy fats. Pack the yogurt-lemon herb dressing separately to keep the salad crisp until you’re ready to eat.
Ginger Beef and Broccoli Stir-Fry
This stir-fry is a quick and flavorful dinner option featuring lean beef and crisp broccoli, all tied together with a ginger-soy marinade. Choose sirloin or flank steak, trim the fat, and slice it thinly against the grain. Marinate the beef in a mix of ginger, garlic, low-sodium soy sauce, and rice vinegar. Stir-fry the beef over high heat, then cook the broccoli until tender but still crisp. Combine the beef and broccoli, and serve with ½ cup of cooked quinoa or brown rice per portion for a balanced carb component. Keep the grains on the side when portioning into containers.
Store these meals in airtight containers in the fridge, and they’ll stay fresh for up to 3–4 days.
7-Day Meal Prep Plan
This weekly meal prep plan is designed to provide three meals and 1–3 snacks daily, with consistent carbohydrate portions to help prevent blood sugar spikes. The plan typically aims for about 1,500 calories per day, with 30–45g of carbohydrates per meal and 15g per snack. This consistency supports stable blood glucose levels, especially for those managing diabetes with medication.
Using the tips from the meal prep strategies mentioned earlier, this 7-day plan applies the Diabetes Plate Method to ensure balanced portions. By batch-cooking grains and proteins on Sunday, you can mix and match meals throughout the week to keep things interesting. Store meals for the first four days in the fridge, and freeze portions for days five through seven. Below is a sample plan that incorporates these principles.
| Day | Breakfast | Lunch | Dinner | Snack |
|---|---|---|---|---|
| 1 | Overnight oats with berries and flaxseeds | Red lentil soup with a green salad | Skillet chicken with roasted sweet potatoes | 1 cup Greek yogurt with mixed berries |
| 2 | Veggie omelet with whole-grain toast | Tofu frittata with leftover sweet potatoes | Roasted pork loin with mashed potatoes | 15 almonds |
| 3 | Steel-cut oats with peanut butter | Roast chicken sandwich on whole-grain bread | Baked white fish with couscous and salad | 1 medium apple |
| 4 | Avocado toast topped with a poached egg | Mexican baked eggs with black beans | Whole-wheat pasta with grilled chicken | ¼ cup hummus with baby carrots |
| 5 | Breakfast smoothie (tofu, banana, berries) | Tuna salad in a whole-grain pita with an apple | Oven-roasted salmon with broccoli | ½ cup cottage cheese |
| 6 | Strawberry protein muffins | Buddha bowl with quinoa and chickpeas | Spinach pilaf with baked chicken | 12 walnut halves |
| 7 | Freezer breakfast burrito (egg and spinach) | Mason jar salad with chicken and vinaigrette | Chicken and white bean stew | 3 cups air-popped popcorn |
To make this plan work for you, focus on batch-cooking essentials like grains and proteins to simplify meal assembly during the week. You can swap ingredients within the same food group to keep meals varied, as long as carbohydrate counts stay consistent. Adjust portions based on your activity level and calorie needs. Use smaller or larger plates to match your specific goals. For extra flexibility, keep "free foods" like raw cucumbers, celery, or low-sodium broth on hand for when hunger strikes between meals.
How to Store and Reheat Prepped Meals
Once you’ve portioned your meals, the way you store and reheat them plays a big role in keeping their flavor, texture, and nutritional value intact.
Refrigerator and Freezer Storage
Keep cooked meals in airtight containers in the refrigerator at 40°F or below, and consume them within 3–4 days. For meals you plan to eat on day five or later, freeze them right after cooking. As Toby Amidor, MS, RD, CDN, advises:
"Cooked meals should be stored a maximum of four days in the refrigerator. If you would like to cook a meal that lasts all five days, then make sure to freeze one container so it can be used later on in the week".
Frozen meals can last up to 3 months if stored properly. Avoid leaving food out for more than two hours. For soups or larger portions, let them cool in shallow containers before transferring to airtight freezer bags. Remove as much air as possible to minimize freezer burn. Clearly label each container with the meal name, date, and carb count to make meal planning and insulin calculations easier.
Reheating Methods
Always reheat meals to an internal temperature of 165°F. When using a microwave, cover the dish with a damp paper towel to trap steam, which helps keep grains and proteins moist. For stovetop reheating, add a little broth or water and heat gently over low to medium heat to retain tenderness. Emily Sullivan, RD, emphasizes:
"Avoiding overcooking your proteins will help keep them moist".
If you’re reheating frozen meals, thaw them in the refrigerator overnight – never on the counter. Once thawed, consume within 48 hours and avoid refreezing after reheating. To maintain texture, store dressings, sauces, and crunchy toppings separately, adding them just before serving.
For even heat distribution, use shallow containers, and let the meal rest for 2 minutes after microwaving to allow the heat to spread evenly.
Controlling Portions When Reheating
Single-serving containers are a great way to manage portion sizes and avoid overeating. They also help maintain consistent carbohydrate intake, which is important for stable blood sugar levels. Pack meals into individual portions right after cooking to simplify reheating and meet the 30 to 45 grams of carbohydrates per meal guideline.
When it’s time to reheat, stick to one portion at a time. This not only keeps portions controlled but also ensures even heating, especially when using shallow containers.
Conclusion
Meal prepping creates a routine that helps regulate blood sugar levels and ensures you’re getting the nutrition your body needs. By setting your carb goals, picking well-balanced recipes, planning your grocery trips, batch cooking essentials, and portioning meals into containers, you can simplify your day-to-day eating and avoid the lure of processed convenience foods.
A key tool in this process is the Diabetes Plate Method. This visual guide makes portion control easier by balancing carbs with fiber, protein, and healthy fats, helping to slow digestion and maintain steadier blood sugar levels.
If you’re new to meal prepping, start small to keep it manageable – try prepping just breakfast for a week or make enough meals for two or three days at a time. Set aside a consistent time each week for your prep, invest in good-quality airtight containers with compartments, and explore resources like Comfy Kitchen for diabetes-friendly recipes and practical tips. With thoughtful planning, meal prepping can lead to noticeable improvements in both your physical health and overall peace of mind.
FAQs
How do I set my carb goal?
To figure out your carb goal for a diabetic diet, it’s best to work with your healthcare provider or a dietitian. They can help you set a target that fits your specific needs, factoring in things like your age, activity level, medications, and blood sugar goals.
Carb counting plays a key role in managing diabetes. It involves keeping track of the grams of carbohydrates in the foods you eat and matching them to your management plan. Tools like meal plans or portion guides can make it easier to stay within your target range and keep your blood sugar levels steady.
What are the best snacks to prep?
When it comes to snacks for a diabetic diet, the best choices are those that are simple to prepare, packed with nutrients, and help keep blood sugar levels stable. Some great options include energy balls, apple slices with nut butter, and other low-carb snacks that combine high protein, fiber, and healthy fats. These snacks are not only satisfying but also easy to prep in advance, making it convenient to maintain steady blood sugar throughout the day.
How do I meal prep if I use insulin?
Meal prepping while using insulin requires thoughtful planning to help maintain stable blood sugar levels. Start by working with your healthcare provider to create a meal plan that fits your insulin schedule. Aim for balanced meals that include a mix of carbohydrates, protein, and healthy fats. Using the diabetes plate method can be a helpful way to manage portion sizes effectively.
To make life easier, prepare meals in advance that are simple to reheat. Consistency is key – try to eat at regular times to stay aligned with your insulin regimen. This approach can help you manage your blood sugar more effectively while saving time during the week.