

Batch cooking saves time, reduces stress, and helps you prepare meals in advance for busy days. By cooking in bulk, you can freeze meals for later use, cutting down daily cooking and cleanup. This guide covers everything you need to know about batch cooking, from selecting freezer-friendly recipes to proper storage and reheating techniques.
Key Takeaways:
- What to Cook: Focus on soups, stews, casseroles, marinated meats, and breakfast options like burritos and muffins. Avoid freezing foods like lettuce, raw tomatoes, or mayo-based dressings.
- How to Prep: Plan recipes with overlapping ingredients, create a shopping list, and set up an assembly line in your kitchen for efficiency.
- Storage Tips: Cool meals completely, use airtight containers or freezer bags, and label with the recipe name, date, and reheating instructions.
- Reheating: Thaw in the fridge or cold water and ensure meals reach 165°F when reheated.
Start small by doubling a recipe you already enjoy, freeze extra portions, and gradually build a freezer meal stash. This method saves time, money, and effort while ensuring you always have a meal ready to go.
The Ultimate Freezer Meal Prep Guide | 40 Recipes That Actually Work
Planning Your Batch Cooking Session
Getting organized is the secret to making batch cooking a breeze. To make the most of your time, start with a solid plan. This means picking the right recipes, creating a smart shopping list, and setting up your kitchen so everything runs smoothly.
Selecting Recipes
When choosing recipes, go for dishes that are easy to scale and freeze well. Think soups, stews, casseroles, marinated meats, sauces, or breakfast favorites like burritos or muffins. Aim for recipes with overlapping ingredients like onions, garlic, or your go-to protein. This not only helps you buy in bulk but also simplifies your prep work.
Another tip? Use "base" recipes that can be repurposed into multiple meals. For instance, a tomato and ground beef mixture can become pasta ragu, chili con carne, or cottage pie. To balance your workload, mix fully cooked meals with "dump-and-go" recipes – those where raw ingredients are frozen together and cooked later. When browsing recipes online, look for "freezable" tags or freezing instructions to ensure your meals hold up well after thawing.
Avoid recipes with ingredients that don’t freeze well, like lettuce, raw tomatoes, or cucumbers, which can turn mushy. Fried foods tend to lose their crispness, and mayo-based dressings often separate. If a recipe includes cream or sour cream, add them fresh during reheating to prevent curdling. For pasta or rice dishes, slightly undercook the grains before freezing to avoid a gummy texture.
Once your recipes are set, it’s time to build an efficient shopping list.
Making a Shopping List
Start by taking inventory of your pantry, fridge, and freezer. As Jessica Fisher, founder of Good Cheap Eats, suggests:
Choose your proteins based on what you already have on hand (shop your kitchen!) or what’s on sale at the store.
After finalizing your recipes, consolidate ingredient amounts. For example, if multiple recipes call for onions, figure out the total quantity needed so you can buy in bulk. Organize your list by categories like produce, dairy, and meat to simplify your shopping trip. It’s also helpful to create a prep list alongside your shopping list, noting which ingredients need chopping, grating, or pre-cooking.
With your shopping done, the next step is prepping your kitchen for action.
Setting Up Your Kitchen
Before you start cooking, clear off your countertops and make sure your freezer has enough room for your new meals. Check that you’ve got all the tools you’ll need, like large pans, sharp knives, and clean storage containers. If you’re short on counter space, consider setting up a folding table to give yourself more room.
Practice mise en place – this fancy French term just means getting everything ready before you start cooking. Weigh, measure, and chop your ingredients ahead of time. As Rachel Beckwith from BBC Good Food puts it:
Weighing, measuring and chopping your ingredients first will make cooking much easier once you start.
Arrange your prepped ingredients in bowls, creating an assembly line to keep things efficient. Plan your cooking order based on appliance availability – don’t pick too many recipes that require the oven at the same time. Start with dishes that take the longest to cook, so everything finishes around the same time.
Finally, clean as you go. Washing dishes and tidying up during your session will save you from a mountain of cleanup later. For extra convenience, consider shortcuts like frozen diced onions or pre-minced garlic to cut down on prep time and mess.
Batch Cooking Methods and Tips
Once your kitchen is set up and ready, it’s time to get cooking. The right methods can mean the difference between a smooth, efficient process and a kitchen that feels like pure chaos. Focus on keeping your workflow organized, portioning meals correctly, and ensuring proper cooling and labeling.
Creating an Assembly Line
Think of your kitchen as a production line, with each area serving a specific purpose. Set up a prep station for chopping and slicing, a cooking station for the stove and oven, a portioning station for dividing meals, and a finished station for sealing and labeling. This setup minimizes unnecessary movement and keeps everything running smoothly.
Start with recipes that take longer to cook so you can work on quicker dishes while they’re going. Gather all your tools – measuring cups, containers, markers, bag holders – before you begin. One helpful tip from a batch cooking guide is:
"It’s really not feasible to complete more than 4 or 5 recipes in an hour, so don’t bite off more than you can chew."
Stick to 4–5 recipes per hour. Once your workflow is in place, you can move on to portioning and packaging meals without wasting time.
Dividing and Packaging Meals
Portioning meals properly is key to avoiding waste. Prepare single-serving portions for lunches and family-sized portions for dinners, and avoid refreezing meals that have already been thawed.
To prevent freezer burn, try the water bath method: fill a freezer bag, leaving it unsealed, then submerge it in water up to the zip-line to push out excess air before sealing it tightly. For casseroles, line your baking dish with greased foil, assemble the meal, and freeze it. Once frozen solid, lift the meal out with the foil and wrap it securely – this keeps the meal intact while freeing up your dish. Soups and stews are best frozen flat in bags on a baking sheet; after they harden, stack them upright like files to save space.
After portioning, make sure everything is completely cooled before moving on to labeling.
Cooling and Labeling
Never put hot food directly into the freezer. This can raise the freezer’s temperature, risking thawing nearby items and creating potential safety issues. Michelle Sendowski, Co-founder of Souper Cubes, highlights:
"The key to making your freezer meal prep as safe as possible is to let your food cool completely as quickly as possible."
To speed up cooling, place pots in an ice bath or divide large portions into smaller, shallow containers.
Once cooled, label each meal with the name, date, and reheating instructions. This makes it easy to grab and heat meals safely, ensuring they reach the proper internal temperature of 165°F. Keep track of what you have with a simple inventory system – something as basic as a whiteboard near the freezer works well. Use a "First In, First Out" approach to make sure older meals are eaten first.
sbb-itb-663e316
Freezer Meal Ideas and Recipes
With your kitchen organized and batch cooking strategies in place, it’s time to dive into some practical freezer meal ideas. These recipes not only save time but also make the most of your freezer space, perfectly complementing the batch cooking techniques we’ve already discussed.
Best Meal Types for Freezing
Certain meals are tailor-made for freezing, making them staples in any meal prep routine. Soups, stews, and chilis are freezer-friendly and often taste even better after being stored, as the flavors have more time to meld. Think white chicken chili, turkey chili, or hearty beef stew – each reheats beautifully.
Casseroles are another great option. Dishes like lasagna, chicken enchiladas, shepherd’s pie, and baked ziti are perfect for feeding a family or portioning into individual servings. A helpful tip: assemble casseroles without baking them first. This way, they won’t dry out when reheated.
Marinated meats are also excellent candidates for freezing. For example, chicken thighs in a cilantro lime marinade or maple mustard sauce freeze raw and continue marinating as they thaw, creating tender and flavorful results. Other freezer-friendly options include meatballs and meatloaf, both of which retain their texture well after freezing.
Don’t forget baked goods! Blueberry muffins, banana bread, pancakes, and waffles freeze effortlessly and are ready to thaw or reheat whenever you need them.
Dump-and-Go Recipes
If you’re short on time, dump-and-go meals are a lifesaver. The concept is simple: combine raw ingredients and marinades directly in a freezer bag, freeze, and later transfer everything into a slow cooker or Instant Pot. This method preserves the texture of the ingredients better than pre-cooking them before freezing.
Some popular dump-and-go options include salsa chicken (chicken breasts with salsa and taco seasoning), Mississippi pot roast (chuck roast with ranch seasoning, au jus mix, and pepperoncini), and marinated chicken thighs in a variety of flavors. As the meat thaws, it continues to marinate, resulting in tender, flavorful dishes.
When prepping these meals, make sure to remove as much air as possible from the freezer bag before sealing it. Label each bag with the recipe name, preparation date, and cooking instructions (e.g., "Cook on low for 6 hours") to keep your freezer inventory organized.
Once you’ve mastered these meals, you can expand your repertoire with freezer-friendly breakfast ideas.
Freezer-Friendly Breakfast Options
Breakfast can be made easier with a few freezer-friendly options. For instance, breakfast sandwiches are incredibly convenient. Layer scrambled eggs, cheese, and cooked sausage or bacon on English muffins, wrap each sandwich in foil, and freeze. When you’re ready to eat, reheat them in the microwave for 2–4 minutes or pop them in a toaster oven for about 15 minutes.
Breakfast burritos are just as practical. Fill tortillas with scrambled eggs, cooked sausage, peppers, and cheese, wrap them in foil, and freeze. For smoothies, portion frozen fruit and greens into individual bags. When it’s time to blend, just add your preferred liquid.
Pancakes and waffles can be flash-frozen on a baking sheet for about an hour before transferring them to a bag – this prevents them from sticking together. Reheat them in a toaster for a crispy finish. Muffins, on the other hand, can be wrapped in foil and stored in an airtight bag. They thaw quickly at room temperature, making them a grab-and-go option.
Here’s a quick guide to storing and reheating popular breakfast items:
| Breakfast Item | Storage Method | Reheating Time |
|---|---|---|
| Breakfast Sandwiches | Wrapped individually in foil | Microwave 2–4 minutes or toaster oven 15 minutes |
| Breakfast Burritos | Wrapped in foil | Microwave 2–4 minutes or toaster oven 15 minutes |
| Pancakes/Waffles | Flash-frozen on a baking sheet, then bagged | Toaster for crispness |
| Muffins | Wrapped in foil, then in an airtight bag | Thaw at room temperature |
Freezing, Storing, and Reheating
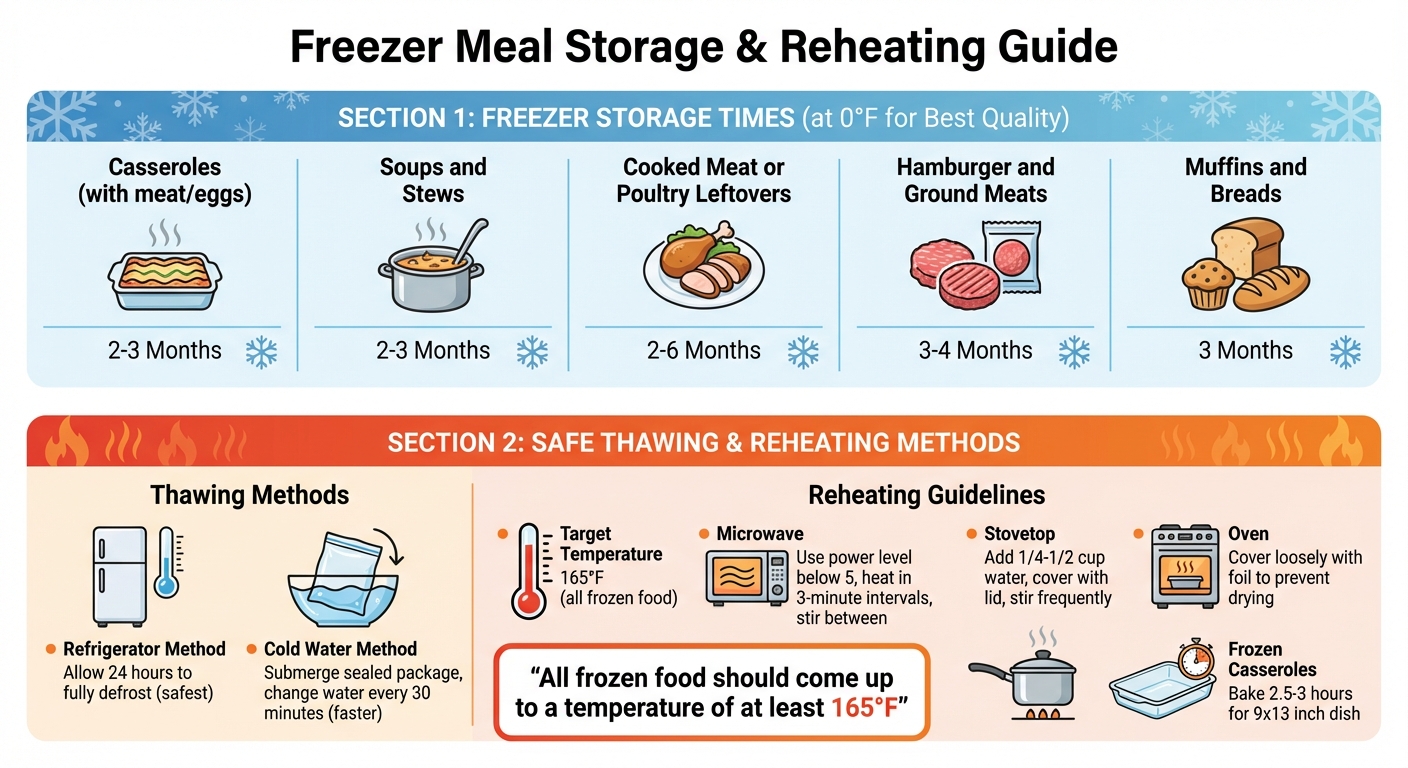
Freezer Meal Storage Times and Reheating Guide
After preparing your freezer meals, the next step is ensuring they stay fresh and safe until you’re ready to enjoy them. By freezing, storing, and reheating properly, you can maintain both the flavor and safety of your meals. Here’s how to handle each step effectively.
How to Freeze Meals Properly
To freeze meals the right way, start by cooling the food completely. This prevents the freezer’s temperature from rising, which could impact other stored items. For large portions, speed up the cooling process by dividing them into shallow containers or using an ice bath. Keep your freezer at a steady 0°F or lower to maintain food safety and quality.
Reduce air exposure to avoid freezer burn and preserve texture. Use airtight containers, vacuum-sealed bags, or freezer bags with the air squeezed out. For added protection, cover the food surface with wax paper before sealing. When freezing liquids, leave 1–2 inches of space at the top since liquids expand as they freeze. A clever space-saving tip: freeze soups or stews in gallon-sized bags laid flat on a baking sheet. Once frozen, stack them upright like books to maximize freezer space. These techniques help ensure your meals are ready to reheat without compromising quality.
Once frozen, it’s important to keep track of storage times and label everything properly.
Storage Times and Tracking
While frozen food remains safe indefinitely at 0°F, its taste and texture are best within certain timeframes. For example, soups, stews, and casseroles typically maintain their best quality for 2 to 4 months, while ground meats last 3 to 4 months. Cooked meat and poultry leftovers can stay at their best for 2 to 6 months.
Label each container with the name of the dish, the date it was prepared, and reheating instructions, like "Bake at 350°F for 45 minutes." Painter’s tape or a permanent marker works well for this. To stay organized, consider using a magnetic whiteboard on your freezer or keeping a printed checklist nearby to log meals as they’re added or used. And don’t forget the "First In, First Out" (FIFO) method: move older meals to the front or top of the freezer to ensure nothing gets forgotten.
| Food Type | Freezer Storage (at 0°F) for Best Quality |
|---|---|
| Casseroles (with meat/eggs) | 2–3 Months |
| Soups and Stews | 2–3 Months |
| Cooked Meat or Poultry Leftovers | 2–6 Months |
| Hamburger and Ground Meats | 3–4 Months |
| Muffins and Breads | 3 Months |
Safe Thawing and Reheating
Proper thawing and reheating are key to enjoying your freezer meals safely and deliciously. The safest thawing method is refrigerator thawing – just move the meal from the freezer to the fridge and allow 24 hours for it to fully defrost. For a quicker option, submerge the sealed package in cold water, changing the water every 30 minutes.
"All frozen food should come up to a temperature of at least 165ºF." – Lexi’s Clean Kitchen
When reheating, always ensure the food reaches 165°F. For microwaves, use a power level below 5 and heat in 3-minute intervals, stirring in between for even warming. On the stovetop, add a splash of water (about 1/4–1/2 cup) to soups or stews, cover with a lid, and stir frequently. In the oven, cover dishes loosely with foil to prevent drying out while the center warms up. Some casseroles and lasagnas can be baked straight from frozen, but this will take longer – a fully frozen 9-by-13-inch dish might need 2.5 to 3 hours to bake.
Conclusion
Key Takeaways
Batch cooking is a game-changer for saving time and reducing stress in the kitchen. The process boils down to a few straightforward steps: plan meals using family favorites with overlapping ingredients to save both time and money, streamline your prep work, and keep your workspace organized. When freezing, make sure food is completely cooled, remove as much air as possible to avoid freezer burn, and label everything with the name, date, and reheating instructions. When it’s time to use your meals, thaw them in the refrigerator overnight and reheat them to an internal temperature of at least 165°F.
How to Get Started
Now that you’ve got the basics down, it’s time to dive in. Start small by doubling or tripling a dinner recipe you already love, and freeze the extra portions. This simple step helps you build a freezer stash without feeling overwhelmed. As Sally McKenney from Sally’s Baking Addiction wisely says:
You CAN do it all, but you can’t do it all at once. Don’t beat yourself up if you plan to make a dozen meals and only end up preparing 4.
Clear some space in your freezer, gather your storage containers, and choose three recipes to try. Remember, batch cooking isn’t about being perfect – it’s about making your life easier, one meal at a time. For more easy recipes and practical kitchen tips, check out Comfy Kitchen and simplify your meal prep journey.
FAQs
What mistakes should I avoid when batch cooking freezer meals?
Batch cooking for the freezer can be a huge time-saver, but a few missteps can ruin the quality of your meals. Here’s how to dodge some common mistakes:
1. Cooling food properly before freezing
Putting hot food straight into the freezer might seem harmless, but it can actually raise the freezer’s temperature, risking the safety and texture of other items. Always let your food cool quickly to room temperature before freezing to avoid this issue.
2. Avoiding overcooking and unsuitable ingredients
Foods like pasta can turn mushy when reheated, so it’s best to slightly undercook them before freezing. Also, steer clear of freezing ingredients like mayonnaise, cream-based sauces, lettuce, or whole eggs – they just don’t hold up well and can lead to disappointing results.
3. Using proper packaging and labeling
Freezer burn is the enemy of good meals. It happens when your containers aren’t airtight. Opt for freezer-safe bags or containers, squeeze out as much air as possible, and don’t forget to label everything with the contents and the date you froze it. Staying organized makes a world of difference.
By keeping these tips in mind, you’ll set yourself up for freezer meals that are fresh, tasty, and ready to go whenever you need them. For more advice and simple recipes, check out the guides on Comfy Kitchen!
What’s the best way to prevent freezer burn on my meals?
To protect your meals from freezer burn, opt for airtight containers or freezer-safe bags. Before sealing, remove as much air as possible – using a straw to suck out the excess air works well. For added protection, wrap the container or bag tightly with plastic wrap, followed by a layer of aluminum foil. Don’t forget to label your meals, and ensure your freezer is consistently set to 0°F (-18°C) for optimal storage conditions.
How can I safely reheat freezer meals?
Reheating freezer meals safely comes down to three essential steps: thawing properly, heating to the right temperature, and handling food with care.
For thawing, the safest approach is to let the meal defrost in the refrigerator overnight. If you’re pressed for time, use the microwave’s defrost setting or submerge the sealed container in cold water, making sure to change the water every 30 minutes. Steer clear of leaving food out at room temperature – it can encourage bacteria to grow.
When it’s time to reheat, make sure the food reaches an internal temperature of 165°F. A food thermometer is your best friend here, especially for thicker dishes like casseroles or soups. If you’re using a microwave, stir the food partway through to eliminate cold spots, and cover it to help retain moisture and ensure even heating.
Once reheated, serve the meal right away and keep any leftovers hot (above 140°F). Avoid reheating the same portion multiple times, and toss out any food that’s been sitting at room temperature for more than two hours. By following these steps, you can enjoy your meals safely and without worry!